Pages

Wednesday, February 27, 2013

Shakshuka

Since getting crazy about hummus, babaganoush, and pretty much all edible things from Israel or Lebanon, I've been mouthwatering over shakshuka, but never got around to making it.  It's definately not an ingredient issue, but maybe I was waiting to taste a real version made by a real Israeli first.  I've now taken matters into my own hands.  The idea came back with a bite when this guy made it recently.  Tonight feels like the right time to dive into a spicy new adventure.  I'll just have to compare with a Lebanese or Israeli person's version when I find some.
Serves 2
Ingredients:
2 Tbsp EVOO
1 onion, diced
3 cloves garlic
1 moroccan chili (or serrano or jalapeño) diced
1 tsp fresh black pepper
1 tsp paprika
1 tsp caraway seeds, cracked
1 tsp cumin seeds, cracked
1/2 tsp turmeric
1 can crushed tomatoes (I used 1 can + 2 large chopped)
2 Tbsp tomato paste
1 tsp apple cider vinegar
1 Tbsp molasses (or 2 Tbsp honey)
salt to taste
handful fresh spinach or other green (or 1 frozen cube)
some plain yogurt (or feta, but I didn't have any)
4-6 eggs
Directions:
1.  In a large deep skillet or sautée pan, heat the oil and cook the onions until translucent.  Add the chili, garlic, and spices and cook, stirring until a hypnotizing aroma invades your brain.
2.  Add the tomatoes, tomato paste, vinegar, and molasses.  Lower the heat and simmer for about 15 minutes or until everything comes together and the sauce has thickened (but not become a paste).  Taste and add salt if necessary.
3. Make 4-6 indentations in the sauce and place 1 tsp plain yogurt into each indentation before cracking an egg into them.  Cook for about 10 minutes on low heat, while basting the eggs from time to time with the sauce.
4.  Cover at the end of the cooking time until eggs are cooked to your liking.  I did mine about 5 minutes more.

Serve with some extra yogurt droplets over quinoa/bulgur mix.
I take back what I could have ever said about moroccan chilis.  They are perfect in this recipe.  Nice spicy chile taste which is not overpowering, but just enough to ward off children.
Back to the shakshuka... I saved some of the tomato goodness and cooked up 2 more eggs for the next dinner.  I'm not sure eggs can get any better than this.  Just divine...

Sunday, February 24, 2013

Coconut Burfi

Continuing with my winter Sunday tradition, this week's sweet thang is coconut burfi.  It's a variation of the Sesame Burfi I made last month, but this time I actually sifted the besan.  I always thought sifting flour was a useless step, but with thick flours such as besan or even whole wheat, it's best to sift to avoid clumping.  I didn't make my own condensed milk this time, but I did use a cardamom pod that I dry roasted and ground.  It does make a big difference.  Cardamom doesn't lose its fragrance with time but it does lose its flavor if ground too far ahead of time.  I' starting to get dangerously used to quality ingredients and methods... It's getting harder and harder to please me with the basics.  Luckily, quality doesn't necessarily mean pricey.  The best things in life are free... 
Ingredients: 
2 1/2 cups (240g) sifted chickpea flour
4 Tbsp oil
4 Tbsp butter (100g)

1 1/4 cup dried coconut (125g)

1 cardamom pod, roasted and ground
1 14 oz can sweetened condensed milk (397g)
Directions:
1.  In a deep pan, melt the butter and oil.  Stir in the chickpea flour a little at a time, as if you were making a roux.  Eventually the mixture will be more floury than liquidy.  That's what you want.
2.  Lower the heat and keep stirring, breaking up the lumps for 10 minutes, then stir in the coconut and cook stirring for another 10 minutes until the flour is slightly colored an a nice nutty aroma is wafting through your home (or just your kitchen if your home is designed for you to be banished from the rest of the house when you're in the kitchen).  Oh wow I just had a flashback.  Open kitchens are psychologically more adapted to help prevent the cook from getting schizo.  Sometimes it takes more than that though...
3.  Turn off heat, stir in the cardamom, then the condensed milk.  Try not to eat spoonfuls of it before pouring it in.  That is reprimandable behavior.
4.  When incorporated, quickly dump the mixture into a parchment paper lined baking dish.  Cover it all with more parchment paper and with a towel, press into a compact rectangular shape, 3/4 in thick. Let cool at least 20 minutes in the fridge before cutting into "pretty" diamond shapes.

That chickpea flour aftertaste is quite pleasant.  After eating a piece, you will immediately reminisce, try to describe it to youself, fail, then eat another piece.
I think I like this version better than the sesame version.

Thursday, February 21, 2013

Sardines Sleeping on Roasted Egglant

I'm feeling romantic.  I didn't want to do a vulgar pan fry paired with potatoes... I wanted the little guys to feel royal before becoming One with me.  Shouldn't it always be that way?
Serves 1 as a meal, 4 as an appetizer
Ingredients:
2 fresh sardines, gutted and cut in half
1 small eggplant, sliced 3mm width
1 large yellow bell, quartered
4 slices of vine tomato (optional)
4 pieces of salad (I would have used romaine or batavia, but all I had was chene)
1 large garlic clove, grated
2 Tbsp EVOO
juice from 1/2 lemon
plenty of fresh cracked pepper
sprinkle paprika
some red pepper flakes
some dried basil
healthy drizzle of top quality basalmic vinegar (dios mio!)
Directions:
 1.  Make your baste.  In a small bowl, mix the garlic, pepper, red pepper flakes, paprika, basil, and lemon juice together.  Brush over the eggplant and quarted bell slices.  Roast in oven on a baking sheet at 190°C for 45 minutes, flipping once.
2.  Brush some of that good stuff on the flesh side of the sardine halves.  Wait until the veggies are finished roasting.
3.  In a hot frying pan, cook the sardine halves skin side down for about 5 minutes until the flesh starts changing color.
4.  Make a bed out of the salad and eggplant slices, drizzle some of that basalmic vinegar that is so good it will make you cry.  Place a sardine half, tuck it in with another slice of eggplant, cover with a quarter of roaste bell, and if you're feeling it, add a slice of tomato.

This is just what I needed...

Tuesday, February 19, 2013

Khatta Dhokla

I can't take much credit for this dish.  It came in a box of mix ready to use given to me by my grandmother.  Nevertheless, the cooking method is complicated.  It needs to be steamed in a pressure cooker in a microperforated pan that I do not have.  I do have a microwave, though.   I'm not a huge fan of microwave cooking but for these extremely rare occasions, I'm happy to own one.
Here's how it all comes together:
200g Gits Khatta Dhokla mix
2 fl oz (60 mL) plain yogurt
8 fl oz (240 mL) water
1 Tbsp oil
2 tsp ginger
Sprinkle chili powder
Sprinkle black pepper
Garnish:
1 Tbsp oil
1/4 tsp fenugreek seeds
1/2 tsp cumin seeds
1 tsp mustard seeds
Some chopped cilantro
Directions:
1.  Mix all the ingredients together until a smooth batter is obtained and divide into 2 batches.
2.  In a microwave safe container, cook each batch uncovered for 5-6 minutes.  Unmold and transfer to a wire rack to let cool before cutting into squares (or pie pieces).
3.  To get the garnish ready, heat the oil in a saucepan.  Throw all the seeds in until they start to crackle, then take off the heat.  Brush the mixture onto your little cake pieces and then sprinkle the chopped cilantro.

Serve warm as an appetizer or side dish.  Gujarat, I'm ready for you.

I'm so happy this finally worked out that I didn't even make dinner.  Oops.

Monday, February 18, 2013

Eating through life all the way down to the Roots

While doing the stand-in-front-of-the-fridge-and-think number, I stumbled upon some fennel bulbs.  Ah yes!  I had some sort of impulsive consumer issue during grocery shopping last week and splurged on fennel, then had other issues and forgot about those naughty little flavor fairies.
Tonight's the night.  I'm suddenly re-inspired.  I'm going to roast those babies for 2 hours with their other friendly root fellows such as beets, turnips, carrots, onions.. ok onions and fennel are bulbs, but they're still underground folk.
The only difference between this time and last time are the onions and protein choice.  I chose fish fillets; cod and flounder, just roasted 7 minutes over the roots.
This is a meal that doesn't need much fuss since the flavor jackpot lies directly in the veggies.  Cooking them this way makes them oh so tender and melt-in-your-mouth-not-in-your-hands yet still have a bite.  Most importantly, the flavor is concentrated instead of washed away in the cooking water.

The fellows are not very photogenic, but they each have a fabulous personality, so give them a chance ladies!

Sunday, February 17, 2013

Tahini Almond and Pine Nut Cookies

Oh these pine nuts are just heavenly!  I can't stop schizophrenically eating them by the handful.  I've been so used to eating poor people's pine nuts that I completely fogot how wonderfully sweet minty waxy and nutty the real ones are.  I'm not sure I'll ever be able to substitute anything else for them in the future.
Nous n'avons pas les mêmes valeurs...
Back to the cookies.  I've been hesitating between this and coconut burfi, and possibly some dohkla, but I have a craving for almonds and tahini right now, so this is what's happening in the kitchen right now.  The day is just beginning, so dohkla is not completely ruled out.
These are a spin off my other tahini cookies but with a few adjustments.  They're actually more a spin off of this recipe.
Yield 56 cookies
Ingredients:
280g sifted whole wheat flour (2 cups)
2 tbsp creme de marrons (chestnut purée)
50g crushed almonds
20g crushed pinenuts
150g butter (5 1/2 oz)
150g (3/4 cup) sugar
pinch of salt
1 tsp vanilla sugar
  2 tbsp water
200g (3/4 cup) tahini
Directions:
1.  Whisk together the butter and sugar until fluffy, then add the vanilla, creme de marrons, tahini, almonds, pinenuts, and salt until it is as homogenous as possible.  I crushed my nuts with a mortar and then got tired of it and left a few chunks.  I'm pretending it was part of my strategy.
2.  Add some flour little by little until your whisk is rendered useless.  Then use your hands to knead in the rest of the flour.  Add a little water to help it come together.
3.  Preheat the oven to 175°C (350°F).
4.  Make tablespoon sized balls and roll them around in your hands before flattening them slightly on the cookie sheet.
5.  Bake for 17-18 minutes or until slightly golden, then let cool on a wire rack.  They will make you crumble.

I'm all out of tahini!  I had to scrape every last drop out of the jar to get to 200g.  I love how tahini can be accomodated to sweet or savory dishes.  It's like a better version of peanut butter.

This version is a nice twist.  I think you could mess around with the extras on this recipe and it will always come out nicely.

Saturday, February 16, 2013

Thai Yellow Chicken Curry

I must be going through an Asian pursuasion.  Thai yellow curry has been on my mind for at least a week but my busy-ness didn't permit me to execute my desires this week, which is why this is going to be quite the experience tonight.  My mix and match goes as follows:
8 skinless chicken thighs
3 Tbsp Thai yellow curry paste
1 small onion, sliced
1 Tbsp dried chopped lemongrass
1 carrot, grated
1 green bell, sliced thinly
1 cup beheaded mung bean sprouts
2 handfuls cauliflower florets
1 small eggplant, sliced into a desireable size (if you can't figure that out, just cube it)
1 handful peas
1 can coconut milk
garnish:
chopped cilantro
chopped basil
thai chili
quality nuac nam
slice of lemon

I learned a trick that makes it even sexier.  Instead of using oil to release the flavor from the curry paste, use the hard cream part of the coconut milk.  The aromas release differently and there is no added oil.
Then I coated the chicken and added it, simmered for about 20 minutes while i chopped the veggies, then added them and the rest of the coconut milk + 1 can of water.
 Served over basmati rice with the garnish.

Yellow Thai curry is just out of this world....mm. the heat just seeps into you and then radiates out of you, leaving you with a satisfying joyous feeling.  The addition of the thai chili makes it lip-numbing, but perfect.  Wanna try?

Sunday, February 10, 2013

Phõ Bo

I'm getting Pho-nky again...must be part of my ginger binge of the moment.
This time I'm trying to be authentic as possible using Banh Pho Thuang Hang (Chantaboon Thai rice noodles).
My Nuac Nam is made of nothing else but anchovy, salt, sugar and water.
I used a whole cinnamon stick in the broth instead of ground and added a bit of freshly ground cloves.
Also, 2 dried red chilis are floating around instead of store bought chili paste.
I still couldn't find any thai basil, but my decorations will be:
mung bean sprouts
lemon juice
chopped cilantro
chopped green onions
chopped thai chili
All this goodness is bubbling in the crockpot, waiting to obtain a happy Chinese New Year.

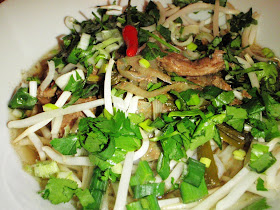
And here it is with all the fixins
The noodles do make a big difference.  I will from now on stay true...

Saturday, February 9, 2013

Pain d'Epices Gingerbread Cookies

My gingerbread urges are flaring up again, and now I can satisfy them... At Last.
These are normally holiday cookies in the US, but I do what I want when I want and nobody's going to stop me as long as I can find the right ingredients...like molasses.  I searched all over France for this incredibly strong naturally licorice and caramel flavored unrefined sugarcane byproduct only to realize it has been available at my closest organic market within walking distance from my place.  I remember always having it on hand growing up but I don't ever remember cooking with it before.  Hmm I wonder if my mother still has that same jar in her cupboard from when I was a minime...
Yields 44 cookies
Ingredients:
2 1/4 cups flour (280g)
1 tsp baking soda
2 tsp cinnamon
1 tsp ground cloves
1/2 tsp nutmeg
1 tsp ginger powder
1/2 tsp épices pour Pain d'Epices (optional, but incredibly sexy)
1/4 tsp salt
1 cup brown sugar (200g)
1/4 cup softened butter (60g)
1/3 cup molasses (113g)
1 large egg
2 Tbsp fresh grated ginger
some granulated sugar for baking
Directions:
1.  Sift together the flour, baking soda, powdered spices and salt.
2.  In a large mixing bowl, cream the butter and sugar until fluffy with a whip.  Get rid of the whip and use a wooden spoon.  Add the molasses and mix together until even.  That is some potent sticky stuff! Oooh!
3.  Add the egg and mix until even.  Add the fresh ginger and keep mixing.  If your arm hurts now, too bad, this is the easy part.
4.  Pour in the dry mixture a little at a time while continuing to mix until it is fully incorporated.  Your arm should hurt now.  You are strong, keep going, you should be proud.
5.  Refridgerate the mixture for at least 30 minutes.  The dough will be easier to work with when cold.  It will harden and be less sticky on your hands.  Mine hardened so much that I broke my wooden spoon I had left in the mixing bowl.  Grrr
When you're ready to roll, preheat the oven to 350°F (180°C).
6.  Make cookies with 1 tbsp of dough rolled between your hands, then pressed into a round 1.5-2in diameter cookies.  Press both sides in a plate of granulated sugar then place on the cookie sheet.
7.  Bake for 10-12 minutes then let cool on a wire rack.  10 minutes for chewy cookies.  12 minutes for crunchy on the outside and slightly chewy on the inside.

 Perfection.
Crunchy on the outside, chewy on the inside, a nice ginger flavor to stimulate your senses.
It's like a festival in my mouth.