Pages

Monday, January 27, 2014

Beef Curry with Whole Shallots

I have to admit that my European side has been pulling me into its arms lately.  I tend to lean that way when I'm not feeling my best and the doctor tells me not to eat anything that might overwork my stomach or intestines.
Hmm that's pretty limiting for me... no chilies no daal?  What in the world can I make without those two key ingredients to my happiness?
Well it turns out I'm feeling better and my Asian side is pulling me back.. though not all the way to India, my heart is making a pit stop in Burma.
I don't have many ingredients since I'm going out of town tomorrow, but I did have a pound of stew beef, my spice drawer, and a can of coconut milk.
My Burma book decided to take a hold on me and had me open up to page 185: Simplest beef curry with whole shallots.
I added a few things to make it "mine" but the inspiration came from there.  I've identified my modifications in case you want to stick to the original recipe.  I really really enjoyed my version so choose wisely.
Serves 4
Ingredients
1 lb (500g) stewing beef, cut into 3/4 inch cubes
1/2 tsp fleur de sel (or just regular salt)
1/4 tsp turmeric
1 Tbsp grated garlic
1 Tbsp grated fresh ginger
2 Tbsp peanut oil (I used canola with a dash of sesame)
1 large carrot, cubed (optional)
1 can coconut milk (original recipe uses 3 cups water)
1 can water
2 tsp fish sauce
8 small shallots, peeled
5-6 kaffir lime leaves (optional)
1/2 tsp red chile powder
garnish:
fried shallots
crushed peanuts (optional)
Directions
1.  Rub the turmeric and salt into the meat, massaging each piece with your fingers.  Let marinate in the fridge at least 1 hour.
2.  In a heavy based pressure cooker, heat the oil and fry the garlic and ginger together for 1-2 minutes or until the raw smell goes away.
3.  Add the beef.  Sear until all the pieces are browned.
4.  Add the carrots, fish sauce, coconut milk, kaffir lime leaves, and water.  Bring to a boil, then cook under pressure for 25 minutes (or simmer half covered for 1 hour)
5.  Open the pressure cooker, add the shallots and chile powder, stir and simmer for another 20 minutes (until your rice finishes cooking).  By this time, the beef and shallots should be nice and tender.

Serve with plain rice, or as I did, a mix of thai red rice with basmati.
Garnish with fried shallots and crushed peanuts.

Exactly what I needed.
It's too bad I'm leaving town.. I feel like this week has major potential for real Cuisine..

Sunday, January 26, 2014

Watercress Laced Broccoli Quiche

Ever since I learned how to make my own pie crust, I've been having mega pie, quiche, and tart urges.
Running flour and butter through my dainty little fingers is just so pleasurable, I could easily spend all day making various ersions of sweet and savory pies.  There is something about it that makes me feel powerful...at least in my right arm.
Without necessarily thinking twice about it, I've been lacing my crust with different ingredients; pain d'epice spices, ground ginger, paprika & rosemary, spinach...I think that's all so far.  Apart from the dough working its way along my hand and fingers, the secret ingredient aspect is probably the next best part about making homemade dough!  It makes it special and unique..just like all the strange and beautiful ideas that pass through my grey matter.
Today my dilemma of having only 3 eggs although I need a total of 5 has turned into something not so dramatic, but creatively delicious.  By replacing the egg yolk I need for the crust with 1 tbsp watercress pesto, I have created a whole new version of my savory pastry with a lovely green color to boot!  I might use this technique for St Patrick's day (although nobody cares about wearing green on that day here in France).

Watercress Pastry
125g (4.4 oz) cubed room temperature butter
250g (8.8 oz) flour
1/2 tsp salt
1 tbsp watercress pesto
5 cL (1/4 cup) warm water
use the method, then poke with a fork and precook for 10-12 minutes at 200°C (400°F)

Quiche Ingredients
1 special sexy pastry, precooked
2 handfuls broccoli florets, chopped
2 carrots, roasted then cubed
1/2 a camembert, sliced
few dots cream cheese
sprinkle of washed watercress leaves
Beat together:
3 eggs
3/4 cup plain yogurt
1 scant cup whole milk
pinch nutmeg
1 tsp piment d'espelette (or chili powder)
lots of fresh cracked pepper


Directions
1.  Place all the vegetables and cheese in the precooked pastry.
2.  Pour the beaten mixture over it.
3.  Bake at 375°F (190°C) for 50 minutes.
4.  Let cool at least 15 minutes.
That last part is the hardest part.  Really.
Mmm perfection!

The watercress is very subtle.. but I know it's there, so that's all that counts.
This is the most perfect quiche I've ever made.  
The filling was light and fluffy.  The yogurt works perfectly in place of heavy cream.  I didn't plan on it that way, but I realized I'd run out of cream while already well into the quiche.
It only gets better from now on...
I can't wait until it's cherry tomato season so I can make a multicolored Cherry Tomato Tarte Tatin!!!!!!!
and various other tarts for that matter.

Saturday, January 25, 2014

Watercress Pesto

I love how you can sub basil for almost anything bright green and call it pesto...
It's a pleasant discovery every time and in no way is it sacriledgious to the original pesto.
Plus it allows you to make pesto when basil isn't in season.  I've done it with arugula, parsley, and kale with excellent results.
Basil is not in season right now, and while absolutely not shopping for food, I happened to stumble upon a lovely bunch of locally produced watercress.  I've seen these deep green delicate leaves before but have never really tried them.  They are much smaller than mâche (lamb's lettuce), with an intriguing taste.  With piqued curiosity and in need of a base for tonight's pizza, I now proudly present Watercress Pesto.
Yield approximately 1 cup
Ingredients
1 bunch washed watercress (about 100g)
4 cloves peeled garlic
1 handful parmesan
handful roasted pumpkin seeds (or pine nuts if you have them)
1/4 cup (I admit I didn't measure) EVOO
dollop of heavy cream
lots of freshly cracked pepper


Blend it

Then toss with pasta, or stir into risotto, or use it as a base for pizza.. as I did...
 and enjoy the finished product.. as I did
It felt so nice to work the dough in my hands after a whole week of eating simple things like rice and noodles and bread with water.
Am I feeling better?  No, but at least I'm happy to eat what I want.  The end result is the same but I'm in such a better mood!

Sunday, January 19, 2014

Spirelli and Goat Cheese Quiche

I'm not sure what makes me happier.. the beauty of the spirelli'd vegetables through a slice of this quiche, or the unique crust surrounding it.. or maybe I should just be happy about the whole concept put together because of how delicious it is. 
I've been away for about a week, and too sick to cook.  The second I started feeling better, my pie crust urges started flaring up again.  I will eventually do the traditional american double crusted chicken pot pie, but I want to test out my home made pie crust in a simpler savory tarte, the quiche.
Making dough is probably the best therapy there is out there, especially when the end product is like a reward.  With that said, there is absolutely nothing in common between making dough for bread, and making dough for a pastry.  NOTHING.  With the only common ingredients being flour, salt, and a bit of water, the bread dough has yeast and olive oil, while the pastry dough has an egg yolk and all butter.  When you work an all butter dough with your hands, the feel is different.  You start with the tips of your fingers, then run all of it through your hands as if you were a child in the sandbox, filtering the stones.  It's a much more delicate process than with bread, where the main idea is to knead it and knead it and knead it.  There is something about it that makes me feel so feminine.
I'm not saying men shouldn't make pie crust.  It probably makes them feel masculine.  I suppose what I'm trying to say is, it makes each part of your hand sensitive to what is touching it, which is a good way of really feeling alive...

Rosemary Paprika Pastry
125g (4.4 oz) cubed room temperature butter
250g (8.8 oz) flour
1 tsp paprika
1/2 tsp salt
1 egg yolk
5 cL (1/4 cup) warm water infused with 1/2 tsp dried rosemary
use the method, then poke with a fork and precook for 10-12 minutes at 200°C (400°F)

Quiche Ingredients
1 special sexy pastry
2 spirelli'd zucchinis
2 spirelli'd carrots
1 log goat cheese, cubed
1 tomato, chopped
Beat together:
2 eggs + 2 egg yolks
1 scant cup heavy cream
1 scant cup whole milk
pinch nutmeg
1 tsp dried sage
1 tsp piment d'espelette (or chili powder)
lots of fresh cracked pepper

Assembly
1.  In your precooked pastry, place a layer of zucchini.
2.  Then add the goat cheese.
3.  Then add the carrots.
Ooo it's so pretty!
4.  Then the tomatoes (or leave them out if you have a strange aversion to them).
I love the colors! It's like a celebration!
5.  Then pour in the very well beaten mixture and decorate with a few strands of zucchini.
If you're more intelligent than I am, you'll use a tin where the bottom doesn't pop out.  Can you see the leakage?  I can't believe I made that beginner's mistake.. but hey, I wasn't feeling 100% well.  I suppose the best recipient for this would be a high rimmed not so wide dish.. and I have one, but I love my 27cm pie tin.
6.  Bake at 190°C (375°F) for 40-45 minutes.  It can be jiggly when you take it out.. you don't want it all browned on top.
7.  Wait at least 15 minutes before cutting!!!

I served with a salad.
And I ate 3 slices.
It was delicate and bursting with flavor.. and the goat cheese was not overpowering, but gave it the necessary punch.  Mmmmm.
It was perfect.  My crust was phenomenal.  I love doing the crust thing now.
Did I mention it makes me put my woman face on?

Saturday, January 11, 2014

Intense Lasagna

 Labor intensive, flavor intensive, and full of love and concentration,
this is the epitome of lasagne, 100% homemade from A to Z.. even more homemade than my last lasagna, and much tastier.  I made away too much pasta dough, and I rolled them out into noodles before realizing, so I ended up throwing over half of them away, which is something I absolutely hate doing.  I had nightmares afterwards.
Really.
So I'll give the full recipe, but keep in mind that you should probably freeze more than half of the dough for later usage.. or just half the dough recipe.  I got it from Amateur Gourmet, who got it from an Italian cookbook, and nobody seemed to comment about dough excess, but I definitely had dough excess I ended up throwing out.  Avoid breaking my heart, please.
There are several steps that go into making good lasagna.  The process is long and messy, but the end result is totally worth it.
This recipe feeds 8-9 people.  That first photo above is half of the yield.  Perfect for feeding a crowd or freezing individually sized portions for a later date.
Part 1:  Too Much Dough
That dough.. is it really green?
Ingredients
3 cups all purpose flour (500g mix of T65 and T110)
1/2 tsp salt
4 eggs + 1 egg yolk
1 cube frozen spinach, defrosted and blended (or handful fresh)
some EVOO for your hands and for coating
Directions
1.  Sift together the flour and salt in a large bowl.  Make a well in the middle and add the eggs and spinach.  To make the spinach blending easier, I put it into my magic bullet with 1 egg and blended until smooth.
2.  Oil your hands and use your fingers to pop the yolks in the well.  Make small circular movements until the eggs and spinach are beaten together, incorporating the flour little by little.  I enjoy this process very much.  It takes some time, so do this in a comfortable place.
3.  Eventually it will all come together.  Knead well for at least 10 minutes.  The dough should be firm, elastic, and slightly sticky.
4.  Make a ball with the dough and rub oil all over it.  Wrap in plastic and let sit at least 30 minutes before working it.  (You can do part 2 while you wait or you can do this the day before).
5.  Unwrap your lovely green dough ball and knead well, for another 5 minutes.
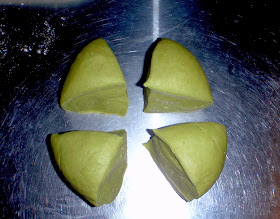
6.  Separate the ball into 4 or 5 equal pieces.  At this point, I suggest you freeze half of it for later because it would be a pity to make all those lasagna noodles and not be able to use them.
7.  On a well floured surface, make a disc with one of the pieces to fit it through the pasta machine.  Start at the largest setting and pass it through several times until you start to get something nice and flat and shiny.  Running it through the pasta machine is tricky when without help, but I got the hang of it.
8.  Run it through to setting 8 (second to last setting)
then cut into 30cm long pieces and set aside on very well floured parchment paper to avoid them sticking to each other.
Oh how pretty.
There's controversy as to whether or not to boil them before assembling.  I happened to boil them, but had I read before doing so that it was not necessary, I never would have put myself through all that.  If you do want to do that, you will need some salted boiling water with 2 Tbsp EVOO and an ice bath.
Boil 4-5 pieces at a time for 1 minute, then transfer to the ice back until ready for Part 4 Assembly.

Part 2 : The Best Meaty Tomato Sauce I've Ever Made

No kidding.  I don't think I've ever made one that tasted this good.  It must be the top quality vegetables and crushed tomatoes I used.
Ingredients
800g lean ground beef (almost 2 lbs)
5 large cloves garlic, grated
2 onions, diced
2 carrots, peeled and diced
2 stalks celery, diced
1 pack fresh mushrooms, washed and cut into chunks
3 cans top quality crushed tomatoes that taste like sunshine (I used Polpa)
2 bay leaves
1 tsp thyme
2 tsp oregano
1 tsp dried basil
lots and lots of fresh cracked pepper
drizzle of EVOO
3 Tbsp basalmic vinegar
salt to taste
Directions
1.  In a very large pot or dutch oven, brown the meat with the garlic and a few cracks of pepper.  Remove the meat and set aside.
2.  Add a drizzle of EVOO into the meat juice leftover from the browning.  Add the onions, bay leaves, thyme, oregano, and basil.  Cook until translucent.
3.  Add the carrots and celery and cook, stirring regularly until it starts sticking or seems dry.
4.  Add the mushrooms and a pinch of salt.  This should get some more liquid going.  Cook about 5 minutes, then deglaze with some basalmic vinegar.
5.  Add the crushed tomatoes and stir.  Bring to a boil, then simmer for 5 minutes.
6.  Add the meat back in.  Bring to a boil, then add some more basalmic vinegar and simmer, covered for about 1 hour.  Taste and adjust the seasoning.  Add more pepper because that's delicious.  During the hour waiting time, stir every once in a while.  Remove from heat while you do Part 3.  You can use this waiting time to go back to Part 1 and roll out your lasagna noodles.

You should be left with a thick ragu sauce that is not runny, but that is very meaty.  If it seems too dry, add just a bit of water.


Part 3 : The Béchamel

This is something I very rarely make, but a good béchamel is really one of the secrets of an excellent lasagna.
Ingredients
5 Tbsp butter
1/3 cup flour
2 1/2 cups whole milk
1 tsp salt
1/2 tsp nutmeg
few cracks fresh pepper
Directions
1.  Melt the butter on medium heat and whisk in the flour.  You should be left with a brownish pasty layer called a roux.
2.  Reduce the heat to a simmer, and pour in the milk, a little bit at a time while whisking.  As you do this, the sauce should thicken.
3.  Add in the salt, pepper, and nutmeg.
It should not be watery, but it should not be as thick as mashed potatoes. It should be like a thick sauce. Watch it, though, because you don't want it to burn. Once it is at its desired thickness, take it off the heat and get ready for Part 4.

Part 4 : The Assembly
Get all your stuff together so all your layers are within reach.  One layer we haven't talked about yet is the cheese.  There is only one rule about this:  There must be parmesan in each cheese layer.  The rest of the decision is up to you.  I used mozzarella parmesan in one layer, then swiss and parmesan on the 2nd layer, and finally just parmesan on the top layer.
Directions
1.  Start with the layer of tomato sauce.  Don't overdo it, but there should be sauce covering the bottom of the dish.
 2.  Then a layer of cheese.  This layer was mozzarella and parmesan.
 3.  Then a layer of noodles.  Be generous.
4.  Then a layer of béchamel.  Spread it gently with the back of a spoon... and who's that snoop?
5.  Then repeat the layers and top with noodle-béchamel-parmesan
6.  Then into a 185° oven for 40-45 minutes until the top is golden and bubbly and beautiful.
and try to wait at least 15 minutes before serving yourself.  I know you're starving and it smells really good, but if you don't wait, it will fall apart while you serve.

I didn't wait long enough.. but seriously, after 4 1/2 hours of intense labor, I have a right to dig in and have my piping hot lasagna fall apart in my plate.  I earned it!

One it cooled to a decent temperature, I made individual portions with my other dish to freeze.  Those portions stayed together perfectly during the transfer.

Thursday, January 9, 2014

Nasi Goreng Kampung

Things just keep falling from the heavens and into my plate!
I was daydreaming of chicken pot pie today, when Elise sacrificed into my hands some of her Malaysian spice packets to my greatest pleasure.  Nasi Goreng is the national Malaysian dish, composed of rice fried in a lovely spice paste made of anchovies, green chilis, shallots, garlic, ginger, and other vegetables.  The more elaborate versions have prawns and/or meat and vegetables like long beans and spinach.  I can't really compare what I'm doing here tonight with the real thing, but I can say the aroma wafting is really a treat.. especially since I've been off asian cooking for a while.  I want to dive into my sautée pan.
I can't take much credit for the spice mix, since it came in this nice little packet
But I will take credit for the adornments.
Serves 3
Ingredients
2 Tbsp canola oil
1 large onion, sliced
1 carrot, diced
2 cloves garlic, sliced
1 tsp ginger, grated
1 cube frozen spinach (or handful fresh)
1 packet Nasi Goreng Kampung
1 cup basmati rice, rinsed, then cooked
4 eggs, beaten
garnish:
lime wedges
fried shallots
crushed peanuts
Directions
1.  Heat the oil in a wok and cook the onions until translucent.
2.  Add the carrots, garlic, and ginger and cook until the onions start to brown, then add the spinach.
3.  Add some of the Nasi Goreng and rice.  Stir fry on high for about 6 minutes until the seasoning has coated everything well.
4.  Make a well in the wok and add the beaten eggs.  Stir the eggs with a spatula as you would do scrambled eggs.  When almost cooked, stir everything together.  Cook for another 3-4 minutes.
5.   Serve topped with crushed peanuts, fried shallots, and a mega squeeze of lime.

Thank you Elise (again), you Rock (again)!

This seemingly basic dish had so much flavor it's not "just rice,"
it's a journey...

Wednesday, January 8, 2014

Spirelli Cucumber Kumquat Beet Salad

I almost didn't post this, but it was so pretty next to my 175g griddles steak that I decided to photograph it.
And when I tasted it, I confirmed to myself that it was worth photographing, because the flavor party in that salad almost surpassed the nobility of a griddled 1" thick steak of "basse cote".
Serves 1 as a side
Ingredients
1/3 cucumber, spirelli'd into spaghetti
1 mini beet (from a jar) sliced
2 kumquats, julienned
1 tsp chili oil
juice from 1/2 lime
freshly cracked pepper
pinch of fleur de sel
pinch of chopped parsley

I hadn't used my spirelli in a while.. I don't know what made me think of it all of a sudden.. hmm interesting.
This salad was as tasty as it was beautiful.. and it's all in my tummy now.

I found these beets jarred by a Polish company.  I suppose julienned raw beet would be delicious as well, but I just love the way they are so small and earthy although they are cooked.  I usually prefer raw vs cooked beets, but these are really marvelous.  Think of it as roma tomato vs cherry tomato.  You see it now?
Yesssss perfection!

Tuesday, January 7, 2014

Customized Mac n Cheese

Where do you draw the line as to what is acceptable to add into mac n cheese?
I for one, have no boundaries.  I put cauliflower, tomatoes, tuna, and parsley in mine.  Does that make me a bad person?  I hope not.
I didn't quite know where I was going with this, but it was a spur of the moment move.  It started conceptualizing as mac n cheese, which I've never made without cream.  I had a block of Cheddar I grated along with random cheese rinds like Beaumont and Gruyere.  Then I decided it needed some protein other than cheese, hence the tuna.  Then I thought, hey where are the veggies.. hence the cauliflower and tomatoes.
Off into the oven it all went, and here we are left with a fabulous baked macaroni platter.
I've never baked my macaroni before.. does that make me a bad person?  Actually, I have, but not with the sauce business.
Either way, I measured absolutely nothing, but I'll give approximate measurements for a possible future recreation of the dish.
Serves 4
Ingredients
about 300g (1/2 lb) cavatappi or elbow macaroni (I used both) cooked al dente
1 large handful cut cauliflower florets
2 small tomatoes, chopped
2 Tbsp butter
1/4 cup flour
1 cup milk
1 cup reserved pasta water
2 tsp piment d'espelette powder (or something spicy)
pinch of nutmeg
1 can tuna, drained
1 cup grated cheddar
1 cup another grated cheese you have on hand (I used Beaumont + Gruyere)
1 Tbsp cream cheese (it was just to finish it)
1 handful chopped parsley
parmesan for garnish
lots and lots of fresh cracked pepper
Directions
1.  Place the cooked pasta with the cauliflower and tomatoes in an oven safe dish.  Arrange so the pieces are evenly spread out.  Preheat the oven to 190°C (395°F)
2.  Make the sauce by melting some butter in a saucepan.
3.  Add the flour and whisk until you have a brownish thick paste.
4.  Add the milk, a little at a time, while whisking.  If the mixture thickens too much, you may want to remove from the heat.  When the milk runs out, complete with the reserved pasta water.  It should still be somewhat liquidy because of all the other stuff we're throwing into this.
5.  Add in the tuna, piment d'espelette, nutmeg, and cream cheese.  Whisk around to melt it.
6.  Stir in all the grated cheeses and the parsley along with lots and lots of fresh cracked pepper.  You should have a thick sauce now.
7.  Pour that saucy goodness into the oven dish with the pasta waiting to be enveloped.
8.  Garnish with parmesan, some more grated cheddar, and lots and lots of fresh cracked pepper.
9.  Bake for 30 minutes or until the top starts bubbling up.

Granted, this is not the lightest meal, but there's something about that cheese crust on top that makes it irresistible..
and after 2 days of eating almost nothing, it definitely hits the spot.

Sunday, January 5, 2014

Kaya Coconut Pie

Before leaving for the holidays, a lovely coworker blessed me with a large can of Kaya from her most recent trip to Malaysia.  I do say "blessed" because it's not something easy to find here in France and it's so incredibly addictingly delicious that it makes me sort of crazy when I think of all the possibilities to use it.
Traditionally, it is spread on toast for breakfast, much like maple butter is in Quebec.  I have to admit it is quite perfect that way, but I can't just stop there.  I must glorify it and make it worth the trip all the way from Malaysia in Elise's luggage with all the other things she must have brought back for herself and her friends.  Last time I made cookies, which I was very happy with.  I recently learned how to make my own pie crust that blows anything you can buy out of the water, so making pie will be the perfect use for this silky coconutty magma.. and I will be able to offer Elise a slice of it to thank her and incite her to continue in her Malaysian treasure retrieval efforts.
Serves 8
Ingredients
250g (8.8 oz) flour (half buckwheat, half whole wheat)
100g (3.5 oz) cubed room temperature butter
2 Tbsp sugar
1 Tbsp powdered ginger
1/2 tsp salt
1 egg yolk
5 cL (1/4 cup) warm water
Filling:
1 3/4 cups kaya (480g)
1/4 cup heavy cream
1/2 cup milk
2 eggs
Garnish:
shredded coconut
Directions
1.  Make the pie crust according to the method.  If you really can't, go buy one.
2.  Pre-cook the crust (if completely raw) for 10 minutes at 200°C (400°F).
3.  Whisk together the filling ingredients and pour into the semi-cooked crust.
aah isn't she lovely?
Sprinkle some shredded coconut over the top before popping it into the oven.
4.  Bake for 10 minutes at 210°C, then 30-40 minutes at 180°C, then let cool before eating.  You want it lightly golden at the top, not brown.  Mine cooked a total of 45 minutes.

I'm very happy with the way this came out.  I probably made about 16 small slices and each slice holds its form well.  The mixture is very coconut, semi-custard, not too sweet, but perfectly dreamy.  Since kaya isn't an ingredient I have on hand, I'll try to make it with adjustments next time.  This is definitely a dessert you can bring when invited somewhere, and I'll probably be making it again in the near future.  The colleagues seemed to like it.. my VIP critic loved it, so that's what makes it all worth it...

*I labeled this Malaysian only because the main ingredient is Kaya, which is typically Malaysian.  I'm not sure making pie is very culturally traditional, however.

Thursday, January 2, 2014

Man'ouché Lebanese Bread with Sumac

I felt unusually inspired today.
While gazing distantly at my Saha cookbook, p 232 and 246.
I felt slightly saddened not to have any pita or Lebanese bread to eat with my hummus and falafels.
The answer was staring at me in the face with eloquent words and delicious descriptions… Man'ouché. A quick inventory of my pantry and yes, I have all the necessary ingredients!
(little did I know I would end up peeling chickpeas for almost 3 hours..)
These work best cooked in a stone oven.  The closest thing you can get to recreating a stone oven is with a pizza stone at the top rack of the oven at the highest temperature.  I suppose this would work on a cast iron skillet, but I have not tried so I cannot attest to the results.
Makes 12
Ingredients
12 oz (355g) flour (I used a mix of white and wheat)
1/2 tsp salt
7 oz (200 mL) warm water
3/4 tsp sugar
1 tsp yeast
1 Tbsp EVOO
well oiled bowl
Topping:
2 Tbsp EVOO
1 Tbsp sumac
Directions
1.  Stir the sugar into the water and add the yeast.  Let sit for at least 5 minutes.  The mixture should foam.
2.  Meanwhile sift the flour and salt together.
3.  Pour the water mixture into the flour and knead.
4.  As it starts coming together, add 1 Tbsp olive oil.  Knead for at least a good 10 minutes until the ball is nice, firm and elastic.
5.  Place the ball in a well oiled bowl, cover, and let rise at least 2 hours.  I let mine rise for much much longer.
6.  Punch down the dough and separate into 12 equal pieces.  Mine were about 45g each.  Lightly flour the balls and cover with a towel.  Let rest again another 10 minutes (while you preheat the oven).
7.  Roll out each piece to a 15cm diameter circle.  My circles are never perfectly round.. but you get the idea.  Brush with a mixture of olive oil and sumac.  I was supposed to have some zahatar in the mix, but I ran out while making my falafels.
8.  Place on the pizza stone and cook for approximately 2 minutes.  It should puff up a bit, but not harden.

Serve with hummus or baba ganoush or whatever you want, but the combination pictured below was simply divine.
Hummus, cucumbers, halved yellow cherry tomatoes, falafels with tahini yogurt sauce.
This time I made my falafels without adding bread crumbs or flour.  They were just simply the most perfect falafels I've ever imagined.. and they materialized.
Maybe it was the hours of labor peeling each individual chickpea with cramped hand muscles and raisin fingers.
Maybe it was just the love….

Wednesday, January 1, 2014

Chutney Duo: Tamarind and Mint

It goes without saying that chutneys are an integral part of Indian cuisine and culture.  Go to any Indian restaurant and there will always be at least a trio of chutneys available for various dipping of appetizers or accompaniment of breads or meats.
I particularly enjoy chutneys with my samosas and pakoras.
The pakoras I chose to end 2013 with are made with Black-eyed peas.  The selection was perfect since black-eyed peas are the traditional American way of bringing luck and good fortune into a new year.
I love to fuse...
Here are two of the traditional chutneys to serve with these appetizers, which I chose as the start to 2014.  Twas a happy new year indeed.

Tamarind Chutney (left)
2 Tbsp tamarind concentrate
2 cups water
1/4 cup jaggery (I used brown sugar)
1 tsp salt
1 tsp chili powder
1 tsp cumin seeds
1 tsp fennel seeds

Dry roast and grind the cumin and fennel seeds.
On the stove top, dilute the tamarind concentrate into the water with brown sugar, salt, and spices.
Bring to a boil, then simmer until the chutney reaches desired consistency.  I probably left it for a good hour on a very low simmer.  Stir every once in a while to check.

Mint Chutney (right)
1/2 cup packed fresh mint leaves
10 sprigs cilantro
1/4 medium red onion
1 small tomato
2 cloves garlic
juice from 1 lime
1/2 tsp salt
1/2 tsp chat masala (I used tandoori masala + amchur)
1/2 tsp sugar

Blend everything together.

I personally prefer the mint chutney with samosas and tandoori things, but I prefer savory to sweet.  People in general (I've noticed) seem to prefer the tamarind chutney.

Needless to say, both were very much needed to accompany all this craziness…
I seriously cannot grip anything in my right hand.  My kneading-rolling-pinching muscles are sore all through my arm through to my triceps.
I think I'm going to be muscularly lopsided if I continue in this direction.