Pages

Wednesday, December 31, 2014

Beetroot Tahini Dip

I wouldn't dare call this marvelous dip "Hummus."  Not because it lacks anything in deliciousness or because of it's ability to pair with anything Mediterranean (or anything at all) but simply because the translation of the word Hummus is Chickpea, and there aren't any at all in this creamy and deep yet light and sweet dip.  I basically replaced cooked chickpeas with roasted beets, and the recipe took on a whole new direction.  I was prompted to make something with beets in it for NYE because it would be one of the healthy light items on a menu filled with rich fois gras, escargots, egg rolls, Mont d'Or cheese for dipping crusty bread and a few veggies, and duck paraphernalia.  I think 2014 was the year of the duck, well, at least for me.
Anyway, the idea of mixing roasted beets with tahini is just genius.  Its already deep earthy sweet flavor becomes creamy and delightful and made an excellent and colorful accompaniment to my falafel and various other dippable vegetables.
Also, it's purple, which makes it worth it all together.
Yield 1 1/2 cups
Ingredients
500g (1 lb) beets, peeled (can be previously cooked)
2 large cloves garlic, crushed
Juice from 1 lemon
1 Tbsp olive oil + drizzles for roasting
3 Tbsp tahini
1/2 tsp ground cumin
1/2 tsp ground coriander
1 tsp dried piment d'espelette (or chile powder)
1/2 tsp fleur de sel
1 tsp cracked black pepper
Garnish:
Dollop of yogurt (optional)
Sesame seeds
Directions
1.  If you are using previously cooked beets (vacuum sealed or recently boiled or steamed) peel, quarter, drizzle with olive oil, sprinkle some fleur de sel, and roast at 200°C 400°F for 30 minutes.  If you are using raw beets, keep them whole and unpeeled and cook for 1 hour or until tender.  You can peel them after they are roasted.  They will taste better that way.
2.  Blend your peeled roasted beets with all the rest of the ingredients until if reaches a homogenous consistency.
I blended the beets with garlic first with the lemon juice and added the dry spices later on, adding in some olive oil as needed.
3.  Serve chilled or at room temperature sprinkled with sesame seeds.  I put a well in the center with a dollop of yogurt.  That is a completely optional step and will not have negative impact if left out (which is why I still consider this a vegan recipe).
I love when my offerings are a feast to all the senses.  Your eyes dance with glee while discovering the vibrant purple glistening color, your olfaction will breathe in Earth, your tongue will dive into the velvet and let your whole mouth partake in the adventure, and finally, you will taste everything you may have sensed, with a little extra suprise of heat....because, well, it's my creation, so I put some piment d'espelette in it.
It's funny because as my tasters were devouring, one said.. 
"Ooh is there spice in there?  It creeps up on you afterwards!"
That thought was followed by..
"Oh right, Steph made it.  It would be more strange if it didn't have any heat."
They are finally starting to understand me!!!

Tuesday, December 30, 2014

NYE Falafel

I have a falafel urge I nursed for 2 days.  If it wasn't for the 12 hour minimum soaking time, there would have been no nursing of urges and I would have acted upon my deepest desire right then and there the second the idea popped into my head, but as it happens, chickpeas need to soak.
They weren't really part of the meal plan, but when the voice speaks to me, I can all but ignore it.
They will be perfect with my Beetroot Tahini Dip that was part of the plan, so I really had no excuse not to make them...
This time around, I decided to make them a bit differently.  I added a green chile (because, well, I don't need any reason to do so) and a grated carrot.  The carrot appeared at the last minute and I decided it was a good idea.
It was.
I also added panko hoping for the nice crunch on the outside airy and soft on the inside.
That was also a good idea.  I will now be using panko in my falafel.
Yield 25-30 falafel
Ingredients:
2 cups dried chickpeas, soaked at least 12 hours
5 large cloves garlic, crushed
1 bunch parsley
if I had cilantro, I would have added a bunch as well
1 green chile, seeded
1/2 large red onion or 1 small, diced
1 carrot, finely grated
2 Tbsp sesame seeds
2 Tbsp za'atar
1 tsp cumin
1 tsp paprika
salt + fresh cracked pepper
2 Tbsp panko + more for rolling
2 tsp baking soda
oil for deep frying
Directions:
1.  Wash the soaked chickpeas well.  I soaked them for over 24 hours and I didn't peel the skin off.  I think it depends on the quality of the chickpeas because these ones really don't need that extra work.  The people that are usually sensitive to that type of thing have no issues with these chickpeas.  I used Wassila brand.
2.  In a food processor, mix the garlic, green chile, and parsley into a paste.  Add the drained chickpeas and a bit of water if too dry to blend.
3.  Stir everything else but the baking soda.  Knead a bit and let rest for 30 minutes.  At this point I clean the kitchen and went on a long walk with my dog.  I have these little ways of building up suspense for myself.  There's nothing more gratifying than coming home after a long sunny but cold walk with your best furry little friend to a clean kitchen, ready to fry up some falafel.
4.  Taste and add adjust the seasoning.  Knead in the baking soda, and make small golf sized balls with your hands.  Roll the balls in some of the extra panko.
5.  Make sure the oil is hot, but not boiling.  Drop the balls in the oil and cook until nice and golden brown.. about 3 minutes.
6.  Remove onto paper towels.
As I fried up my Falafel listening to A Day at the Races, tears streaked down my cheeks..
I may have been going through a hormone imbalance, but I was weeping in part from the onions, in part from the deeply romantic act I was performing which grasped my heart and squeezed all the composure out of my body that I had captured throughout the year...

Monday, December 29, 2014

Rice Paper Egg Rolls /Cha Gio /Nem Ran

2015 is going to be a good year.
How do I know?
Because I can make egg rolls with rice paper without them exploding everywhere.
Yesterday I went on and on about my quest to find egg roll wrappers at the Asian supermarket.. and today I'm posting egg rolls with rice paper instead of egg roll wrappers.
WTF.
The answer to your question is, no, I have not gone completely madd and schizo.. although sometimes I do wonder...
It's just that my egg roll wrappers came in packages of 30, and since they need to defrost, if I open one, I'd better use the whole package.
I had just a touch of filling leftover after rolling and frying my 30 "normal" egg rolls, and since rice paper is dry, I can use one sheet at a time without worrying about wasting the rest of the pack.  I always have rice paper handy for spontaneous spring roll action, so I made my 5 last egg rolls with this rice paper.
There are only 4 pictured.. because I ate one before photographing to make sure the crispiness was worthy of my nimble fingers typing about this adventure.
The result?
Fabulous crispiness, just the way my Mother would like them.
They are a bit trickier than the egg roll wrappers because you have to prep each sheet within seconds of rolling.. and you can't really roll them all at once and then fry (or at least, I didn't think it was a good idea) because damp rice paper tends to stick to the surface it is in contact with... so I was afraid they'd rip apart as I would pluck them before getting them to the hot oil.
So how do you achieve this result?
Well, this is a big load of trial and error.  Really.  I think the rice paper I used was probably one of the   reasons it worked this time.  I used Banh Trang brand 22cm diameter with Bich-Chi Bong Thap stamped onto the package.  This brand is not my favorite for spring rolls, however.  For those, I prefer the Lion Brand.  They are more pleasant for cold appetizers.
Anyway, here is my technique:
1.  Dip the edges in some water, then dip your index in that water and slide it across the middle of the sheet on both sides.  This pretty much means, do not soak the whole sheet in water.  You want the edges to be malleable and the middle to be just damp.
2.  Place 1 Tbsp filling onto the bottom half of your circle.
3.  Roll tightly starting with the bottom until you get to the middle.  Tightly is the key.  When you get to the middle, fold in each side, then continue rolling tightly until you get to the top.  Since that top edge is wet, it will "seal" the roll.
4.  Place directly into the hot oil and fry for about 3-4 minutes.
5.  Remove onto paper towels, to soak up the oil and keep them crispy.

Filling all mixed together for 35-40 egg rolls:
500g (1 lb) ground turkey cooked in 1 Tbsp oil and 1 Tbsp black vinegar
1 section (2oz) bean thread noodles, soaked, drained, and cut
10 dried shitakes, soaked, drained, and sliced
3 medium carrots, cut into matchsticks
1 cup shredded red cabbage
bunch scallions, chopped
1 bunch chopped cilantro
1 Tbsp fish sauce
1 tsp sesame oil
1 tsp ground white pepper
2 egg yolks

Nuac Mam Cham (Dipping Sauce) for 20 Egg rolls:
2 1/2 Tbsp fish sauce
3 1/2 Tbsp rice vinegar
2 cloves garlic, grated
1 piment oiseau (birds eye chili) chopped and seeded
1 tsp sugar
2 Tbsp lemon juice

Serve with some salad and mint (not shown because I was not planning on showing anything today).
These "normal" egg rolls preceded my rice paper egg rolls.
Quite a fiasco happening in my kitchen, really.

Sunday, December 28, 2014

Singapore Mei Fun with Duck

As I walked into my favorite Asian Wonderland, Paris Store, a dizzying sense of calm and euphoria came upon me.  I felt so sure of myself, having perused the aisles plenty of times, having helped newcomers a few times with unfamiliar products, and having searched long and hard for specific items with the reward of actually finding them.
This time I had my list of regular items and a few extras I was hoping to discover.
I went there for egg roll papers for my share of the New Year's Eve annual potluck.  That was my regular item.  The item I was hoping to discover was gochugaru, a Korean chile powder or paste (I should have done my homework on that one before going on that journey) for a kimchi project that's been on my mind for a while, but which I unfortunately didn't find, or which I may have found, but didn't know that I was holding the researched product in my hands.
It's true.  Every time I've gone to that place, it's either for extra familiar items such as lentils or Indian products.. for which I need absolutely no help, or for real Chinese items, which are becoming more familiar and I can more or less work out the product by reading the English translated labels.. not the French.  I don't know who's in charge of translating Chinese food labels into French, but they seem to think that pickled mustard greens or turnip greens are "Chou."  I may be strange, but even if they don't use mustard or turnip greens in this country, they can at least imagine a literal translation such as "Verts de Moutarde" or "Verts de Navet" but not Cabbage!
Ok, that aside, you have to obviously have done your homework and if possible looked at photos of the item you are looking for, because you can't really count on getting any valuable information from the people who work there.  I'm not saying they're bad at their job, but you have probably about a 20% chance of targeting the right ethnicity of the person vs product you are searching.  Their French is ok, but since they don't really think of their products with their crappy French label translations, you'd better know how to pronounce it in Mandarin/Cantonese/Vietnamese/Korean/Thai.  And even then, you're not sure that particular person speaks the language you have phonetically memorized the product name in.. or that you are pronouncing it correctly.  No, no.. you're always on your own if you need product help.. or if you find someone like me shopping there and I happen to have already sourced the product.  Sometimes I giggle to myself when I spot first timers and hand around to see if I can be of any use to them.
I do love that place very much.  It's not a place I go to often, but it feels like it's so much a part of me that I have part of my brain stuck there sometimes.  I even have some delicious memories there..
So after proudly finding my kimchi and pickled mustard greens and unfortunately not finding my gochugaru, I went to the freezer section to find my egg roll papers.. quite sure of myself since I knew exactly which freezer they are kept in and which brand I wanted.
As my euphoria wore off, I opened the targeted freezer... my jaw dropped and my heart sank.  Completely empty.  With everything I mentioned above, there was no way I could ask one of the workers if they had any egg roll wrappers which they hadn't stocked yet because I can work out the "Cha Gio" part but the rest would have been sort of a hit or miss and I would have ended up with some Nuac Nam or Sriracha instead of the wrappers.  I frantically toured all the freezers just to make sure they hadn't changed spots.. and nothing.  There were a few freezers with sealed cardboard boxes inside and a big written sign saying "Do not open the boxes," but that's it.
There went my NYE offering.  I had finally found something that everyone liked, and now I had to change my plans.  It rarely happens that I make something everyone likes.  The picky eaters in my crowd are very hard to please.. and this time, they actually unanimously requested my egg rolls.
A part of me was secretly happy because it meant I'd probably come back again this week, and it's always a pleasure to peruse those aisles as if I own the place, but even then, I wasn't certain to find my egg roll wrappers.
A quick look left, then right (besides, I couldn't tell the people that worked there apart from the customers), and I tore open the first cardboard box in the freezer specifically labeled "Do not open."  At that moment, I may not have felt so sure of myself at first, but a big rush of adrenaline quickly put me in my rebel state.. and when I'm in my rebel state, nothing can stop me.  NOTHING!
People started looking at me and crowding to see what was in the secret boxes, but I no longer cared, I would state my cause, proudly, especially because the very first box I opened contained the prized egg roll papers I came so far to retrieve.
GLORY!
People all started digging into that box.. because apparently, they were also wandering around aimlessly hoping those egg roll papers would just appear (or someone working there would get around to stocking the empty freezers).
Obviously, EVERYONE is making egg rolls for the holidays.  
It's the only logical thing to do.. isn't it?

This post is supposed to be about my Singapore Mei Fun with Duck.  Yes, I know, I'm getting to that.
I knew I was having company over and I still had a bit of roasted duck leftover from Christmas Eve.  I was going to make a, Hachis Parmentier with duck instead of ground beef and a purée of carrots and sweet potatoes instead of regular mashed potatoes.  That idea was clear as day in my head since the morning.. but after my Paris Store fiasco, I was swept up with Asian Persuasion.  My guest of honor is a fan of rice vermicelli noodles and anything Asian I seem to make, so some Mei Fun with Duck was the only way to go, and to make the best use of the last of my duck meat.  I can do that French thing another time... or I'll probably end up eating it somewhere that exists already.
This.. is purely a "me" recipe.. meaning it corresponds to my mood and the elements surrounding my day more than any baked casserole could.
Plus, I wanted to try out my ShaoXing wine since I finally figured out what the bottle looked like!
This is "Singapore" style because of the turmeric.  The Chinese version of this is the same but without the turmeric.
Serves 3-4
Ingredients
200g dried rice vermicelli, soaked in warm water 1 hour and drained
200g roasted duck meat, cut into bite sized pieces
2 Tbsp oil
2 handfuls sliced shitake mushrooms, soaked and drained
1 onion, sliced into moons
3 carrots, peeled and grated into matchsticks
1 cup shredded red cabbage
1 green moroccan chile (or jalapeño), seeded and sliced
2 scallions, white parts sliced lengthwise, green parts chopped finely
2 eggs, beaten
2 garlic cloves, grated
1 inch ginger, grated
1 tsp turmeric (or heavily turmeric'd curry powder such as madras)
Stir-Fry Sauce:
1 Tbsp ShaoXing wine
1/2 Tbsp light soy sauce
1 Tbsp dark soy sauce
1 Tbsp black vinegar
1 Tbsp sesame oil
1 Tbsp oyster sauce
1 Tbsp sesame seeds
1 tsp ginger-garlic paste
Garnish:
Thai chile
green parts of scallion
Sriracha sauce (optional)
Directions
1.  Prep all your ingredients so that they are ready for when you need to throw it in the hot hot wok.  For the duck meat, heat 1 Tbsp of the oil in a wok and add the cooked duck meat.  Cook until browned, then set aside.  In the same wok, add the beaten eggs, cook, scramble, then set aside.
2.  Start the stir-fry.  Place the remaining oil in the wok.  Add the carrots, chile, and onion.  Cook until the onion is translucent, then push everything to the side without overcrowding and add in the cabbage and mushrooms.  If you think your wok is too small, do this in batches.
3.  Add in the garlic, ginger, and turmeric.  Stir fry for 30 seconds.
4.  Add in the browned duck meat, white parts of the scallions, and drained vermicelli.  Again, make sure not to overcrowd the work or everything will steam instead of stir-fry.  Cook for another minute.
5.  Add in the stir-fry sauce and cook for 2-3 minutes, making sure the heat is high and the sauce gets evenly distributed.
Serve garnished with the green parts of the scallion, a thai chile, and some Sriracha sauce in case you need some more heat.

The perfect ending to my adventure-day..

Friday, December 26, 2014

Gourmet Roasted Duck Ravioli

It seems to be my own personal tradition, but every year during this period I take out my pasta machine and make ravioli.  The first year of my pasta machine, I made some vegetarian versions, such as goat cheese and sundried tomato ravioli.  Those were a big hit among my fellow tasters and kept me motivated for the upcoming ravioli urges I would be bound to have.  The second year I hopped on the butternut bandwagon and made roasted butternut squash ravioli with sage.  That was a step up from my first time.  Both were delicious, but I started working with the flavor combinations (and was well guided by the internet as well.)  If anything, the internet has taught me that butternut squash and sage go together just as well as clams and linguine do.
OOoooh clams!
This takes us to year number 3 of my handy pasta machine.  This year, I freestyled.  It was a complete work of my imagination that I had dreamed up the very day I bought the duck I was planning to roast for Christmas Eve.  I was actually more excited about transforming the leftovers into this exquisite ravioli than the actual Christmas Even dinner.. which I eventually constructed correctly.  Today was the day I would realize the creation of my dreams.
I had strict indications as to which leftovers were completely off limits until I had made my magic happen.  Thankfully, nobody in my house touches my fridge (with the exception of cleaning day) besides me.
Lo and behold, the work of my brain speaking to my heart directing my hands and being advised by the voice...
Yield 42 Ravioli (5-6 servings)
Ingredients:
Dough:
2 cups (about 200g) whole wheat flour
2 eggs
pinch of salt
drizzle EVOO
1 Tbsp water
extra flour for shaping
Filling:
200g roasted duck meat, finely cut with kitchen shears
2 finely diced large mushrooms
2 Tbsp heavy cream
handful chopped parsley
juice from 1/2 orange
1 Tbsp grated ginger
few cracks fresh pepper
Wash:
1 egg, beaten
Sauce for 4 servings:
2 tsp duck fat
100g sliced mushrooms
1 large clove garlic, grated
3 Tbsp heavy cream
juice from 1/2 orange
handful freshly chopped parsley
lots of cracked black pepper
pinch fleur de sel
3-4 ladles ravioli cooking broth
Garnish:
drizzle truffled olive oil
chopped parsley
grated parmesan
Directions:
1.  Make the dough.  Mix the ingredients and knead into a ball.  Wrap in plastic and let sit for at least 30 minutes at room temperature.
2.  Prepare the filling by stirring everything together.  If it's too thick, add a bit of cream.  Refrigerate.
3.  Cut your dough into 4 pieces.  Roll out each piece with your pasta machine onto the second to last setting.  Mine was number 8.
4.  On each band, place 1 heaping tsp filling every 3 inches.
5.  Beat an egg and brush a bit of eggwash around each filling ball.  This will act as glue.
6.  Fold your band over and press all around the balls of filling to make sure there are no air bubbles.  Use a cookie cutter or ravioli cutter (if you're lucky enough to have one) to shape your pasta.  When it cooks it will get all wrinkly anyway, but at least you will have tried to make it shapely and pretty.  Make sure to let as little dough go to waste as possible.
I saved the trimmings from each band and was able to make a fifth band with the extra dough.  I froze 2 servings of these lovely little exquisite beings for indulging at a later time.. when roasted duck might be a far away memory.
7.  When you are feeling ready and after having taken a short break to resource yourself, boil for 4 minutes in chicken stock or salted water.  You should make your sauce at this time.
8.While you're waiting for the stock to boil, in a separate wok or pan, make the sauce.  Melt the duck fat and sautée the mushrooms until tender and they have released some of their juice.
9.  Add the garlic, orange juice, and parsley and heat through.
10.  Remove from heat and stir in the cream along with some cracked black pepper.
11.  If you're good at coordinating, you should be finishing off boiling your ravioli.  Ladle in some of the cooking water into your sauce.  Taste and add a pinch of fleur de sel if necessary.

Serve the ravioli in a dish with a ladle of the mushroom sauce.
Sprinkle some chopped parsley and a bit of parmesan.
To finish it off, drizzle a bit of truffled olive oil into each plate.
What I like about this home-style fine dining is that you can have quality as well as quantity.  I won't be left hungry with just a mise-en-bouche of this earthy meaty tangy creation.  The orange is not overpowering, but is quite noticeable.  It balances out the richness of the dish.  Cooking the mushrooms in duck fat gives it a nice reminder that there is duck on the outside as well as the inside.  Poaching the ravioli in boiling stock breaks down the parts of the duck that might not have been as tender re-heated microwave style.
The truffle oil takes this one out of the ball park, out of my heart, and into my soul...

Thursday, December 25, 2014

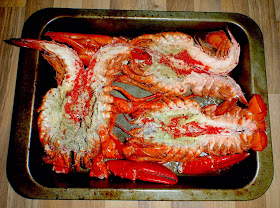
Roasted Lobster Brushed with Rouille

So, I originally intended to griddle my Lobsters as I did last year... but the little voice on my shoulder kept screaming ROUILLE at me.
"Ok, ok," I calmed the voice, "I will try."
Well, after carefully watching Fonfon's video tutorial, I thought I was armed and dangerous with madd Rouille making technique.
I might as well let it out now.. I've never in my life made mayonnaise from scratch.  It seems like something basic enough, but as working egg whites into "winter sports" readiness, mayonnaise takes a bit of familiarity with the hand mouvements.  It is not fool-proof.. and sometimes, you have to admit to being that fool.  There is a moment in the egg yolk beating to oil pouring ratio or debit where you either make it or break it.  I thought I had made it, but then its consistency was not that mayonnaise-like consistency I was hoping for.  I even "cheated" and used an electric beater, but to no avail.  It stayed a thick sauce instead of a mayo, but oh was it delicious!
It was thick enough to use as a "glaze" before roasting.. as well as a dipping sauce, so all was not lost!
I used it on my pre-cooked thawed American northern Atlantic (east coast) lobsters.
A word on lobsters.
They are beautiful creatures, and must be cooked the day they "die," or even better, the day they are caught.  When fresh, they are usually still alive.  I just don't have the heart to cook it alive.  I know somewhere in my brain that even if I buy it pre-cooked frozen, it was cooked alive before being frozen in its brine.. but I just can't do it.
Same with crawfish or crab.  I love to eat them, but I won't buy them alive.  It's strange because I don't have that guilt or terrible strangeness with shellfish or even shrimp.  I used to go fishing using live shrimp as bait.. and that really didn't bother me.  It bothered me more to see the fish gasp for fluid to flow through its gills.
Ok can we get back to this meal please before I temporarily become vegetarian?
There were only 3 or us so I used 3 lobsters, but the sauce makes enough for 10 or more.
Ingredients
3 thawed pre-cooked lobsters, sliced down the center and drained of excess "water"
handful chopped parsley
drizzle of lemon juice onto each half
Sauce:
2 egg yolks at room temperature
2 large garlic cloves, grated or crushed
2 tsp Rouille spices (chile powder, paprika, saffron)
pinch fleur de sel
few cracks black pepper
1/2 tsp quality mustard.. meaning not the fluorescent crap you find in the US (I used Amora)
few Tbsp olive oil
few Tbsp canola oil
some really technically out of this world elbow grease or an electric beater
Directions
1.  Place the egg yolks, garlic, and mustard in a mixing bowl and whisk together until well combined.
2.  Start beating.. either electrically or with your elbow grease or heart pumping.  While this is happening, add a drizzle of the oils, starting with the olive oil.  Keep pouring it in until it thickens.  Besides the fact that there is garlic in there, this process is just called "making mayonnaise."
3.  When the mayo has combined, stir in the rouille spices, fleur de sel, and black pepper.  Give it another beat if it needs it.  Taste and make sure it's got enough of everything.
4.  Brush this mixture onto the lobster halves,
drizzle with lemon juice, and sprinkle on some chopped parsley.
5.  Bake, flesh side up, for 10 minutes at 200°C 400°F.
Serve with extra dipping sauce and feel your body slowly rising to the heavens..

You may not have noticed, but these 3 lobsters were females and full of roe.  That roe is the most divine I've ever had.  I may have "stolen" most of it off the tip of my finger before baking, but I admit my greed.  I don't regret it!
This lovely starter was followed by some griddled octopus for a very very happy ending..

Whole Roasted Duck in Orange-Ginger Glaze

It was fabulous... and it really had no other choice than to be fabulous, since it took a total of 5 hours to prep and cook.  I've never gotten more intimate with any other bird in the history of my life.
Duck is quite a treat and I eat it often, mostly the magrets (breast).  A whole duck is a completely different ordeal.  When roasting, there are issues to beware of, such as not undercooking it and ending up with tough meat.  There will be no rare or medium rare cuts.. it needs to be fall-off-the-bone juicy on the inside and crispy on the outside.
To obtain that regal status, you need to put in a bit of work and technique.  Thankfully, the HungryMouse gave me the perfect method.. slow and low.  So yes, I did manage to get this done.
1 duck will feed about 6 people.
 So here she is in all her splendor, cavity exposed and all.  I had to cut off the neck and head, which I didn't photograph because it made me sad.  I placed the neck inside the cavity along with a few Javanese Long Pepper Berries and one orange sliced in half.  You can fit a lot of things in there!  The orange is to keep it moist on the inside.  You may notice I have my duck on a small pan inside a large pan.  What I would have liked to do is have a rack that fit inside that larger oven pan.. but I don't have one, so that is my make-shift rack.  The reason is that, to obtain crispy skin, you don't want your bird bathing in its fat.  Ducks sweat off a lot of fat.. and you want to be able to collect it and use it to cook your turnips in later on (or potatoes or anything because duck fat makes anything delicious).
 So after rinsing and patting it dry, I scored my duck in a criss-cross pattern all over, front and back.  There is one part where I may have scored too deeply.  You don't want to score all the way to the flesh.  Then I rubbed some coarse sea salt all over it.  I closed her little legs together with some string so the orange would steam the inside during cooking.
 Next is the cooking part.  This baby cooks for 4 hours at 300°F 150°C.  As I said, slow and low.. but that doesn't mean you sit back and relax for 4 hours.  You need to flip that bird every hour.  start breast side up for 1 hour.  The photo above is after 1 hour.  I then flipped it.
 Here you have it after the 2nd hour, breast side down.  Now you can remove that fat that has collected at the bottom of the pan.  Don't throw it out!  You'll use it later on.  It's culinary gold.
Flip it breast side up for the 3rd hour.
 Here she is after the 3rd hour.  Keep collecting that fat and make sure the duck is not bathing in it.
flip it breast side down for the 4th hour.  During this time, make the glaze.  I juiced 1 orange, grated about 1 inch off a ginger knob, added 3 Tbsp balsamic vinegar, and 2 Tbsp fig chutney.  Many glazes use honey and soy sauce as well.. I just couldn't give up my honey for a bird.. I didn't have the heart to do it.
 Here she is again after the 4th hour.  Flip it over again and turn up the heat to 400°F 200°C.
How do you flip it?  Well, try not to burn your hands...
Blast on high for 10 minutes, then remove and apply the glaze all over and on the inside too if you can reach.  You see that bowl in the background?  That's the duck fat I was using to cook my rutabagas and golden ball turnips in.
Cook it for another 5-7 minutes with the glaze on, then remove, let it rest, carve, and serve.
This was a real treat.  You couldn't taste the orange ginger glaze so much.. maybe because I didn't eat the skin, but the meat was perfect.  I took a leg, which is always my favorite part of a bird.  The meat was tender and juicy and fall-off-the-bone... just the way I like it.  
I paired it with some lambs lettuce and oh my those roots!
I sliced up about 1kg or 2 lbs worth of golden ball turnips and rutabagas on my mandolin.  Working in batches, I sautéed the slices in some of the duck fat and a pinch of fleur de sel.  I deglazed with a little of my orange-ginger glaze and that was it.  
Perfection, just as I had planned...

Wednesday, December 24, 2014

Tangerine Chess Pie

This is a staple in the southern states today but it's origins source it from New England dating back to colonial times.  It may have gotten its name from being kept in a chest during travelling.  Aah yes, a pie chest.  That's the type of thing I can imagine myself owning.
I chose this recipe for Christmas dessert because oranges and tangerines symbolize prosperity and wealth.  There are many tales as to why that is, but whatever the reason, you may have noticed that those fruit seem to be plentiful this time of year.  In France, they seem to be tossed around and offered.  In the US, they are commonly placed in Christmas stockings.  One tale mentions that St. Nicolas had given gold to a poor family of 3 daughters so they could offer dowry to their future husbands.  He had offered this in stockings that had been hung to dry above the fireplace.  Another tale mentions that the orange or tangerine offered a nice exotic treat post WW2, in place of chocolate.  Either way, there was no way anyone will ever get me to make Buche or Yule Log.  Even if it's "traditional,"  it's just not my thing.  This fruity pie is the perfect way to express my desires.
Inspired by SouthernLiving.
I had to halve the sugar on that original recipe because it was just too much.  I'm not sure how any reasonable person in their right mind could eat something that sweet.
Serves 6-8
Ingredients
1 homemade shortcrust (I used half buckwheat, half T80), pre-baked 10 minutes
150g (3/4 cup) brown sugar or cassonade
1 packet vanilla sugar or 1 tsp extract
45g (approx 1/4 cup) melted butter
4 eggs, beaten
1 Tsp flour
1 Tsp cornmeal
2 tsp tangering zest
1/3 cup freshly squeezed tangerine juice (3-4 tangerines)
1 Tbsp lemon juice
supremes from 3-4 tangerines (pssst.. this is the hardest part)
Directions
1.  Whisk together everything but the supremes.
2.  Pour into the pre-baked shortrust and bake at 175°C 350°F for 40 minutes or until the custard has set and the top is golden.
3.  With your nimble little fingers, decorate the edges with the supremes.  I used 4 tangerines and probably got about 6 decent wedges.
Hey, it's not ALWAYS about the looks.  It's about the Love..
4.  Let cool 1 hour.

Now.. lets talk about the taste.  This is a very sweet dessert.  It's sweeter than I'm used to, so I'm glad I halved the sugar.  It's a perfect holiday dessert because of its decadence.  It's generous flavor embalms you with that acidic citrus touch.  You can taste the light squeeze of lemon and all that tangerine zest.  If I would have done a better job with the supremes, it is something I would be proud to offer at a restaurant... even a French one!

Tuesday, December 23, 2014

Sautéed Tellina - Wedge Shells - Bean Clams

My heart hijacked my brain today.
It had its way with me.  I was unable to resist.. nor did I make any effort to do so.
Thus this wonderful day began, thus this wonderful day gave way to this lovely mango-inspired dinner.
I find it harder and harder to resist chatting up my fish monger.. especially during this season when there is a large selection and plenty of life on the stalls.  Last week I succumbed to Jackknives, today it's Tellina.  In English they are known as Wedge Shells or Bean Clams, which are common names for the bivalves from the Tellinidae family.  I also find it harder and harder to resist the idea of how naughty the word bivalve sounds.
These little clams were a real treat.  I love discovering the different offerings our Earth sacrifices for our worldly pleasure...
Serves 1-2 (I had this all to myself)
Ingredients
450g (1 lb) Wedge Shells
2 garlic cloves, grated
3 Tbsp excellent quality olive oil
1/4 tsp freshly cracked black pepper
handful chopped parsley
5-6 jarred sundried tomatoes, chopped
juice from 1/2 lemon
1 tsp ground piment d'espelette
1 cup water (as needed)
Directions
1.  Soak the shells in some warm salted water for about 1 hour.  This step is important, for they will spit out their sand.  Remember, Mother Earth is willing to make offerings, but we need to learn to make the best use of them.  If you have a mouthful of sand, you will not appreciate the delicate flavor of these clams.  Drain and rinse.
2.  Heat the oil in a wok or frying pan.  Add the drained Tellina, garlic, piment d'espelette, and lemon juice.
3.  Cover and cook for about 6-8 minutes or until the shells have opened to expose their inner beauty and completely offer themselves to you.
4.  Add in the sundried tomatoes, parsley, and pepper.  If it's dry and you want it saucy, add a bit of water.

Serve as is, or tossed with some al dente linguine.
I have to admit that in my extreme gourmandise mood of the day, I had it both ways.
I also had a few oysters along side as mid-meal hors d'oeuvres.
I think I'm ready to happily dream about my next encounter with my kidnapper...

Sunday, December 21, 2014

Winter Borscht

There are many different versions of Borscht depending on the season or region of Eastern Europe.  The Russian and Ukrainian versions are very similar, and it is that version I have in a small memory parcel deep in my brain that has somehow resurfaced since yesterday.  Summer Borscht is eaten in a similar way that Gaspacho is eaten.  Nice and chilled on a hot day.  Winter Borscht is eaten steaming hot.  The broth is clear but red and earthy and full of beet flavor.
The only time I've ever eaten borscht was back in my university days.  I had a Russian friend who hosted a team project meeting at his parent's place and his mother politely offered to feed the team.  When you're a student, there is nothing better than being offered a home cooked meal, especially by somebody who's well trained in that domain.  The best part of this offer was that she was giving young Americans from various backgrounds a peep into Russian cuisine, which none of us had ever tried.
Her Borscht nourished me, but also drove me crazy.  In those days, my cooking skills were limited.  I knew how to make only what my mother had been able to explain to me over the phone, which was great, but I was not ready to take on challenges or cross over my culture-comfort zone.
Today, I'm ready to take on the world, and if this Borscht tastes remotely like the one engrained in my memory, I will have conquered that challenge.
By the way, this Borscht was out of this world.
Adapted to the slow cooker from Natasha's Kitchen's stove top recipe.
Serves 6
Ingredients
450g (1 lb) stew beef
2 bay leaves
1 beet, peeled and grated into sticks
2 carrots, grated into sticks
1 onion, diced
1 potato, peeled and cubed
1 tomatoes, diced
2 cloves garlic, finely grated
1 Tbsp balsamic vinegar
1/4 tsp freshly ground black pepper
1 Tbsp dried dill
2 beef bouillon cubes (find some without MSG)
1 Tbsp coarse sea salt
1 Tbsp sugar
8 or more cups water
1 1/2 cups shredded cabbage (I used red)
1 jalapeño or green chile, seeded and diced (absolutely necessary!)
garnish:
plain yogurt or sour cream
freshly chopped parsley
squeeze of lemon
red pepper flakes for extra spice
Directions
1.  Place everything but the garnish into the crock pot.  The water should cover everything but you may need to push some veggies down under the water level.  Cook on low for 7-9 hours.
2.  Fish out the beef pieces and shred.
3.  Serve hot into bowls with some shredded beef for each serving and garnish with a dollop of plain yogurt and parsley.
The longest part is all the cutting.  I spent about 1 hour doing prep-work.  It will take much much longer if you don't have the right tools.  I may not know how to play a musical instrument, but I sure know how to jam on my mandolin to get those gorgeous vegetables to their match-stick perfect shapes.

Saturday, December 20, 2014

Holiday Meal Plan Interruption

As I research a few meal plan options for Winter Solstice dinner, my concentration is interrupted by beets.
Yes I'm craving beets.  
My mind went from "the best way to roast a whole duck is at low temperature for 4 hours" to "OMG WHEN WILL I HAVE TIME TO BE MAKING BORSCHT!!??"
Where's the Food.. seriously.
Maybe it's because I know I won't be making it tonight, since it's Happy Hour Evening with Hummus and friends, so that goes out the window.
I might make it tomorrow, but I want to make sure I have enough time for Green Chile Cookies and Pumpkin Pie.
If I make it tomorrow should I use a slow cooker?  Will I have to make something else as well because it's somewhat a soup and I am the only person in the house that likes soup?
Also, if I do make it only for myself, will I be able to finish the leftovers before Tuesday?
And finally, if I don't end up making it tomorrow, how long will I have to wait?

Why is this interrupting me?
Because for Winter Solstice eve, I'm making a whole roasted ginger-orange duck with rutabagas, turnips, and potatoes.
For dessert I'm planning on some sort of Tangerine Chess Pie.
There are only 3 of us and I know I will be eating leftovers for quite some time, especially because I'm making Grilled Lobster for Winter Solstice day, so no leftovers.
My gameplay is to transform that leftover orange ginger duck into some exquisite Ravioli...
and since I'll be busting out my pasta machine, I'll be making sheets for lasagna as well.
Meaning there will be some Lasagna happening, too.
All this, and then it will surely be New Year's Eve, and I really really want to make Egg Rolls for the NYE potluck.  Since I'll be deep frying I'll want to also get my Samosa batch done so I can have them readily available for my future Indian evenings.. which I intend to have soon.. I'm actually itching for one in the very near future.
If the weekend after NYE is free and I still haven't made my Borscht, I might be able to fit it in at that time.. but I'm not sure that weekend will be free.
So I might not be able to make it for another 2 weeks.. which is disturbing my concentration.

The fact that I just wrote all that frustration down helped me organize my holiday meal plan.. so maybe I will be making my Borcht tomorrow after all.

Ah I feel better now... I'll calmly go back to my Happy Hour preparations.

Thursday, December 18, 2014

Jackknife and Rocket Stilettos

Where I thought I may have lost it, I found Inspiration by my side again during Stiletto night..
Even my fishmonger participated, laughing with me about the live crawfish looking more like pets than a meal while a long line of customers impatiently waited their turn.
Hey, it's my evening.. anything goes!
She seemed intrigued at my determination to buy the only jackknife clams on the stall, thinking I had cooked them plenty of times and knew exactly what my results would be... then she remembered she was talking to me.. the one always trying new things in awkward ways... with piment!
I targetted jackknife clams tonight, hoping there would be some available because I've been told about them a number of times without really knowing what they tasted like or how to prepare them.  They are naughty awkward little fellows.  They are sold live and seem to drool with their tongues hanging out whenever they sense something interesting about to happen.  They are quite meaty for shellfish as opposed to a.. say.. scallop or clam, where the weight is more shell than flesh.  Here you have a 50-50 flesh to shell wight ratio.. if not 60-40, which is quite amazing.. since they are sold by the kg.
The perfect music to accompany my evening couldn't be anything else but Queen, A Day at the Races, followed by A Knight at the Opera.
Serves 1 (hey didn't I mention it's Stiletto Night?)
Ingredients
500g - 1 lb Jackknife Clams (about 25)
For pan fry:
1 extra large garlic clove, grated
juice from 1/2 lemon
2 tsp Rouille Spices (paprika, chile powder, garlic, coriander, saffron)
1 Tbsp olive oil
few cracks black pepper
2 Tbsp chopped parsley
For salad:
2 handfuls rinsed arugula (rocket)
1 small shallot, minced
1 drizzle balsamic vinegar
few sundried tomatoes from a jar
pinch fleur de sel
few cracks black pepper
drizzle walnut oil (or spray if you have it)
For the extra mile:
some Selles sur Cher raw milk asked goat cheese
some crusty "campagne" bread
Directions
1.  Place the live Jackknife Clams in some water with a tsp of coarse sea salt for about 15 to 30 minutes.  During this time they will release any sand they have trapped inside.  This step is quite crucial.. unless you enjoy grinding your teeth on some sandy goodness.
2.  Drain, rinse, and soak in fresh water for another 15 minutes just to get the last bit of sand out.  Drain and rinse again.
3.  During all the soaking waiting time, prepare the pan fry sauce.  Stir all the ingredients together in a bowl.  When the jackknife clams have finished draining, spoon this mixture into each one of them.
4.  Prepare the salad by tossing all the ingredients together.
5.  Cook the jackknives on a very hot skillet for about 5 minutes, stirring from time to time so they are evenly cooked.
Serve immediately.

For a happy ending my way, don't forget the goat cheese coarse after the "dégustation."
It is the cherry on top.   A reminder that after a blissful meal, paradise is waiting..

Monday, December 15, 2014

Black Bean and Carrot Chili

There are no words in our languages of the world to describe the comfort this brings to me when within my edible radius...
Black beans are my favorite go-to Mexican bean, and carrots make a nice chunky meaty chili without so much of the meat.  This probably goes against "chili" rules as it is vegetarian, but I'm getting tired of calling my dinner "Beans."  As it is, this chili is a full meal with rice to avoid confusion with "soup" and various protein toppings to balance it out.  The "chili" part is also because I have whole chipotle chiles hanging around and along with my different textured toppings.  Creamy avocado, crunchy red cabbage, smokey chipotles, zesty green onions, and sour yogurt.  Ooh!
Plus, it was thick and chunky and definitely NOT soupy.
Serves 6
Ingredients
1 cup dried black beans, soaked at least 12 hours
1/2 cup pinto beans, soaked as well
2 bay leaves
1 chicken or vegetable bouillon cube
1 large chopped onion
3 large tomatoes, chopped
3 large, peeled and chopped
4 cloves garlic, grated
1 can chipotle chiles in adobo sauce, some chopped
1 chopped tomato
1 Tbsp dried oregano
1/4 tsp ground cumin
Juice from 1 lemon
1 tsp coarse sea salt
1 Tbsp cracked black pepper
5 cups water
Garnish:
shredded red cabbage
chopped cilantro
chopped green onions
shredded gruyere or swiss (optional)
diced avocado
plain yogurt (optional)
egg (optional)
Directions
1.  Put everything but the garnish in the slow cooker and set on low for 7-9 hours.  Remove bay leaves.

Serve with rice and arrange your garnish.  Sometimes I like to add an egg on top.
This comforting feeling can come and go, but nothing can compare to how a sunny side up egg makes sunlight burst through the warmth of its caress as it flows into my heart...

Wednesday, December 10, 2014

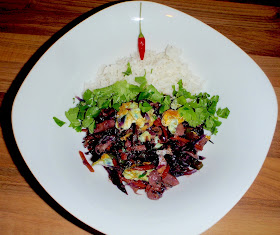
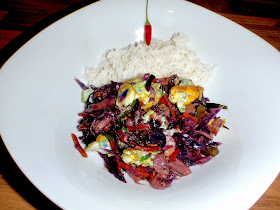
Green Eggs and Mushroom Thai Stir-Fry

Tonight when inspiration became me, it created Fight Food.
I wanted spice, color, depth, and the result ended up giving me a visual surprise... I completely forgot that indigo and yellow made green...
Serves 4
Ingredients
4 eggs

3 handfuls sliced mushrooms
1 carrot, peeled and julienned
1 red or green bell pepper, sliced
4 kaffir lime leaves, sliced
1 Tbsp Thai yellow curry paste
2 Tbsp olive oil
1 Tbsp fish sauce
1 Tbsp Sriracha sauce
chopped cilantro for garnish
thai red chile (for garnish and only if you can handle the heat)
basmati or jasmine rice to serve
Directions
1.  Heat 1 Tbsp of the the oil in a wok and crack in the eggs.  Cook 1-2 minutes, then scramble.  Finish cooking and reserve.
3.  Add the sliced mushrooms and cook until they start to release some of their juices.
4.  Add in the cabbage, carrots, bells, and lime leaves as well as the oyster sauce, sriracha, and fish sauce.  Cook stirring for about 5 minutes, adding water if too "dry."


2 handfuls shredded red cabbage
1 Tbsp oyster sauce (omit if GF)
1/4 cup water
2.  Add the  rest of the olive oil and fry the yellow curry paste until fragrant.
5.  Stir in the cooked eggs and turn off the heat.
Serve with some basmati rice and garnish with chopped cilantro and a Thai chile.. if the heat isn't enough to satisfy your spicy craving....

The eggs turning green after was an unexpected bonus.  The red cabbage releases a purple-ish juice, which, when stirred with the eggs during the last step, turns them a super-natural green color..
All Natural!

Tuesday, December 9, 2014

Raclettiflette with Perfectly Steamed Potatoes

I haven't felt this feeling in a very very long time.. but today, all I wanted was some tartiflette.  Tartiflette is a traditional French casserole made with Reblechon cheese from the Savoy mountains.  It's typically eaten in the winter (unless you only visit France in the summer) and typically is what is served when you go on a ski-cation.  I don't know why, but I've always preferred making this with Raclette cheese.  Raclette is another cheese from the same region, but is usually served melted on potatoes instead of baked in a casserole.  My Raclettiflette is basically a Tartiflette, but with a different cheese.  Both ways are good, but I find Raclette cheese easier to lay into a rectangular pan.  I heard you can do this with St. Nectaire, my ultimate favorite cheese.. oooh.. tempting, but I can never  get around to cooking with that cheese since I eat most of it before my preparations can begin.
I've posted this recipe before, but it's been a while, and I've gotten better at seeking out good quality raw milk cheese.. and I've gotten better at making potatoes keep their natural taste through steaming instead of boiling.
Serves 6
Ingredients
1.5 kg (3.3 lbs) potatoes (about 10 large Bintje)
350g (12.3oz) salt-cured or smoked pork belly, sliced into bits
4 shallots, diced
3 cloves garlic, minced
1 Tbsp dried thyme
1 tsp cracked black pepper
1 Tbsp olive oil (just in case)
1/4 cup dry white wine
450g (1 lb) raclette cheese, sliced into 1/4" pieces (I used raw milk cheese)
4-5 Tbsp heavy cream
Directions
1.  Cook the potatoes.  To do this in the most optimal way, scrub them with the skin on, stab them a few times with a fork, then place them in the steamer basket of your pressure cooker.  Place about 1 inch of water (enough to steam but not touch the potatoes.)  Close the cooker and cook on high.  When it starts to whistle, count 15 minutes.  I cannot give measurements for any other type of steaming because I don't see any reason to use another tool for steaming potatoes.
When they are done, let the pressure drop from the cooker and open up to let cook just a touch.  When they are cool enough, peel them.  The skin should come off easily.
2.  While you are waiting for them to finish cooking or cool down, prepare the rest.  Place the sliced pork belly in a heavy based pan or wok and cook on high for a few minute until nicely colored.  Add the thyme and pepper during this part.  I was expecting the fat to render, but since this was good quality belly, the pan was quite dry.  Remove and reserve.
3.  In that same pan, add a bit of olive oil if your belly did not render any fat.  Add the shallots and cook until translucent, then add the garlic and cook until fragrant.
4.  Deglaze with the white wine and let simmer 2-3 minutes so the alcohol burns off.
5.  Add the cooked peeled potatoes to the mix.  Smash a bit with a potato masher.  They should smash easily.  You don't want mashed potatoes.  You want it chunky.  Mix it all well and turn off the heat.  You can preheat your oven to 200°C 400°F at this point.
6.  Assemble.  In a baking dish, place half the potato mixture in one layer.  
Spread 2 Tbsp cream over this layer.
Cover this layer with the raclette slices.
Repeat once.
7.  Bake for 30-40 minutes at 200°C 400°F.  The result should be bubbly and golden as mine is. 
8.  This is the hardest step.  Let cool at least 20 minutes before serving.  It needs time to set just a bit. If you don't wait, it will be too hot to eat anyway.
Serve with some salad.

This is the best version I've made of this so far.  A good piece of meat with good quality cheese and shallots instead of onions are the small simple changes that go a long way.
I don't indulge like this very often, so this is my coma meal of the month.. enjoy =)