Pages

Friday, January 30, 2015

Colombo Coconut Sesame Sweet Potatoes

Rummaging through my happy place, I found a long lost spice that had been living in obscurity, way back there, hidden and forgotten.  I think I may have only used it once, but Colombo spice powder is a type of Caribbean curry powder, often used with coconut milk to cook chicken.  Not only did I rub it all over my chicken legs before roasting them, but I also wanted to spice up my side dish, sweet potatoes.  The interesting part about this typically Caribbean spice is that it's mostly an Indian import to the area that was adapted to local tastes during colonial times.
No matter where I go or how open I am, the things I tend to fall head over heels for are almost a constant.  That said, I have a whole continent in my constant, but there's no denying it.. curry and spice run through my veins.
Serves 2-3 as a side
Ingredients
1 large sweet potato, cubed
3 carrots, peeled and cubed same size as the sweet potatoes
1 Tbsp olive oil
1 tsp Colombo spice powder (or other curry powder you have)
3 cloves garlic, minced
4 Tbsp dessicated coconut
Pinch fleur de sel
1/4 tsp piment d'espelette powder
Few cracks green pepper
3 Tbsp water
1 tsp white sesame seeds
1 tsp black sesame seeds
garnish:
chopped cilantro
Directions
1.  Heat the oil in a wok or heavy based pan.  Add the sweet potato and carrot cubes along with the colombo spice powder.  Stir to coat and cook until lightly colored, about 8-10 minutes.
2.  Add the coconut, garlic, piment d'espelette, pepper, and pinch of fleur de sel.  Stir to distribute, then add the water, lower the heat, and cook covered for about 5 minutes.
3.  The potatoes should have softened and should be tender to the bite.  Add the sesame seeds, stir, and serve.

Garnish with some chopped cilantro.
I served mine with some green beans and chicken roasted in a Colombo spice powder rub.

I loved the heat of this dish and the texture of the cooked creamy sweet potato coated with the toasted coconut and sesame seeds.  I love that the sesame seeds came out of nowhere but felt like they belonged to the territory.
I love the way this dish makes me feel.
I love the way I can make my own senses burst on a whim...

Wednesday, January 28, 2015

Suan La Tang - Hot and Sour Soup

There is something that engulfs my soul each time I make a meal like this.  I've had this type of soup before in restaurants, but I've never enjoyed it as much as I did this homemade version.  I added the same type of seaweed found in miso soup.  I don't quite know what it's called because the package was in Korean, but it's definitely seaweed and not kelp.
This soup has all the functional elements working together to make me feel happy again.  It has the heat from the chiles, the hot temperature, the tang from the vinegar, the complete meatiness of the shiitake mushrooms, and the green slippery seaweed.  Not to mention how beautiful it becomes at the very last minute when the beaten egg is stirred in.  It goes from a watery pot of strangeness to a blooming delicacy.
I can't really cite a recipe that I followed because I didn't use one.  I followed the basic guidelines for hot and sour soup.. which involve egg, corn starch, vinegar, tofu (in this case, paneer), and mushrooms.  The rest was all me.
Needless to say I blew myself away with this one.
Serves 3-4
Ingredients
8 dried shitake mushrooms soaked in 2 cups hot water for 15 minutes
1 handful dried seaweed, rehydrated and cut with kitchen shears
3 cups chicken or vegetable stock
1 celery stalk, chopped
1 tsp white pepper
2 Thai chiles, chopped
2 pinches angel hair chile
2 Tbsp soy sauce or tamari
3/4 cup paneer or firm tofu, cubed
1/2 cup frozen peas
4 cloves garlic grated
1 Tbsp corn starch mixed with some cold water
5 Tbsp rice vinegar
2 eggs, beaten
garnish:
chopped scallions
drizzle sesame oil
Directions
1.  Heat the stock, white pepper, celery, and chiles in a pot.
2.  Meanwhile, slice the soaked shiitakes and strain the soaking water.
3.  Add the cut seaweed and sliced mushrooms along with their strained soaking water to the pot.  Bring to a boil, then simmer, covered for about 5 minutes.
4.  Add the soy sauce, paneer,  and peas and simmer a few more minutes.  Add more water if necessary.
5.  Add the garlic and corn starch mixture.  Heat through, stirring.  The corn starch is for thickness.  Add more if you like it thick.. less if you like it thin.  I like mine thin.  Do this for a minute or two.
6.  Remove from heat and stir in the vinegar and beaten eggs.  
Cover until ready to serve.
Serve garnished with some chopped scallions and a few drops of toasted sesame oil.

Enjoy hot... very hot.. and very spicy!
This meal is mostly balanced according to the elements.  It's served in a broth with seaweed and egg (water), mushrooms (earth), garlic, chile, and paneer (metal), and the sour element (wood) from the vinegar.  I suppose there's a fire element missing, but all you need to do is drink a glass of wine and you have it made.
Usually there is some sort of meat added but I wanted it to be semi-vegetarian and I didn't quite feel the need to add any meat.  If I did, I would have chosen ground turkey because it's rather neutral and would absorb the sour and spicy flavors of the broth.  The paneer, mushrooms, and eggs made it more than meaty enough for me.

Monday, January 26, 2015

Roasted Veggie and Garlic Pizza

Garlic.
Do it.
It's healing powers are magical and it can work its way into and onto just about anything.
Serves 2
Ingredients
Dough:
150g all purpose flour
80g whole wheat flour
5g (1/2 tsp) salt
15cL (5 fl oz) warm water
5g sugar
10g fresh yeast
2 tbsp EVOO
Cornmeal for rolling and base
Use the method for making the dough
Toppings:
1-2 Tbsp olive oil mixed with 2-3 cloves garlic, smashed for the base
1 roasted zucchini slices in garlic
roasted eggplant slices in garlic
Sliced mozzarella
Chopped red onions
Parmesan
Cook in an oven pre-heated to the highest temp on a pizza stone for about 10 minutes.
Then add the egg yolks
Cook for another 3 minutes and remove and let cool for at least 10 minutes.
Serve with some lambs lettuce and top with some red pepper flakes.
This was a perfect happy ending to a long day of skiing under the snow in the cold!

Wednesday, January 21, 2015

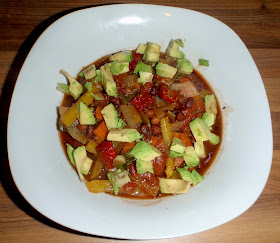
Black Chickpea and Turtle Bean Chili with Sundried Tomatoes and Spinach

This meal is the exact incarnation of a voluntary breaking of culinary cultural barriers.
I went going for a slight twist on a Mexican black bean chili by doing half and half with kala chana (black chickpeas), which I essentially use in Indian cuisine.
And then I let all my desires lose... I added sundried tomatoes (whaaaat?) and fresh baby spinach toward the end.  What Mexican dish has ever done that while still tasting "Mexican"?
The one I conjured in my small stubborn heart... which made me release my happiness while exhaling pure joy and forgetting any moments of stress or annoyment I may have gone through during the day.
This chili was so good with a broth so rich that nobody even noticed the fact that it was meatless...
Serves 4-5
Ingredients
3/4 cup black chickpeas (kala chana), soaked overnight
1/2 cup black turtle beans, soaked overnight
1 large carrot, peeled and diced
1 yellow onion, sliced
4 cloves garlic, chopped
1 Tsp ground cumin
1 tsp smoked paprika
1 Tbsp dried oregano
1 Tbsp coarse sea salt
2-4 whole dried chile de arboles
2 bay leaves
1 can tomato pulp
3-4 cups water
last entries:
1 tsp olive oil
1 yellow bell pepper, sliced
3-4 handfuls rinsed baby spinach
10-14 sundried tomatoes, chopped
lots of freshly cracked pepper
garnish:
chopped avocado
chopped green onion
chopped cilantro
squeeze of lime
shredded red cabbage (for under garnish)
grated gruyère or swiss (optional if vegan)
Directions
1.  Put everything but the last entries and garnish in a slow cooker and set on low for 7-9 hours.
2.  About 30 minutes before serving, add the baby spinach and sundried tomatoes into the slow cooker.
3.  Heat the oil in a wok or heavy based pan and sautee the sliced bells.  Add the pepper and cook on high, stirring for about 5 minutes.  You want them to be cooked but still have a bite to them.  Add them to the slow cooker to heat through.

When ready to relax and enjoy, serve with the garnishes of your choice.
For example, over a mattress of shredded red cabbage...
 and then unmake the bed after adding the avocado, green onion, cilantro, and lime...
 Or serve it over some home fries with some grated cheese, Poutine style.. 
Quebec, not Vladimir..

Monday, January 19, 2015

Ringan/Brinjal/Eggplant Palita

To all people unaware, this looks like a standard Indian dish you may find in any Indian home.. but to the trained eye, nose, and tongue, this is the true meaning of a melting pot.
Here we have something Gujarati (center), something Andhrian (south), and something Punjabi (north), all communing together in one plate, for my ultimate sensory pleasure.
I may have made a small tweek to the original Guju recipe which calls for only coriander powder and chile powder.. I used sambar powder.. which is worth any festivity on its own, but paired with eggplant, it becomes a creamy dream full of heat and heartfelt comfort...
Serves 3 as a side
Ingredients
1 large eggplant (brinjal or ring an), sliced into 1/8" slices
3 cloves garlic, grated
1 Tbsp ginger, grated
1 1/2 tsp sambar powder (or other chile powder)
1 1/2 tsp garam masala (or coriander powder)
pinch fleur de sel
1/2 tsp oil
2-3 Tbsp oil for cooking (in batches)
Directions
1.  Soak the eggplant slices in some salted water for at least 10 minutes.
2.  While you are waiting for the soaking to happen, mix the rest of the ingredients (besides the cooking oil) into a paste.
3.  Drain the eggplant slices, pat dry, and prick with a fork.  Rub the paste onto each slice.
4.  In a wide flat pan, heat part of the cooking oil to high heat.  Cook eggplant about 2 minutes on each side until colored.  Do not overcrowd the pan.  I did mine in 2 batches.
I served mine as a side to some Mango Pappu and some Roasted Tandoori Chicken.

I think I'm back on my India spiral again.. and I like it!

Sunday, January 18, 2015

Dosa or Idli Punugulu with Methi

This weekend has been quite fruitful.  Yesterday I suddenly wanted to make potstickers even though I was having company over for a different meal plan.  That didn't stop me.. I made 60 potstickers and with the leftover filling, made some spring rolls and served a few of each as an appetizer to the original bun bo plan.  It all worked out in the end.. besides the actual photo of the more than sexy appetizer I had prepared with the sauce and the floating sesame seeds..
aah how forgetful I am sometimes!
This morning I felt more than inspired after yesterday's adventures.  I dreamt that I was gifted with dhoklas by my favorite French guest.. which actually doesn't seem so far out.. since she usually likes anything Indian, Asian, or vegetarian I offer her (with only a few exceptions.)
The waking from that dream had me wanting to make samosas to accompany the dhoklas.  I contemplated this feat out loud several times, wondering if I really wanted to spend all that time making the dough, doing the frying business etc..
When I looked out the window and acknowledged the foggy cold weather, I decided it was the perfect day to be spending making samosas.  At least I wouldn't be cold!
After the samosas were finished, I contemplated making dhoklas to conclude what I had dreamt about.. and then.. as I opened my cupboard to start with the dhokla batter, the dosa batter box fell out.  I had remembered seeing something about using dosa batter for appetizers other than dosa (since I'm retarded in the crêpe or dosa shaping business), and that faint recipe browsing memory brought me to this Punugulu... which was perfect, since I hadn't thrown out the samosa frying oil yet.
So yes, I spent my Sunday frying, listening to several Elvis gospel and country albums.
Today was a Sunday kind of Love...
Inspired by Sailu's recipe.
Yield 18 Punugulu
Ingredients
2 cups Dosa batter
1 small red onion, minced
1 green chile, minced
1 tsp grated ginger
2 Tbsp rice flour
2 Tbsp whole wheat flour
1/4 tsp turmeric
1/2 tsp cumin seeds
1 Tbsp chopped fenugreek leaves
1/4 tsp salt
1 handful chopped cilantro (if you have it)
curry leaves (if you have them)
oil for frying
Directions
1.  Whip all the ingredients but the oil together and let sit for at least 5 minutes.  During this time, you can heat the oil.  If the batter is too watery, add more rice flour or whole wheat flour.
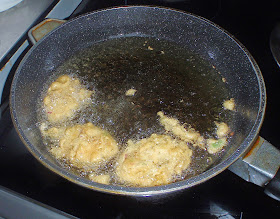
Mine may have been slightly too thin.  You want it thicker than this.
2.  Using a tablespoon, place spoonfuls of batter into very hot oil, making sure not to overcrowd the frying pan.
In the original recipe, it makes ball shapes.  Mine makes pakora shapes.  As I said, next time I'll thicken the batter.  These did come out nice and airy, though.
3.  When they are slightly golden on each side, remove onto some paper towels and let the oil drain off.
Hmmm I think I was in a frying mood today.

Serve with some chutney or pickle.  I served mine with brinjal pickle.
Just lovely served with some mango pappu and samosas...

So these are obviously fried, so relatively greasy, but they are worth every single drop of that oil!  Crunchy on the outside and moist on the inside with that fermented aftertaste that dosa batter undeniably offers.
Yes.
Again.
Please.

Mango Pappu (Dal)

Get your wooden spoon ready...
I ran out of curry leaves.
This is in part a very sad thing because I really really wanted to use them in this Mango Pappu... but the dal in itself was enough to console me.
Based on Sailu's recipe.
Serves 4-5
Ingredients
1 heaping cup yellow toor dal
1/2 cup chopped sour mango
1 chopped red onion
1 green chile, sliced (I used Moroccan)
1 Tbsp grated ginger
1 tsp coarse sea salt
1/4 tsp turmeric
juice from 1/2 lime (only if mango is not sour enough)
1 plain yogurt
3-4 cups water
Seasoning:
2 Tbsp sunflower oil
1 tsp black mustard seeds
1 tsp cumin seeds
4 cloves garlic, grated
2 dried red chiles
sprig curry leaves (I wish I had)
Directions
1.  Boil the dal with the mango, green chile, ginger, salt, turmeric, and water until tender, about 20 minutes.
2.  Prepare the seasoning.  Heat the oil in a wok and add the mustard and cumin seeds until they crackle.  Add the dried red chile, garlic, and curry leaves (if you are so blessed) and cook for another 30 seconds.
3.  Add the seasoning to the dal.  Taste for sourness.  If your mango is not sour enough, add some lime.  I used some mango slices preserved in vinegar from a glass jar.  I wasn't sure exactly how sour it would turn out when cooked, and I decided it may just have been some unripe mango, but not sour enough.  Still amazing, though.
4.  Simmer for 10 more minutes, then stir in the plain yogurt.  I felt the yogurt step was necessary to take this a step further.

Serve with some hot basmati rice in a thali.  I had some samosas and punugulu with some eggplant pickle.
I prefer to eat this hot, but some may find it rather sensual to eat it cold.  I will not get upset if this is what you choose..

Thursday, January 15, 2015

Stiletto Ginger Garlic Chile Cockles

Ok I probably should have named this
Stiletto FAIL!
But not because of my genius preparation...because out of the 550g (19.4oz) cockles I bought, only about 75g (2.6oz) of them opened.  I usually trust my fishmonger, but today, my smiling crazy brunette must have been off, and some slow unusual guy replaced her.. and he sold me some bad cockles!!
NOT a good start to Stiletto Night.
Fortunately, my evening was saved by a few things.  Among them, an incredible Chabichou
a Poitou goat cheese with a nice firm center and gooey creamy outskirt, enveloped by a wrinkly pungent skin.
MmmMMmprrRrrRr (can you hear me purring from here?)
One of the other Stiletto-saving events of the evening is the blasting Pulp Fiction DVD IN ENGLISH I'm watching as I'm writing this... and the best part is all the lovely memories it brings back as if my best friends were right here next to me, sniffing my Chabichou breath as I recite the lines.. and dance to the Jack Rabbit Slim dance contest with Mia Wallace.
Si I decided to post this because my sauce was completely worth it.  It's a Chinese-style stir-fry that rocked my world, and I will re-use with (fresh) clams or tellina, or mussels or even jackknives.  Oh yes.. jackknives would go very very well with this business!
Serves 1
Ingredients
400-500g (1 lb) shellfish of your choice (I used cockles), soaked in saltwater for 2 hours and rinsed
1 tsp sesame oil
1 tsp olive or sunflower oil
2 cloves garlic, grated
1 inch ginger, grated
3 Tbsp chopped leek
2 Thai chiles, chopped (not for the weak)
1 Tbsp ShaoXing cooking wine
1 tsp sesame seeds (I used black)
Directions
1.  Don't forget to do that soaking in water with salt business.  This is important for the shellfish to release their sand.  You may want to change the water once during this time and be sure to remove any that are already opened.. those ones are dead.
2.  Heat the oils in a wok or heavy based pan.  Add the leeks and chile cook for about 1 minute.
3.  Add the ginger and garlic and stir-fry for about 30 seconds, then deglaze with the ShaoXing.
4.  Add the rinsed and drained cockles.  Cover and cook for about 6-8 minutes.  After this time, they should have all opened wide to expose their inner selves.  If they haven't.. throw them out and complain to your fishmonger.. which is what I'm going to do very very soon.
5.  Add the sesame seeds and stir to mix.

Serve hot.  Eat with fingers and tongue.  Enjoy this experience as I was planning to.
Either way, console yourself with some excellent cheese... Please.
Oh and watch Pulp Fiction.
Next time, I'll be doing this to Moulin Rouge... aaah yes I love this idea!

Tuesday, January 13, 2015

Black Bean and Golden Ball Chipotle Chili

No matter what is going on in my life, this keeps happening.
There's really nothing I can do to stop it, it just keeps whispering to me.
So I decided to just stop resisting, and life seems to be better that way.
My bean urge sprouted on me at noon.. which is normally too late, because I like to do an overnight soak before cooking.  I tried to resist the urge, but before leaving I had unknowingly rinsed a cup of back beans, chopped a bunch of different veggies, and placed all this in the slow cooker.
Life is definitely better with beans.  The difference this time is the addition of golden ball turnips.  I have worked these previously alongside some roasted duck and I was swept off my feet.  They are nutritious, so it's a good thing to include them, but they didn't quite shine alongside all the other additions.  I couldn't taste the distinct sweetness of the golden balls through the creaminess of the egg, the crunch of the cabbage, the spice and smokiness of the chipotle pepper, and the tenderness of the beans in their deep dark broth.  It was a good idea, though, for nutrition's sake!
Serves 6
Ingredients
1 cup dried black beans, rinsed but I forgot to soak them and it was ok
2 bay leaves
1 Tbsp coarse sea salt
1 large chopped red onion
3 small golden ball turnips, peeled and cubed
1 large carrot, peeled and chopped
3 cloves garlic, chopped
1 can chipotle chiles in adobo sauce, some chopped
1 small can non GMO corn
1 tsp ground cumin
Juice from 1 lemon
1 Tbsp cracked black pepper
8 cups water (less if beans are soaked)
Garnish:
shredded red cabbage
chopped red onions
chopped cucumber
soft "boiled" or steamed eggs (optional)
Directions
1.  Put everything but the garnish in the slow cooker and set on low for 7-9 hours.  Remove bay leaves.
Serve with rice and arrange your garnish.
I've decided that bay leaves are the magic that remove any undesirable effect from beans.
I've also decided that beans are the simple things in life that bring me immeasurable amounts of joy... which is probably why I have an entire cupboard stocked with different varieties of beans and lentils.. but black beans just have this grasp on my heart which can only be felt, not explained.
Especially after the bed is unmade...

Sunday, January 11, 2015

Spicy Tangy Meatballs

I knew I was going to be making meatballs tonight, but I didn't know if I was going to go turkey or beef.. and further down the road, if I was going to go Chinese or Italian.
The quick scan of my fresh inventory screamed Italian, although I could have easily gone either way. I don't know why I did this.. because I know deep in my heart that it's not in season, but I bought a large bag of zucchini this week.  I wanted a taste of summer.. even if the weather is almost summer like.  Yesterday (mid January, mind you, and in France.. not California) I went jacketless outside all day.  Yes, I was in long sleeves, but not a sweater, and I was almost sweating.
This is not a complaint.  I love when the weather is sunny and warm any time of the year because it reminds me of home, but it also reminds my body that "seasons" only happens in movies, and in "real" life, anything is available year-round.
And so as back in Cali, I could eat Zuppa Toscana in mid-summer, here in France, I'm making griddled zucchini with sundried tomatoes and meatballs in the winter.
And I'm ok with that.. because my actual real life body is on California time.  It might be a life saving denial strategy.  My body is a refugee to it's "safe place" where terrorists are a threat, but they seem far away.
I've made similar recipe in the past, but I gave it some peps.. and it was well worth it.. because there's nothing that screams Summer like little bursts of sundried tomatoes in your meatballs.
Yield 16-17 small meatballs
Ingredients
250g (1/2 lb) ground beef
1 carrot, finely grated
3 cloves garlic, grated
1 small red onion, finely diced
1 Tbsp diced green chile
1 Tbsp strong mustard
6 sundried tomatoes, diced
1 Tbsp piment d'espelette
1 Tbsp worcestershire sauce
lots and lots of fresh cracked pepper
1/2 tsp fleur de sel (flake salt)
1 1/2 tsp fennel seeds
drizzle olive oil for meatballs
1 egg yolk
2 Tbsp olive oil for cooking
Directions
1.  Mix all the ingredients together with your hands until homogenous.
2.  Form small balls in the palm of your hands.  I made about 17, but it depends on the size you want them.
3.  Heat the 2 Tbsp olive oil in a wok or heavy based pan and cook the meatballs carefully without overlapping so they brown on all sides, about 5 minutes, turning them from time to time.
4.  Set aside until ready to use.
I served mine over pasta with griddled zucchini and artichoke hearts in a spicy tomato sauce laced with extra sundried tomatoes.

Saturday, January 10, 2015

Hedgehog Mushrooms

Not all mushrooms are created equal.  It's true.  There are the "normal" ones that you find anywhere, and then there are the special ones that make your eyes sparkle and your salivary glands alert.  Cêpes, for example, are on the special list.  They are big, meaty, and have enormous flavor..but they are outrageously expensive unless you find them youself.  Other favorites of mine are the trumpet looking ones.  Black trumpettes, Chanterelles, and Girolles.  I love the way they release their flavor and aroma into my haven of pleasure.  What I don't like about them is that they are difficult to clean.  Mushrooms should be wiped with a damp'cloth or'lightly rinsed, but never soaked, for it appears they lose some of their flavor.  It is the longest part about preparing wild mushrooms.. Unless you don't mind eating twigs, dried leaves, or dirt.. Which I don't.
This is where the superiority of the hedgehog mushroom comes in.  These large and somewhat flat topped mushrooms, also called Mutton's Foot (Pied de Mouton in French) have all the flavor of the beloved Girolles, but are much bigger and easy to clean.  The bigger they are, the fewer you have to clean, which is great news.
They also have this incredible meaty texture that stays firm through cooking.  When sliced, they look like little angels with feathers under their wings.  I'm always quite impressed with the cross-sectional beauty of things.  The fuzzy little underarms and the clean white flesh make me so giddy with excitement!
As all good quality mushrooms, they don't need much adornment.  Sautéed in some olive oil, duck fat, or butter with garlic and a pinch of fleur de sel and some cracked black pepper is all they need.  They will release their divine nectar, and then absorb most of it back.  Some like to add a drizzle of cream or some freshly chopped parsley, which give them a nice last touch if needed.
They make a perfect side dish to any meal.. Or as the star of a main vegetarian dish, such as an omlet or a risotto.
The taste of these hedgehog shrooms just blew me away.  I had never tried them before for some unknown reason, but they rank very high on my preferred mushroom list with cêpes and black trumpets.  I probably won't give chanterelles a second glance now that I've discovered these hedgehogs!
Serves 3 as a side
Ingredients
450g (1 lb) hedgehog mushrooms, wiped clean and sliced
3 cloves garlic, minced
1 Tbsp olive oil or butter or duck fat
few pinches fleur de sel
lots of cracked black pepper
Directions
1.  Place the oil in a wide heavy based pan and heat to very high.
2.  Lay the shroom slices in one layer with the minced garlic, without overlapping.  Cook in batches to make sure they sautée well and not steam.
3.  Let cook for about 1-2 minutes before stirring, then add the fleur de sel and black pepper.  Cook until the juices release, and then are re-absorbed.  This may take 5-7 minutes per batch.
I served mine alongside some roasted chicken legs and carrot sticks.

This was amazing.. in the American sense of the word...

Thursday, January 8, 2015

Baked Shells with Pilchard Herring and Leeks

There are days where a can of fish and a few odd vegetables make a comfortingly exciting meal.. especially if you are intelligent enough to add a bit of spice where it belongs...
Serves 4
Ingredients
300g (10.6oz) pasta shells, cooked al dente
2 Tbsp olive oil
2 small leeks, washed and sliced crosswise
1 zucchini, sliced into quarter moons
1/4 cup dry white wine
1 tsp paprika
1/2 tsp chile powder
1/4 cup heavy cream
1/4 cup reserved pasta cooking water
lots and lots of freshly ground black pepper
1 can Herring in tomato sauce (Pilchard)
pinch fleur de sel
2 handfuls freshly grated Gruyère cheese
1 handful grated parmesan
Directions
1.  Heat the oil in a heavy based pan and and add the sliced leeks.  Cook until they start to sweat, then add the zucchini slices.
2.  Cook for about 5 minutes, then add the paprika, chile powder, some black pepper, and a pinch of salt.  Deglaze with the white wine.
3.  Open the can of herring (mine had 3 big ones) and remove the fish onto a plate.  Pour the tomato sauce into the pan and heat through.  If your herring is not in tomato sauce, add in about 1/4 cup crushed tomato as a sub.  You might want to add salt if you do this.
4.  While you may be waiting for cooking things to be happening, carefully open the herring with your fingers and remove the central fish bone.  This will separate them into fillets and make them more pleasant to eat with a mouthful of cheesy shells.
5.  When the shells are al dente in their cooking stage, drain but reserve some of the cooking water.
6.  Remove the leek and zucchini mixture from heat and stir in the cooking water and heavy cream.
7.  In a baking dish, place the drained pasta followed by the leek zucchini mixture.
Shake the dish a bit to have everything settle in.
Lay the herring fillets on top
Top with the cheeses
8.  Bake for 15 minutes at 200°C 400°F or until the cheese is slightly crusty.

Serve hot.. piping hot!
I don't do casseroles or baked pasta dishes very often, but when I do, I like to make it a memorable experience.

Herring fits very nicely into this picture.
I love the way I can take something from a can and make it shine.
Ooh!

Wednesday, January 7, 2015

Burmese Golden Egg Curry with Zucchini

After coming home late, I felt like a dinner making machine.  As soon as I walked in the door, I knew I'd be making some type of Burmese Golden Egg Curry with a twist, but I'd also be making a parallel dinner to satisfy other needs.  It's like today's lunch.  I couldn't decide if I wanted to finish the Thai Leek and Mushroom Curry or the Red and Green Dal.. so I had both.
Somehow, it was perfect, but in another way, it felt imperfect.  I suppose they two meals cancelled each other out, considering one was more Earth, and the other Water.. and Earth destroys Water.
Anyway, I eventually decided to not eat my parallel meal and leave that one to the wolves.  Mine would correspond more to the "me" in me.. spicy, tangy, garlicky, and crunchy.  I think I have those elements covered well now.
I'm ready for tomorrow.. are you?
Serves 2-3
Ingredients:
4 large eggs "hard boiled" or steamed 10 minutes and peeled
1/4 cup mix sesame oil and sunflower oil
1/8 teaspoon turmeric
3 small shallots, minced
2 teaspoons minced garlic
1 jalapeño or Moroccan green chile, seeded and diced
1 zucchini, sliced into quarter moons
¼ teaspoon Red Chile Powder
1 can crushed tomatoes
2 teaspoons fish sauce
coarse sea salt to taste
1/4 tsp cracked green pepper berries
Garnish:
sesame seeds
mung bean sprouts
Directions: 
1.  Heat the oil in a wide heavy skillet over medium-high heat. Add the turmeric.. it will fizz.  This is very sexy.
2.  Add the peeled eggs and fry until golden and a little blistered all over: cook on each side in turn, then try to balance the eggs on their ends to cook the tips. Frying the egg is a fun little task, quickly done, and it makes them very attractive. They should be golden and blistered all over.  Remove, cut them lengthwise in half and set aside.
3.  Pour off all but 2 to 3 tablespoons of the oil (the oil can be used again for stir-frying). Heat the oil remaining in the pan over medium heat, add the shallots, green chile, and garlic, and fry briefly, until translucent. 
4.  Add the zucchini slices and can of crushed tomatoes.  Simmer until the zucchini is tender, about 10 minutes.
5.  Stir in the fish sauce and salt, then taste and add as much chile powder as you find necessary
6.  Place the eggs into the sauce to heat through.

Split the eggs for beauty and serve hot or warm over some quinoa garnished with sesame seeds and mung bean sprouts.

Feel the heat rise within you.. even at room temperature.. and enjoy the ride...

Tuesday, January 6, 2015

Green and Red Ki Dal

I think I may be in tune with the season here.
It is winter and Water type foods should be privileged during this special season.  Water is the element of the kidneys and includes any black or dark purple food, as well as beans and rice.  I may have accomplished this Water with just a touch of Fire.. but not enough to make smoke signals.
I have mixed whole green and red lentils into this lovely dal, whose flavor feels complete with the crunch of the scallions and red cabbage.  It is the first time I use green lentils other than split peas in dal and I have to admit that they do have much more flavor than the brown or blond lentils.  I was pleasantly surprised by my integration of a typically French lentil into "my" type of cuisine.
Serves 5
Ingredients
1/4 cup whole masoor dal (red lentils), washed and soaked 1 hour or more
3/4 cup whole green lentils, washed and soaked 1 hour or more
1 tsp coarse sea salt
4 cups water
2 Tbsp canola oil
1 tsp cumin seeds
1 tsp coriander seeds
1 Indian bay leaf
pinch asafoetida (hing)
1/4 tsp turmeric
1 red onion, sliced into moons
2 large cloves garlic, grated
1 Tbsp ginger, grated
2 green chiles, seeded and sliced
1 tomato, chopped
1 tsp garam masala
1/4 tsp chile powder
Garnish:
chopped scallions
red chile flakes or fresh red chile
shredded red cabbage
squeeze of lime
Directions
1.  Bring the washed and soaked lentils to a boil in the water with the salt.  Reduce heat and simmer for about 15 minutes or until the lentils are bite tender but not complete mush.
2.  While this is happening, heat the oil in a wok and add the cumin and coriander seeds with the bay leaf.  Cook until the seeds sputter, then add the hing and turmeric until they fizz.
3.  Add the onion slices and cook until translucent.
4.  Add the green chile, garlic, and ginger.  Cook, stirring until the raw smell dissipates.
5.  Add the chopped tomato, garam masala, and chile powder.  Cook, stirring for about 2-3 minutes or until the tomato "melts" and you are left with a nice fragrant curry.
6.  Transfer the curry to the pot of lentils.  Bring to a boil, then turn off heat and let the flavors infuse until ready to serve.
Serve over some basmati rice topped with crunch and heat.  The crunch comes from the scallions and cabbage.  The heat from the extra chile you may want to add.  I also added a squeeze of lime to make it extra special.

There is no doubt in my mind that this was the right thing to do...

Sunday, January 4, 2015

Thai Leek, Mushroom, and Sweet Potato Curry

This one came as a surprise.  I've never used leeks in a Thai recipe before, but something told me it would work well together.
In the middle of the afternoon, Thai chile and coconut was all I wanted...I wonder what made me sway that way..
It must be the fresh lemongrass.  I worked it for the first time this weekend and I am in Love.  There is something about that acidic chest taste (not mouth taste) that so clearly defines the Thai curry I go crazy for.  It is strong, but attenuated by the coconut milk which helps balance all the powerful roots happening.
It's hypnotizing...
The elements are heavy on Earth and Water here, and since Earth destroys Water, I'm not sure if this is functional with the 5 Elements, but I will get better and better at this analysis with time.
Serves 5-6
Ingredients
3 leeks, white parts, washed and sliced thickly
250g (8.8oz) mushrooms, coarsely chopped
1 sweet potato, peeled and cubed
2 Tbsp oil
1 inch grated ginger
3 lemongrass stalks, finely chopped
4 cloves garlic, grated
1 green chile, seeded and sliced
1 slice dried galangal (or 1 tsp freshly grated)
2 kaffir lime leaves
2 small carrots, peeled and julienned
1 can coconut milk + 1 can water
1 tsp sea salt
1 tsp cracked black pepper
1 tsp ground coriander
1 tsp ground cumin
1/4 tsp turmeric
1 tsp tamarind paste
garnish:
mung bean sprouts
chopped cilantro
Thai red chile
wedges of lime
Directions
1.  Heat the oil in a large wok and sweat the leeks with the salt, about 5 minutes.
2.  Move the leeks over to make space, and add the ginger, galangal, kaffir leaves, lemongrass, garlic, and green chile.  Cook until fragrant, about 1 minute.
3.  Stir all together, then move everything over to one side again.  Add the mushrooms and carrots.  Let sizzle for about 2 minutes.
4.  Stir all together.  The mushrooms should have let out a bit of juice.  Add the pepper, coriander, cumin, turmeric and coconut milk with water.
5.  Bring to a boil, then add in the sweet potato cubes.  Simmer, covered for about 10 minutes or until the sweet potato is cooked, but still has its shape.
6.  Stir in the tamarind paste, then taste and adjust the seasoning.
Serve hot over basmati rice garnished with bean sprouts, cilantro, Thai chile, and a squeeze of lime.

This is the Thai curry recipe I am the most proud of.
I did it without using a remade curry paste and it tasted restaurant-style phenomenal!  I may never use a pre-made curry paste again.