Search this blog

Translate

Wednesday, July 30, 2014

Steamed Fish with Fermented Black Bean Sauce

Something magical happened today...
Something I had been longing for, dreaming of, romanticizing, tasting, feeling was able to materialize today.  All the past month's withholding was released upon arriving in my Asian Wonderland.  I felt a rush of oxytocin and serotonin and was able to let myself go, if only for a few seconds.
I was able to walk freely through the aisles, inspecting each item, feeling a close tenderness enveloping my aura and leading me to the treasure I had been seeking.
Dou-chi.
Dou chi is Chinese for fermented black soy beans.  Sometimes they are called salted beans.  Here I finally found them, in the spice aisle (where I wasn't looking) in their vacuum sealed bag.  I would finally be able to make Sichuan style steamed fish starring the 2 little fellows:
Doubanjiang (right) and Dou chi (left).
Serves 2
Ingredients
2 small hakes (whatever white fish you desire) gutted and scaled
1 tbsp Doubanjiang
1 1/2 tsp Dou chi (fermented black beans) chopped
2 cloves garlic, grated
1 inch ginger, sliced
1 handful chopped scallions
1 Tbsp cooking wine (I used mirin)
Directions
1.  In a small bowl, mix together the doubanjiang, chopped dou chi, garlic, ginger, wine, and half the scallions.
2.  Score the fish on each side, then stuff the mixture inside the fish and rub it well all over the outside and into the crevices.  Let marinate this way for about 15-20 minutes.  Meanwhile you can prepare the sides if needed.
3.  In a bamboo steamer, lay some cabbage leaves or banana leaves or parchment paper at the bottom, then lay the marinated fish inside and cover.  Place about an inch of water in a large enough pan and bring to a boil.
4.  Put the bamboo steamer in the pan with the boiling water and cook on high for 7-8 minutes, then turn off heat and let sit for 5 minutes before uncovering.
5.  Serve with rice and a salad or whatever you so desire for the fish is so good and spicy and pleasantly umami that it doesn't matter what you serve it with, just sprinkle the rest of the scallions over it on the plate.

Pungent is an appropriate word to describe that dou chi.  It's a salty fermenty pungent flavor that marries perfectly with the fish.  Do not use too much or it might overpower you.. and if you're lucky you may have the same reaction I did..
a feeling so incredible it almost seems illegal..

Print Friendly and PDF

Moroccan Poached Egg Soup

The "cold" rainy July weather is giving me soup hallucinations.  My recently swapped Moroccan spice mix for a few chiles de arbol and tucked nicely into my spice drawer has also been nagging at me.  Every time I open the happy place drawer, I open up the little jar and breath in, trying to discern the blend.  I kniw for a fact there is chile powder, coriander, and perhaps a bit of cumin, but there is something else in there that makes it so incredibly Moroccan that I can't seem to uncover.  It's quite different than ras el hanout.. It would be more of a blend for tajine, so that is how I'll describe it in the recipe.  The best way to get your hands on something of this quality is to fetch it from Morocco, or have someone you can count on fetch it for you from Morocco.
That's what I did (well, it was a gift.. i didn't specifically order it), but in the meantime, use a blend for tajine.
Serves 2
Ingredients
1 Tbsp EVOO
1 onion, sliced
1 carrot, peeled and cut into chunks
1 large zucchini, cut into chunks
1 heaping teaspoon spice blend for tajine
1 tsp tomato paste
1 tsp harissa
1/4 cup chana dal, soaked (or cooked ckickpeas)
1 cube chicken or veg bouillon
enough water to cover (about 3 cups)
2 eggs
Handful halved cherry tomatoes
Handful chopped cilantro
Directions
1.  Heat the olive oil in a pot and add the onions.  Cook until translucent, then add the carrot chunks.
2.  Cook, stirring for about 5 minutes, then add the zucchini, spice blend, tomato paste, harissa, and chana dal.  Mix together until evenly pasty.
3.  Add the bouillon and water.  Bring to a boil, then simmer for about 15 minutes or until the carrots are tender.  Taste and adjust the seasoning if needed.  It should be deep and spicy.
4.  About 10 minutes before serving, bring back to a boil and drop in the eggs.  Let them poach covered and off heat.  Let rest for 5 minutes.

Serve with 1 poached egg per person.  Garnish with cherry tomatoes and chopped cilantro.

I didn't photograph the phenomenon, but when you pierce the egg, the yolk mixes into the broth making it creamy and velvety.. another pleasant surprise...

Print Friendly and PDF

Tuesday, July 29, 2014

Spicy Melon & Basil Muffins

There comes a time during a day filled with extensive research on various subjects, that I scramble to the kitchen with a desire to make muffins.  It's one of those things that once I decide to do it, there is no stopping me.  Even on days I realize I'm out of flour or eggs or bananas (usually not on the same day), it doesn't stop me.  It's like an urge I need to let be expressed.  These days, the expression lies in  herbal combinations.  I love the way herbs or spices enhance the flavor of fruity muffins, especially basil.  Hmm actually, mint or rosemary do a lovely job as well.  Oh I need to try one with cilantro next time!
And that's how a combination of melon and basil makes its way into a muffin in my house.  I had a half melon perfectly ripe, juicy, and sweet just begging to star in the show.  I was worried about the juiciness of the melon after blending it, so I added some ground almonds and corn starch as thickener.   What I like about muffins is that I'm never 100% sure how they will turn out in the end.. if they will be fluffy, flat, or even if the flavors will go well together.  The first bite is always a surprise.  That surprise notion is covered with the addition of chile powder.  Mine is very strong, so I only used a bit, but oh how it does little wonders in unexpected places!
Yield 15 muffins
Ingredients
1 egg, well beaten
1 tsp corn starch
100g (3.5oz) cane sugar
40g (1.4oz) canola oil
30g (1oz) ground almonds
320g (about 1 1/4 cup or 11.3oz) blended melon
1 handful finely chopped fresh basil
1 tsp baking powder
3/4 tsp baking soda
1/4 tsp chile powder
1/4 tsp salt
150g (5.3oz) whole wheat flour
Directions
1.  Beat together the egg, corn starch, sugar, melon, ground almonds, and oil.  Beat it well, then fold in the basil.
2.  Sift together the flour, chile powder, baking powder, baking soda, and salt.  Carefully stir in the flour mixture until just combined.
3.  Fill your buttered muffin tins 3/4 full and bake for 22-25 minutes at 175°C 350°F or until a toothpick comes out clean.

The juicier the melon, the longer they will have to cook at a lower temp.  I almost went for 150°C 325°F for 30 minutes, but thought of that too late.  I may have ended up with a prettier shape and avoided the brown tops, but eh.. the muffins were delicious so who really cares how they look?
These turn out very very moist and fragile, so be gentle please..

Print Friendly and PDF

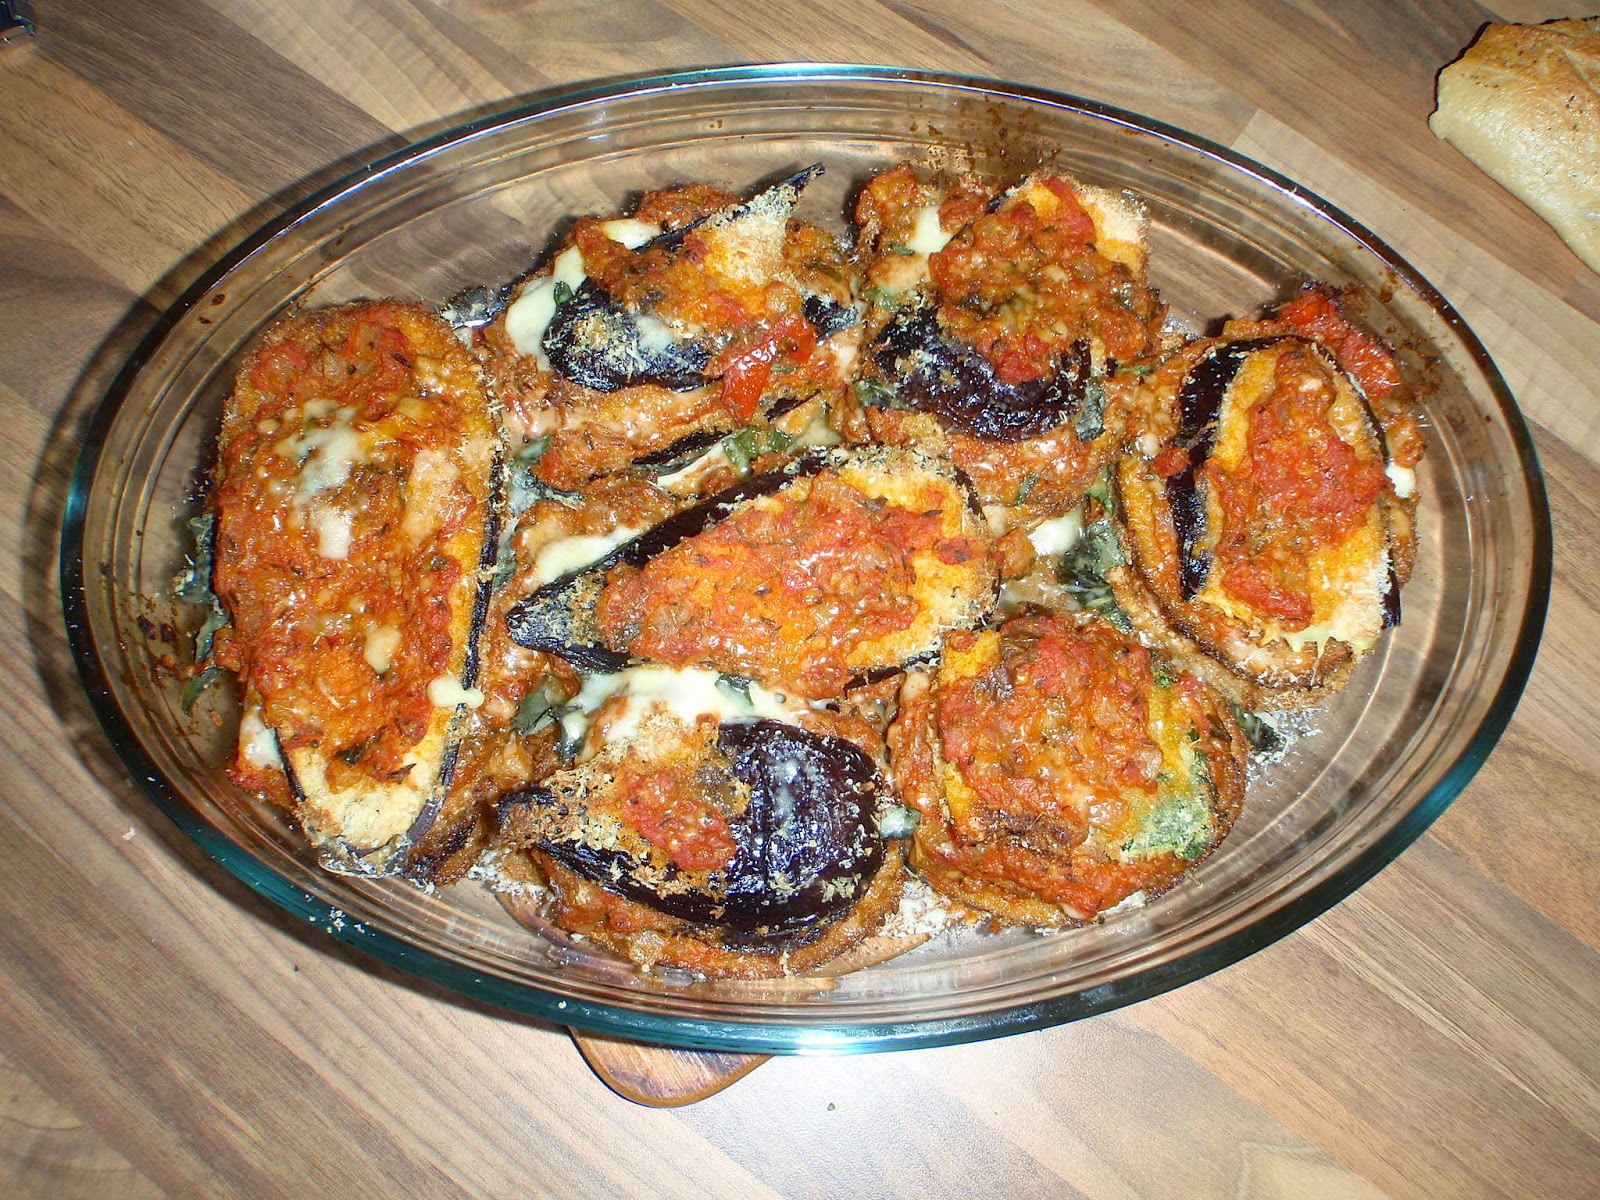
Eggplant Parmigiana with Panko

The scent of celebration is in the air, and though I am not hosting an official event tonight, I am hosting a personal one, for it´s often time for celebration in my heart no matter what is officially happening in the organized world.
For my own little special event, Eggplant has come out to play.  Its flirty little way of overindulging several of my senses made it quite appropriate.  Meals like this seem simple, but require preparation and planning.  The beauty of a well thought out meal is the ease with which you feel it run through your body, knocking at your soul, and making its way in...
Serves 4-6
Ingredients
2 medium eggplants cut into 1/4" slices (I used 2 eggplants and  completed with 1 large zucchini)
3 eggs well beaten
few cracks black pepper
about 2 cups panko
about 1 cup flour
some EVOO for drizzling
fresh sliced mozzarella (I completed with goat feta)
handful chopped basil
about 1 cup grated parmesan
few dashes red pepper flakes

Sauce:
2 Tbsp EVOO
1 large chopped onion
pinch of salt
5 cloves garlic, grated
1 medium carrot, grated
1 Tbsp dried thyme
3 large ripe tomatoes, chopped
1 can crushed tomatoes
1/2 cup water
1 handful freshly chopped basil
1 Tbsp balsamic vinegar
1 tsp cracked black pepper

Directions
Prepare the eggplant:
1.  Sprinkle salt over the slices and let sit for at least 20 minutes.  They will sweat.  Rinse them well and pat dry.  While waiting, make the sauce.
2.  Get your breading ingredients ready.  Beat some black pepper into the eggs.  Prepare a dish with the flour, and another with the panko crumbs.  Brush some olive oil onto some parchment paper in an oven tray.
3.  Coat each eggplant slice with flour, then dip into the egg, remove and let as much egg drip off as possible, then press into the panko, making sure to cover each side of the slice.  Place onto the oiled oven tray and repeat with each slice.  When the oven tray is full, drizzle a bit of EVOO over the slices
and bake at 245°C 475°F for 20 minutes, flipping once.
You may have to work in batches depending on the number of trays or oven space you have.  When the slices are done, set aside.

Make the sauce:
1.  Heat some EVOO in a heavy based pan.  Sweat the onions with a pinch of salt.  Cook until translucent.
2.  Add the garlic, carrots, and thyme.  Cook, stirring for a few minutes, then add the tomatoes and water.
3.  Reduce the heat and simmer for 20 minutes.  The sauce should thicken and reduce a bit.  Add the vinegar, basil, and pepper and simmer for another 10-15 minutes.  Taste and adjust the seasoning if needed.

Assemble:
In an oven proof dish, lay the largest slices at the bottom.
Spoon some sauce over the slices
Add the mozzarella slices
And the basil
Sprinkle some of the parmesan
Repeat.  I ended up with 3 layers.
At the last layer, top with some red pepper flakes.
Bake at 180°C 350°F for 25-30 minutes or until the cheese is bubbly and the tops are golden.

I served over some hot al dente linguine tossed with black pepper and olive oil.
This was a brilliant meal.  Although the panko isn't authentic Italian, it helps give that "fried crunchy" impression without any frying, and I certainly did not miss that heavy frying part in this assembly.
Panko and I are going to be good friends... I can feel it...

I had a whole other dish going on with zucchini.  On that assembly I used goat feta instead of mozzarella and it gives the dish a completely different outcome that is equally delicious and a bit surprising, since you aren't really expecting to taste zucchini and feta in a parmigiana.
I also ran short of sauce, so I added a sliced green tomato on that last layer.  Man those things are juicy!  I'll be communicating more on those soon.
I don't follow the rules, and I'm fine with that...

Print Friendly and PDF

Saturday, July 26, 2014

Orange Anise Almond Cookies

I've recently decided it's a good idea to drink perrier with a squeeze of orange juice for a change instead of lime or lemon.  It's such a good refreshing idea that I now find myself with a constant supply of oranges full of sweet nectar and waiting to be consumed at any time of the day, in my perrier, or with my eggs at breakfast, or just any time of the day when I open the fridge an spot one.
This morning I had a cookie flash.  Fresh oranges in a cookie.  Hey it worked with ruby red pomelos and I really enjoyed the citrus touch of those ones.  The nice twist on these is that they are gluten free.  That happened unintentionally and I only realized it as I started to list the ingredients.  It's nice to know that even if you are condemned to do that GF dance, you can still eat delicious cookies!
The addition of anise seeds was supposed to give a subtle background licorice flavor, but it was too subtle.  Next time I'll put a whole tsp of seeds.
Yield 4 dozen cookies
Ingredients
1/2 cup (110g) room temperature butter
3/4 cup (185g) brown sugar
1 large egg, beaten
1 Tbsp orange marmelade
zest from 1 orange
juice from 1/2 orange
175g (6oz) ground almonds
125g (4.4oz) buckwheat flour
1 tsp baking powder
1 tsp ground ginger
1/4 tsp anise seeds, ground
1/4 tsp salt
slivered almonds for topping
Directions
1.  Sift together the flour, ground almonds, baking powder, salt, anise, and ginger.
2.  In a separate mixing bowl, cream the butter and sugar together, then add the egg and beat well until homogenous.
3.  Add the orange juice, zest and marmelade and mix well.
4.  Ditch the whip and switch to a wooden spoon.  Add the dry ingredients little by little, while mixing until all incorporated.  The end result should not be dry and should stick to your fingers.
5.  Chill the batter while you preheat the oven to 350°F 175°C.  If you chill the batter it will be easier to manipulate.
6.  Take a scant tablespoon size amount of dough and plop it onto you cookie sheet.  This might be easier with an ice cream scooper.  I don't own one of those.  Sprinkle with a bit of slivered almonds.  Keep about 2 inches of space around each one since they are going to expand.
7.  Bake for about 12-14 minutes or until they are just about to golden.  Remove and let cool on a wire rack until they set.

These are very orangey and PEPpy.  They are quite chewy, not cakey or crunchy, but bursting with deliciousness.
Perfect for this strange hail/sun/rain/heat weather we're having right now!

Print Friendly and PDF

Wednesday, July 23, 2014

Golden Eggs in Coconut Yam Curry

The little voice over my shoulder was very present today.  Upon arrival in my kitchen, images of golden eggs and yam were floating around.  I was trying to come up with something that would work well with both starlets when the voice kept sending me coconut whispers and aromas.  How does that little voice manage to feel so real all the time?
I decided to take it Indian style, and rework something I had done before.
This recipe is very similar (meaning exactly the same as) the Egg and Brinjal Curry I've done before, except for swapping of yam for eggplant, and a lot less pre frying, which makes it healthier.
Serves 4
Ingredients:
6 eggs, steamed or hardboiled and shelled
1/4 cup oil for frying
1 medium yam, cubed
3 dried curry leaves
3 cloves
1/2" cinnamon stick
1/2tsp cumin seeds
1/2 tsp fennel seeds
1 onion, sliced
1/4 tsp turmeric
some chili powder
1 tsp ground coriander
1 tsp tandoori chicken masala
1 tomato, chopped
1 can (400mL) coconut milk
chopped cilantro to garnish
Directions:
1.  In a wok or heavy based pan, heat the oil with a pinch of turmeric and a pinch of tandoori masala, then fry the eggs, carefully turning them on each side until their skin starts to blister.  Remove and set aside on some paper towels.
2.  Toss the oil but leave 1 Tbsp. Heat and add the curry leaves, cloves, cinnamon, cumin seeds, and fennel seeds.  Heat until it starts to crackle and pop.
3.  Add the onion.  Stir and cook until it colors, then add the yam.
4.  Add the turmeric, chili powder, coriander, and tandoori masala.  Stir to coat evenly.
5.  Add the tomatoes and coconut milk and bring to a boil, then simmer uncovered for about 15-20 minutes, until the yam is cooked through.
6.  Before serving, cut the eggs in half and drop them into the curry.

Serve over some basmati rice and garnish with cilantro.

It's funny how you can change one ingredient and rediscover a whole new world..

Print Friendly and PDF

Monday, July 21, 2014

Chicken Soup with Ras el Hanout

 I know it's the middle of July, but it's raining today and I've been feeling slightly under the weather.  There's nothing like a good chicken soup to knock you back into shape..
well, that and a bit of Motivation.
I was planning on making a minestrone type of soup, but something North African swept underneath my soul and the lovely smell of Ras el Hanout materialized in my brain and before I knew it, I was swept off my feet.  Eating this really gave me the peps I was lacking and I'm sure tomorrow I will be just as energized as I usually am.  It reminded me of couscous, but that must be the wonderful workings of the spices.
Serves 4
Ingredients
 2 chicken breasts
1 Tbsp EVOO
1/2 yellow onion, diced
2 medium carrots, peeled and chopped
1 large tomato, chopped
1 Tbsp tomato paste
1 Tbsp harissa
1 heaping Tbsp ras el hanout
1 cube lamb bouillon (or chicken or veg)
4 or more cups water
1 bell pepper, chopped
1 handful fresh spinach
few cracks fresh pepper
pinch of salt (if needed)
Garnish:
squeeze of lime
chopped scallions
chopped cilantro
Directions
1.  In a large pot, heat the olive oil and sweat the onions until translucent.  Add the carrots and stir about 1-2 minutes.
2.  Add the tomatoes, tomato paste, harissa, and ras el hanout.  Stir into a paste, then add the bouillon cube and the water.
3.  Bring to a boil, then add the whole chicken breasts.  Let boil for 5 minutes, then cover, remove from heat, and let sit for 10 minutes.
4.  Remove the chicken breasts and let cool before shredding with your fingers.  I really like this part.. it's like string cheese but with chicken!
5.  Place the soup back to a simmer and add the bell pepper.  Cook for about 5 minutes.
6.  Throw in the spinach and let wilt.  Stir the shredded chicken back in and heat through.  Add a few cracks of fresh pepper.  Taste and adjust the seasoning and water level if needed.  I didn't need any salt.

Serve garnished with some lime juice, chopped cilantro, and chopped green onions.
This little creation works very well as a soup, but would be equally satisfying over some couscous or bulgur..
Oooh that gives me an idea for leftovers!
Needless to say, I feel much better..

Print Friendly and PDF

Saturday, July 19, 2014

Minty Peanut Butter Muffins

I'm not sure how I came up with this one.  I had started my basic muffin batter and knew there would be handfuls of freshly chopped mint going in, but the banana and lime just invited themselves into the mix.  The lime was begging for a good zesting and the banana wanted a good mashing.  What's the deal with the peanut butter?  Well, it pairs so nicely with banana that I ended up asking it to join.  A request gladly accepted.
I was planning to use watermelon instead of banana and peanut butter, but I just imagined a watery unwatermelon-tasting muffin, which would beat the entire point of using watermelon.
So the real question is, do all these flavors really go together?
The blueberry lime basil muffins did, so I thought there would be a good chance for these to make it to the."Strange but Delicious" list.
Yield 15 muffins
Ingredients
2 eggs, well beaten
2 bananas, well mashed
150g (5.3oz) cane sugar
1 packet vanilla sugar (or 1 tsp vanilla extract)
3 Tbsp peanut butter
40g (1.4oz) canola oil
1 tsp baking powder
1 tsp baking soda
1/4 tsp salt
zest and juice from 1 lime
2 handfuls finely chopped fresh mint
150g (5.3oz) organic whole wheat flour
crushed peanuts for garnish
Directions
1.  Beat together the eggs, sugar, mashed banana, peanut butter, lime juice, zest, and oil.  Beat it well, then fold in the mint.
2.  Sift together the flour, baking powder, baking soda, and salt.  Carefully stir in the flour mixture until just combined.
3.  Fill your buttered muffin tins 3/4 full, top with crushed peanuts and bake for 18-20 minutes at 180°C 350°F or until a toothpick comes out clean.

It turns out the flavors DO go extremely well together.  The lime is subtle, the peanut butter is not overpowering, and the mint is an excellent enhancer.  It leaves you with a refreshing pleasant aftertaste and has you coming back for more..
sort of like Pain d'Epices...

Print Friendly and PDF

Friday, July 18, 2014

Roasted Eggplant in a Salad

Yet another unmade bed salad has appeared before me nicely arranged and tidy, full of colors, each item in its place, some hot, some cold, some raw, some having once lived and squirmed during its short life.
All this wonder on a bed of baby spinach and oak leaf lettuce.. sending me deep into a satisfaction coma.
I have found yet another way to enjoy my eggplant.  Cut into little triangles (or more like arcs) and oven roasted to a crispy outside and creamy center, still hot and tossed into a lovely salad.
To accompany my main event were some tomato slices, roasted with the eggplant so that they were "confites," meaning that they cooked in their own juices and naturally concentrated in their sweet tartness, and still warm.
The shrimp does make this salad interesting, but it's really not the main attraction.
Everything happening around that eggplant is the main attraction.
The garnish was some feta and cilantro, a drizzle of EVOO, some lime, pepper, and a drizzle of cider vinegar.
All these items together in one dish makes the whole evening worthwhile...
(the olives were eaten before making it into the salad)

Print Friendly and PDF

Wednesday, July 16, 2014

Sichuan Chicken Noodle Salad

I've been craving cold noodle again.  The weather chilled for about a week but the match has struck again, and my life is ablaze.. again.  What I was looking for was the "chaos out of order" effect visually, and the mala numbing spicy effect taste wise, but refreshing all at once.  Here is the perfect match to my mood swings.. there is chicken, vegetable, crunch, tang, spice, and it's all served cold... as is revenge..
Inspired by ChinaSichuanFood
Serves 4
Ingredients
For the chicken:
2 chicken breasts
1 tsp whole Sichuan peppercorns
1 green onion, sliced lengthwise
2 slices fresh ginger
1 tsp doubanjiang (PiXian broadbean chili paste)
enough water to cover

Noodles:
8 oz (230g) sweet potato starch noodles (or whatever noodles you want) cooked and drained
2 tsp sesame oil

Chili oil:
1 tsp ground Sichuan peppercorns
1 tsp red chili powder (mine is extra spicy)
2 star anise
4 slices ginger
3 Tbsp canola oil

Dressing:
3 cloves garlic, grated
1 Tbsp light soy sauce
2 Tbsp black vinegar
2 Tbsp rice vinegar
2 Tbsp mirin (or sugar)

Toppings:
2 julienned carrots (or cucumber)
1 green onion, chopped
crushed peanuts
fried shallots

Directions
1.  Place all the "For the chicken" ingredients in a pot of water.  Bring to a boil, let boil 5 minutes, then cover, remove from heat, and let sit 10 minutes.  Drain and cool the chicken in cold water, then shred and set aside.
2.  Cool the cooked noodles under cold running water, then toss in sesame oil and set aside.
3.  Make the Chili oil.  Place the Sichuan pepper and chili powder in a bowl.  In a pan, heat the oil with the ginger and the star anise.  When it starts to bubble, remove the ginger and pour the rest into the bowl.  Let infuse and cool.  When cool, remove the star anise.
4.  Make the dressing.  Stir it all together.
5.  Assemble.  Normally you are supposed to just toss everything together, but as you may have noticed, I like to make the bed before tearing it apart.  Neatly place everything as you wish,
then add the chili oil and dressing and make a big hot mess...
... a really really hot mess..

Print Friendly and PDF

Monday, July 14, 2014

Chipotle Black and Pinto Beans

This morning as I woke up with a sudden craving for black beans.  Some nice Tex-Mex spicy black beans.  The type of beans that have you eating right out of the pot after dinner while doing the dishes.  I instinctively jumped up and plugged in my slow cooker, rummaging through my legume cupboard in search of my pearly black beans.  When I found them, peacefully waiting to be chosen, I found I only had 1/2 cup left.
What should I do, voice over my shoulder?  Should I change my plans and go for some kala channa or whole urad daal?
I was going to eat black no matter what at this point.  The voice over my shoulder started to whisper non related suggestions into my ear...so I had to take care of it later, but my half cup of black beans had locked eyes with some pinto beans.  They soon struck up a conversation and when I went to place them back in their places, was surprised to find them in deep osmosis, refusing to be separated.  All this devotion to one another was making me weak in the knees, and I eventually gave in to their pleas.  Why not?  They will give my smokey chipotle black beans some nice depth of flavor and add a different texture.
"I told you so..." said the little voice over my shoulder.
All this time I thought it was trying to tell me an inappropriate story, but it was suggesting all along to give in to the fusion, speaking of the beans..
Serves 4-6
Ingredients
1/2 cup dried black beans
1/2 cup dried pinto beans
3-4 cups water
1 chicken or vegetable bouillon cube
1 large chopped onion
1 large carrot, peeled and chopped
4 cloves garlic, grated
3 chiptole chilis in adobo sauce, chopped into chunks
1 tbsp tomato paste
1/4 tsp ground cumin
Juice from 1 lemon
1 Tbsp apple cider vinegar
1 Tbsp EVOO
Pinch of salt
Garnish:
chopped cilantro
chopped scallions
Directions
1.  Heat the olive oil in a heavy based pan and add the onions with a pinch of salt.  Let color a few minutes, then add the carrots.  Cook for about 5-10 minutes.
2.  Add the garlic and cook another minute.
3.  Transfer the lovely mixture into a slow cooker, followed by all the other ingredients.
4.  Cook on low for 7-8 hours.
This is beautiful on its own, but I served mine with some roasted chicken thighs, rice, and avocado slices.
I'm very happy I listened to that little voice over my shoulder.  The mixture of the two beans take this to a whole other level.  The smokiness of the chipotle peppers infuses differently into the black bean than the pinto bean.
Aren't I a lucky one to be able to satisfy myself to this magnitude..all it takes is that little whisper..

Print Friendly and PDF

Saturday, July 12, 2014

Apricot Fig Pie with Pistachio Almond Sand

I was recently gifted with fresh juicy apricots and figs.  Fresh figs off the tree, so juicy and fabulous, you can't help but let out a little sigh when taking the first bite.  When I cut them for this pie, I felt amazed at how intricate their interior design is.  It's like post modern meets classic.  Then I saw them blush for having their intimate parts are so rarely exposed fresh.  The apricots are equally amazing, but their interior design is minimalist, yet eternally classy.
I have to admit when I started making this pie, I had no idea where I was going with it, apart from the fact I wanted apricots and pistachios in it.  As I went along, I realized I didn't have enough apricots to cover the whole pie..so I grabbed the last 2 figs and completed the filling.  As I doubted myself, my little voice told me to keep it up, even if the figs weren't enough, we'll find something.  The best part of traveling is the journey, not the destination, right?
Serves 6-8
Ingredients
400g (about 8 whole) apricots, pitted and cut into 8ths
2 large juicy figs, carefully cut into 8ths
2Tbsp ground almonds
2Tbsp ground pistachios
2Tbsp dark brown sugar
1 shortcrust, poked and precooked 5 minutes
Directions
1.  Mix the ground pistachios, almonds, and brown sugar together.  This is your sand.
2.  Cover the bottom of you shortcrust with the sand.  Keep about 1 Tbsp of it for the topping.
3.  Lay your apricot 8ths into the sand, making sure you keep them nice and snuggled together.  I had them side spoon eachbother to the right on one round, then to the left on the other round.  Lay your fig 8ths in the center, following the same logic as for the apricots.
 4.  Sprinkle the rest of the sand over the top.
5.  Bake at 210°C 410°F for 15 minutes, then lower the temp to 180°C 350°F and bake for another 35-40 minutes.
Let cool to room temperature before eating.

As you may have just realized, this is quite simple, but it's grade A material.
That pie is perfect in so many ways (as is the ginger laced crust).  The idea came naturally, the flavors combined well, the juiced from the fruit were soaked up by the sand, it wasn't too sweet, the fruit still had flavor, and it didn't need any whipped cream or any sort of adornment at all.
I'll definitely be making similar things in the future.. but lets not make any projections just yet..

Print Friendly and PDF

Sardine Hammam

 There is nothing new going on here, but I thought these little ladies were so pretty marinating in their little mixture, waiting for their turn on the plancha, that I needed to photograph them.  That's 2 and a half layers of orderly sardines drizzled in lemon juice, garlic, piment d'espelette, and olive oil.
Nothing beats bbq season like fresh Mediterranean sardines.  This is the first of many I'm planning for the summer.
Followed by some excellent firm shrimp marinated in orange juice, garlic, fleur de sel, black pepper, and chopped parsley.

Can Life get any better than this?

Print Friendly and PDF

Thursday, July 10, 2014

Floor Yourself Salad with Apricots and Feta

Ok, so.. this was not a planned event.  The planned event was a big honking griddled steak and a simple salad.
A simple salad for me is just some red oak leaf lettuce and batavia leaves in some tangy vinaigrette made of mustard, special olive oil, and cider vinegar.  That's how it started, really, but then I heard some incredible siren-like voices that seemed a bit muffled.  I started searching and placing my right ear onto windows and cupboards, trying to figure out the source of the hypnotizing voices.  I eventually evolved toward the fridge, where the song sweetened.  "No... pobrecitas!" I thought, "The lovely things are trapped inside!"  After opening the pleasure box (or pleasure prison, depending on who's side you're on) I discovered my lovely tree-to-my-hands apricots in a harmonized acapello, dedicated to me.  Moved by their lullaby, I plucked one from the group and inspired its aroma.  It softly whispered to me, "take me now.. I am ready."  This is obviously an offer I can't refuse, I must find a way to integrate this beauty into myself through a dish. In response to the pleads, I sliced the plump sweet organic apricot and sprinkled it over my greens.
Now what?  The Happy Place drawer is calling.  I knew right away that my pine nuts were dying to participate, after hearing all the commotion.  I indulged their wants by sprinkling a few over my apricots and greens.
"This salad is starting to have some personality," I thought to myself, "but something is missing..."
And that's when the feta pranced in, taking this nice interesting salad into an all out Floor-Yourself-In-The-First-Bite salad.
Of course the griddled steak was good, that's a constant truth..

... but this salad..

.. there are no words..

Print Friendly and PDF

Wednesday, July 9, 2014

Shitake and Kelp Linguine

After discovering the loveliness of kelp (and ending up with too much of it) I repurposed it into this very interesting pasta.  Interesting because, who adds kelp in pasta?  I do.  But I didn't do the Asian spin on it.  I did it creamy style with some sliced shitake mushrooms, tomatoes, garlic, and some cream.  That's it, and it is a nice spin from ordinary pasta dishes.  These are flavors that go so well together it just gets me all tied up in a knot.
The kelp adds the sea saltiness, the shitakes add the meatiness, the tomatoes add a bit of fresh, the garlic a bit of bite, and the cream ties it all together.  It's also a perfect way to use up any kelp you may have made too much of.
Serves 4
Ingredients
350g (3/4 lb) linguine, cooked al dente
30g (1oz) dried kelp, soaked in warm water until rehydrated
8-9 dried shitake mushrooms, soaked in warm water, then sliced
2 gloves garlic, grated
1 tomato, chopped
lots of fresh cracked pepper
1/2 cup heavy cream
some reserved water from cooking pasta
fleur de sel to taste
parmesan for garnish
1 Tbsp EVOO
Directions
1.  Heat the oil in a heavy based pan or wok and add the sliced shitakes with a pinch of salt.  Cook, stirring until slightly colored.
2.  Add the kelp and garlic and cook for about 1-2 minutes, stirring.
3.  Add the chopped tomato and lots of pepper.  Remove from heat.
4.  Toss the hot linguine with the cream and the kelp shitake mixture.  If it seems too dry, add some of the pasta cooking water and coat the noodles well.

Garnish with some grated parmesan and serve piping hot.

This meal was simple but intriguing at the same time.  The shitakes are a newfound infatuation.  I know I've had them before, but I've never worked them as I've been doing this week, and they are soooo MeaTy!  When you bite into them it's like you're biting into a piece of beef, but that tastes like an amazing shitake.
How did they do that? Where's the Food?
It might seem like I'm purposely eating tomatoes and mushrooms.. but it really is not as it seems.  These items just happen to be appearing in my life and I am embracing them enthusiastically..

Print Friendly and PDF

Tuesday, July 8, 2014

Sichuan Kelp Salad

I've gotten to a point where I can more or less invent a dish using region specific ingredients, and then casually name that dish as being a dish from that region.. and after making sure I'm not being sacrilegious, it turns out my "invention" is something that would be home cooked in that region.
To be a bit less general, my target region is Sichuan, China.  To make a Sichuanese marinade or dressing, you pretty much use the same basic ingredients.  Doubanjiang, sesame oil, black vinegar, cooking wine, and soy sauce with varying ingredients being Sichuan peppercorns, sugar, garlic, ginger, seeds...
Once you understand the seasoning, you can use Chinese vegetables and mushrooms to make a stir fry, soup, or salad.  Here I used dried kelp I cooked and rehydrated to make a hot/cold salad.  The hot being some grilled marinated chicken and shitakes, the cold being the kelp acting as cold noodle with some fresh, herbal, and crunch.
Certain recipes require studying beforehand, technique, and concentration.  Others only require understanding.  This is one of those understanding recipes.
Lets talk about that kelp.  The bag had 60g dried kelp, which is peanuts.  I thought it would make only one serving.  The thing is, once you cook it, it rehydrates and quadruples in size, making it enough for 4.  Oh no worries, I will find ways to repurpose it.
While cooking it smells like the ocean.  It's a soothing aroma.  In the salad it did not taste fishy at all, but acted as noodles.  I'm aware there is a product called "kelp noodles."  This is not that product.. though I will be seeking those out next time I take a trip to Asian Wonderland.  Kelp is a great fight food.  It's full of vitamins, minerals, iodine, chlorophyll.. and protects from radiation and reduces it in the body.. which makes it an appropriate food for anyone, especially the extreme orient (with their recent radiation troubles).  It's fun to play around with and it keeps like pasta when dried, or can be frozen.  There really isn't a reason not to include kelp in the kitchen.  You never know when you might have an urge.
Serves 2
Ingredients
30g (1oz) dried kelp, soaked
1/2 julienned cucumber
6-8 shitake mushrooms, soaked if dried, then sliced
2 chicken cutlets, cubed (or more mushrooms if veg)
1 Tbsp oil
marinade:
1 tsp doubanjiang (Pixian broadbean chili paste)
1 tsp sesame oil
1 tsp black vinegar
1/2 tsp whole Sichuan peppercorns, lightly crushed
dressing:
1 tsp doubanjiang
1 tsp sesame oil
1 tsp rice vinegar
1 tsp mirin
1 tsp light soy sauce
1 clove garlic, grated
toppings:
chopped basil
chopped mint
crushed peanuts
1 tsp sesame seeds
fried onions or shallots (thought of it too late)
Directions
1.  Make the marinade and rub it into the chicken and mushrooms.  Set aside while you chop and prepare the rest.
2.  Cook the kelp in some boiling water for 5 minutes.  Drain and rinse with cold water until cooled, then set aside (preferably in the fridge)
3.  Heat the oil in a wok and add the sliced shitakes.  Let them cook a few minutes, then add the chicken.  Stir fry for about 3-5 minutes until all cooked through.
4.  Assemble.  Place a portion of kelp in your serving dish.  Make a spot for each item, the shitakes, the chicken, the herbs, the cucumber.. then spoon some dressing over it all.  Top with the crunch toppings, the peanuts and sesame seeds.  Now that I think about it, some fried onions would have been lovely here as well.  Ah maybe next time.
5.  Observe and take in the beauty of your creation, then tear the sheets off the bed and throw the blanket to one side, the pillows in the middle, and plop yourself onto the pile.
see translation = stir it together with your chopsticks.
This was pure delight.  The most surprising part is how full I was after eating this.  It's basically a salad, but that kelp really satiates.. and those mushrooms are so meaty they stand out all on their own.  This could easily be all vegetarian if you skipped the chicken and doubled the shitakes! 
I would not be shy serving a salad like this to a Chinese friend.  I'm sure that friend grew up eating salads like this.. seasoned like this.. made with love like this... which is why I can proudly call it a Sichuan Kelp Salad.

Print Friendly and PDF

Monday, July 7, 2014

Kadhai Golden Egg Curry

After Kadhai Chicken and Kadhai Paneer, here is my little twist, the Kadhai Golden Egg, inspired by Burmese Golden Egg Curry.
My hallucination day led me to this curry.  This is drug free hallucination, mind you..I just have a powerful imagination at times, mostly when I'm in the kitchen.  While writing this, a memory just flashed before me..the one of my mother cooking diligently, and I walk in, wanting to help, but surely making things worse since I have no idea what to do or how to do it..and my mother freaking out over something seemingly silly, such as moving the carrots over to make space for the salad bowl.  My reaction at that time was.."you get schizophrenic in the kitchen" and that little description lived on for years to come.  I'm not sure the scene went exactly as I described, since it was so long ago, but it's the result that made it so memorable.  Whenever we would talk about being schizophrenic, we were obviously referring to cooking, and only a couple of people in my world would even understand  anything I have just described.  That flash has made me realize tha I am truly my mother's production in the purest form.  I felt "schizophrenic" today...in  a way only my mother would understand..
Serves 4
Ingredients:
6 steamed or hard boiled eggs, peeled
Pinch turmeric
3 Tbsp canola oil
2 Tbsp coriander seeds
1/4 tsp fenugreek seeds
2 whole dried chilis
1 large onion, sliced
1 bell pepper, sliced
2 Tbsp minced garlic
2 Tbsp minced ginger
2 chopped tomatoes
1 tsp chili powder
1/2 tsp amchur (mango powder)
1 tsp garam masala
1/2 tsp turmeric
salt to taste
1/2 cup whole milk to taste
julienned ginger for garnish
Directions:
1.  Dry roast coriander and fenugreek seeds with the dried chilies.  Crush with a mortar and pestle.  Set aside.
2.  Heat the oil in a wok and fizz in a pinch of turmeric.  Add the peeled eggs and cook until the skin has blistered all around.  Remove and set aside.  Leave about 1 Tbsp oil in the wok and pour out the rest.
3.  In the remaining oil, fry onions until brown.  Add the ginger and garlic and cook, stirring for 2 minutes.
4.  Add the tomatoes and cook until soft.
5.  Add the ground spice mix, then add some salt and the rest of the spices and cook for 10-15 minutes, stirring on low heat.
6.  Add the sliced bell pepper and milk.  Cook until boiling, then reduce heat until bell is desired tenderness.
7.  Add the eggs back in about 5 minutes before serving, to heat through.
I served with some cold Caviar Lentils and Khaman Dhokla

Print Friendly and PDF

Sunday, July 6, 2014

Carrot Halwa Burfi

If you were to take a tour through my brain today, you would have to shield your eyes or cover your ears at one point, but generally, you would find yourself in a minimalist kitchen surrounded by women of various ages in saris all performing a different task involving toasting, shaping, or simmering Indian snacks and desserts.  All of us working together, singing, laughing, and merrily chatting in preparation for the big event.  You would find all this natural and normal and would either watch in amusement or wash your hands and join us without for one moment asking youself what that big event is..
Well, when reality politely kicks you out of my brain, you will realize you are alone in your kitchen in an apartment in France, in shorts, probably talking or singing to yourself while busy doing various tasks in preparation for...well, nothing really, but feeling so much joy anyhow.
Sometimes my brain is a fun place to be..I wouldn't rather be anywhere else, actually.
So, since reality is only a question of point of view, my task requires halwa making skills, but as I may have mentioned before, halwa is not very portable.  You kind of have to serve it in a little dish with a spoon.  You can't just randomly distribute it without going around collecting your empty recipients at one point.
My plan is not to randomly distribute my halwa.  I have a very targetted and thought out distribution plan, but still, I wanted it to be easy to eat with the hands and somewhat portable.
I've done the fusion thing before and baked it into a cookie, and it was spectacular.  Here I'm going the more traditional route and making it into Burfi.  I'm really not changing anything from the original carrot halwa except the cooking time, so there is less moisture and I can shape it and cut it easily when it cools.
There is no difference in taste, but oh will there be a difference in appropriate times to eat halwa!
Now, this halwa can be enjoyed anytime throughout the day (or night) instead of waiting for dessert time.  That alone makes the big huge difference.
Yield approximately 16 Burfis
Ingredients
400g (approx 1 lb) grated carrots (5 medium)
3/4 can sweetened condensed milk (about 1 cup)
1/4 cup desiccated coconut
7 cardamom pods, dry roasted and ground
1/4 cup slivered almonds
1/4 cup raisins
3 Tbsp ghee or oil
Directions
1.  Heat the oil in a wok and add the grated carrots.  Stir well to make sure they all cook evenly.  Cook this way until they slightly change color and become tender, about 5-7 minutes.
2.  Add the condensed milk.  Lower the heat a bit and cook, stirring until lost of the liquid evaporates, about 15 minutes.
3.  Add the coconut, ground cardamom, raisins, and almond slivers.  Turn heat to low, stir, and cook until it thickens, about another 10 minutes.  I'm givinh time indications, but if you place the halwa on one side od the pan and liquid leaks out, it's not done yet.
4.  Place some parchment paper in a rectangular oven tin, the press the halwa into it, being careful not to burn yourself.  Shape it the way you want, then refrigerate until cool.  It should have slightly hardened and be easy to cut.
5.  Cut into diamond shapes (or whichever burfi shape you like) and you are ready to distribute!

This is just classic, accompanied by some Sesame Date and Sweet Coconut Ladoo.
I had to hide it before my lady peers ate it all...

Print Friendly and PDF

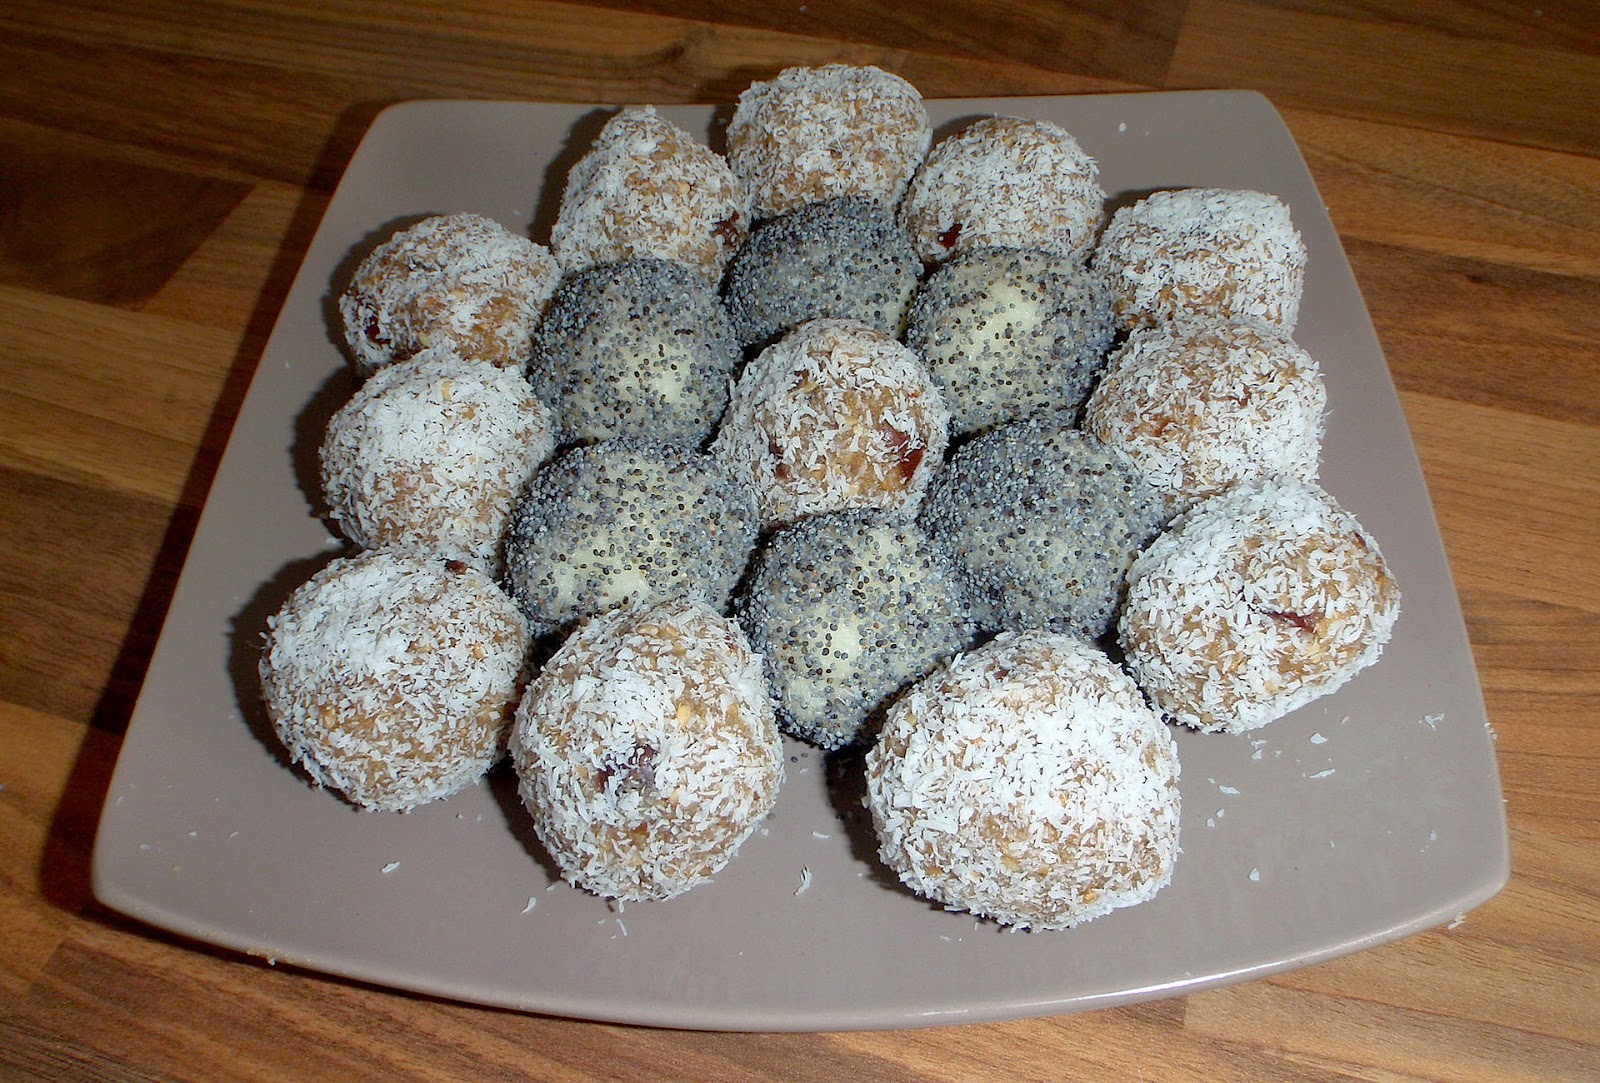
Sweet Coconut and Sesame-Date Ladoo

Ladoo is a Sanskrit word for "small ball."  In India, ladoos are often sweet treats of various compositions often served at weddings, used as offerings during Hindu religious ceremonies, and served as a traditional dessert during the holy month of Ramadan.
The timing seems perfect now to respond to my lingering urge of making ladoos.  It turns out they are very simple to make and require little to no cooking.  The best part is that most of the work is done between the palms of your hands, which means the person wh will be enjoying your work should first taste the love you spilled into the ladoo, then taste the sweet.
Here I decided to make two versions.  One healthy and almost vegan, and another sweet and decadent.
When I say almost vegan, it's because I used 1 tbsp of honey, and honey, as I recently discovered, is considered non-vegan although it is a pure gift from God, which makes it even more appropriate as a sweetener for ladoos.  That little rule (and the fact that I love eggs and cheese) makes it a complete impossibility for me to go vegan.  I mean how could one possibly live without honey??  Isn't our very  purpose in this life to seek out and find all the different types of honey this earth has to offer?
Anyway, if you are vegan, just use a less than stellar substitute and life will continue on in its dull honey-less fashion.

Sesame Date Ladoo
Yield 12
Ingredients
1 cup sesame seeds
3/4 cup chopped pitted dates
1/2 cup dessicated coconut
1 Tbsp honey (I used rosemary)
1 Tbsp water
Dry coconut for dusting
Directions
1.  Dry roast the sesame seeds until fragrant, about 2-3 minutes.  Transfer to a spice grinder and pulse for about 3-4 seconds.  You are not trying to make tahini here, just burst open the sesame seeds.  Reserve into a mixing bowl.
2.  Dry roast the coconut about 1-2 minutes.  Add to the mixing bowl.
3.  Add the dates, honey, and water and start to knead.  Yes you will get it all over your fingers, but it is necessary to feel the lovely textures at your digital extremeties.
4.  Once the dough is well mixed, make small balls about the size of a mini golf ball (if that even exists).  Roll them well between your palms, singing or humming your current emotion.
5.  Dust each ball with some dry coconut and refrigerate until ready to serve.

Sweet Coconut Ladoo
Yield 10
Ingredients
1 cup dessicated coconut
1/2 cup sweetened condensed milk
Poppy seeds for dusting
Directions
1.  Knead the coconut and condensed milk together to form a ball of dough.
2.  Make little balls and roll them between your palms, concentrating your loving thoughts into each one.
3.  Dust each ball with some poppy seeds and refrigerate until ready to serve.

So If there were to be an order in which to enjoy the ladoo, I would start with the Sesame Date Ladoo.  These are not too sweet, but full of sesame flavor decorated with specks of date.  These would be more of a fast-breaker.
The Sweet Coconut Ladoo are decadent and very sweet.. dessert like.  These would be appropriate for  a bit of indulging.  They leave a lingering taste and have a very interesting texture.

We may now move onto the other tasks at hand.. for this is just the beginning.. since I opened up a can of condensed milk, I had to figure something out before eating it all by the spoonful...

Print Friendly and PDF

Thursday, July 3, 2014

Caviar Lentil and Mackerel Salad

I've never experienced actual Beluga Sturgeon caviar.  All I have been exposed to are salmon roe or lump eggs...both of which I thoroughly enjoy.  I don't particularly care for tarama, which is strange since that's what is most accessible in these parts.
These black lentils are known as Beluga lentils due to their shiny black color.  They lose a bit of that color during cooking, but are full of flavor and distinguishable from other lentils.  I usually do lentils Indian style, but I was told these are great cold, and I could trust my composed salad making instincts to bring the best out of this veg caviar.
You may not see it, but I laid them on a bed of grated carrots, then surrounded the arrangement with sliced tomatoes, basil, and feta.
Finally I placed some mackerel filets over the top, which made some nice volume in the plate that may not be noticeable, but which I greatly appreciated.
Serves 2-3
Ingredients
Caviar Lentils:
6 oz (18cL) dried black lentils, rinsed
plenty of water
drizzle extra special olive oil
pinch of fleur de sel
few cracks black pepper
juice from 1/2 lime
1/2 tsp cider vinegar
1 diced shallot
Grated Carrots:
2 large carrots, peeled and grated
1 large clove garlic, grated
1 Tbsp extra special olive oil
juice from 1/2 lime
pinch fleur de sel
few cracks black pepper
Toppings:
1 juicy vine tomato, sliced and halved
crumbled feta
few basil leaves
naked grilled or steamed or canned mackerel
Directions
1.  Cook the lentils in plenty of water until bite tender, but not mushy.  I'd say about 20 minutes simmering, but do the taste test to be sure.
2.  Rinse under cold water to cool, then toss (or shake) with the other "Caviar Lentils" ingredients.
3.  Toss or shake the "Grated Carrots" ingredients together.
4.  Arrange everybody nicely in your plate.

Each item has its place, make sure you don't get confused in the placement.
Through the course of your life or meal, all the ingredients will mix together, infusing your mind and body with ultimate delight.  During this time, each ingredient will lose it's individual purpose, but will serve you for the greater good.

That Mackerel has absolutely no idea it would be paired with caviar.. but it is enjoying the moment so much, it is blinded by love...
One day I will experience and enjoy real Beluga Sturgeon Caviar, but that day, I will be the producer..
Why worry about tomorrow when you can enjoy today?

Print Friendly and PDF

Wednesday, July 2, 2014

Rolled Turkey Roast with Lemon Quinoa

Alright alright.. I don't always eat salad.  Actually, I only eat salads by craving.  I went through a major salad craze that may not be completely over, but tonight I took a salad break for some roasted food.
Here in France, you can find turkey breast rolled into a roast and bound together with string.  It's actually a strange concept, but works well.  Since it's rolled, they stay moist throughout the roasting instead of becoming dry as if you roasted just a full breast.  It's a concept I like because it stays together well like a log in the oven, and then slices nicely with no bone in the way.
Since I was turning the oven on to roast, I decided to use it to its full extent and roast some eggplant slices, tomato, and zucchini in there as well, you know, to kill 2 birds.
This was a great idea, by the way.  There are few more exciting ways to "dĂ©guste" these types of vegetables than roasted or grilled.  The tomatoes become just sublime, the eggplant creamy, and the zucchini just mildly colored and still crunchy.
I also did a no fuss deal.  My rolled turkey roast was frozen when I plopped it into the oven with a drizzle of olive oil, some fleur de sel, and some thyme.  I cooked it at 190°C for about an hour and a half, basting every once in a while.
About halfway through, I slid some olive oiled zucchini sticks, eggplant slices, and tomatoes into the oven.  I sprinkled all fo it with a touch of fleur de sel, some piment d'espelette, some black pepper, and some thyme.
I also cooked up about a cup of quinoa with 1 cup salted water, juice from 1/2 lemon, 1 large grated garlic clove, and 2 Tbsp chopped basil.  I cooked this covered on low until all the liquid was absorbed.

The end result was both hot, creamy, tangy, and meaty.  The lemony quinoa with basil made my heart leap.  
This was exactly the type of comfort I needed to calm my violent uproar of voices in my head.. making me take long deep breaths with my eyes closed and my head slightly tilted back.
Hopefully this remedy will work at least until tomorrow.. 

Print Friendly and PDF

Tuesday, July 1, 2014

Watermelon Basil Chili Salad

Welcome to July.  Time is flying by so fast I'm not even sure what my name is anymore or which language I'm supposed to be speaking at what time of the day.
The basil in season these days has one of those lingering aromas that sticks with you all evening.  Just catching a whiff makes my heart thump and my limbs tingle.
Basil is sophisticated and fresh, and when paired with watermelon, it creates something outstanding.
I've made a similar salad before, but here I decided to keep it simple.  No tomatoes, vinegar, or red onion.  I wanted to keep the watermelon chaste.
The watermelon I used is baby watermelon.  The seeds are black but so small they don't bother me while eating.  And oh is it perfectly sweet and crunchy.  I love that about watermelon.. it gushes with a subtly sweet flavor while staying crisp.. but so juicy.. but so firm..
oh dear, I'm hyperventilating..
Serves 1
Ingredients
as much watermelon as you feel like eating, cubed
1 Tbsp chopped basil
1 Tbsp chopped scallions
1 small handful crumbled feta
1 thai chili
juice from 1/4 lemon
light drizzle of EVOO

Have this alongside some grilled sardines, and start singing Great Gig in the Sky like a madwoman.. but in a good way..

Print Friendly and PDF