Search this blog

Translate

Showing posts with label Dessert. Show all posts

Sunday, March 19, 2017

Single Layer Carrot Cake with Olive Oil

It took me 3 rounds of baking this cake before I actually got a chance to snap a shot of a slice, let alone post the recipe.
That's how fast it goes.
The last time I made it was for my Mother in Law, who had never had carrot cake before, and thought the idea was interesting.  As I grated my carrots and prepared the olive oil, I could literally see the question marks above my in-law's heads as I told them I was making a cake for dessert.  They really thought I was pulling their legs and I was making some sort of appetizer.

Everything was settled once they had a slice and made 2 break through discoveries:  
1.  Carrots can be used in dessert!
2.  The French are not the only ones who can do dessert!

Come on now, everyone who has eaten at my table several times has had carrot or beetroot halwa before.. this really shouldn't be a surprise to anyone!

So I now present to you the most requested dessert (and easiest one to make) in my house, 
the Single Layer Carrot Cake with Olive Oil.

Serves 10-12
Ingredients
Wet:
170g (6oz) brown sugar
180 mL (3/4 cup) Olive Oil
60g (1/4 cup) plain yogurt
3 large eggs
Dry:
2 tsp vanilla extract or 1 packet vanilla sugar
250g (2 cups) flour
1 tsp baking soda
1/2 tsp salt
2 tsp ground cinnamon
1/4 tsp nutmeg
1/4 tsp freshly ground java pepper (or quality black pepper)
Fold in:
260-280g (2 cups) grated carrots (approximately 6 medium)
1 inch freshly grated ginger
60g (1/2 cup) raisins or 3/4 cup chopped pecans
Frosting:
100g (3.5oz) room temperature cream cheese
50g (1.76oz) softened butter
50g (1.76oz) icing sugar (powdered sugar)
1/2 tsp vanilla extract
2 Tbsp plain yogurt
1 tsp freshly grated ginger
pinch freshly ground java pepper

Directions
1.  Combine the dry ingredients and set aside.
2.  Beat the brown sugar, olive oil, and yogurt together for at least 1 minute.
3.  Add the eggs in one at a time, beating them in, then add the vanilla.
4.  Add the dry ingredients into the wet and stir until just combined.  This means not to mix it too much, but enough so the pockets of flour have disappeared.
5.  Fold in the grated carrots, ginger, and raisins very gently.
6.  I don't have one of those cake pans where the bottom drops out, and I don't believe I really need one, so I used a 20 x 25cm (8 x 10in) rectangular pan lined with parchment paper.  The parchment paper makes it easy to remove the cake from the pan and cut it nicely at the end.  Pour your batter into this and distribute it evenly.
7.  Bake at 180°C 350°F for 32-38 minutes.  Check for doneness by poking a toothpick into the center.  It is done when it comes out almost clean.  If it is totally clean, the cake will be less moist.
Each oven is different, so it's hard to give an exact time.  In my oven, it is perfect at 33-34 minutes.
8.  Remove from the oven and let cool to room temperature before frosting it.
9.  Make the frosting.   Beat the butter and cream cheese together, then incorporate the sugar, vanilla, ginger, and pepper.  It should be rather stiff.  To make it easier to spread, add the yogurt.  It should not be runny!  Don't screw this up!
10.  Apply the frosting with the back of a spoon or a frosting spatula so there is a nice thick even layer covering the entire top of the cake.  I'm not usually a frosting person, but trust me, this is necessary.  Don't think to hard about it.. just do it.
Cut the cake the way you like, into sizes you like, and serve at room temperature or cold.
You can add chopped pecans or raisins to each slice to make it pretty, instead of just plopping it onto the table, parchment paper and all the way I usually do.
The result is so moist and decadent, not too sweet, but just enough with a touch of zesty happiness.
No, you can't taste the olive oil.  No, it doesn't taste like a salad.
It actually gets better the next day...
and the next..
and the next after that..

Print Friendly and PDF

Wednesday, September 7, 2016

Extra Dark Chocolate Brownies

Interestingly enough, I have never in my entire life been a brownie baker.  I've been a brownie eater, but I'd never ventured into that domain before.  Until, that is, brownies were requested from me.
It is hard for me to not fulfill a request related to food.  Especially when that request is for something American, Indian, or Mexican.
So I took on the request.. it really can't be that complicated to make brownies, right?
Well, it depends how you like them.  There are 3 categories of brownie preferences:  cakey, chewy, or fudgy.  The ingredients and cooking times will depend on what you are going for.  My requester obviously had no idea what I was talking about, so I first tried a cakey recipe.  My first try was awful.  I mostly followed the recipe, but I must have overcooked them.  Plus, I realized that my requestor was not a cakey fan.  That one didn't make the cut.
Then I found this one.. a nice fudgy heaven using cacao powder.. meaning REAL chocolate.  The result is absolutely perfect.  I did reduce the sugar a bit because 250g seemed a bit much.  This is one I will be making over and over with different variants (candied ginger instead of chopped chocolate).  It got a thumbs up from every person who tried them.  I never need to search for a brownie recipe again.  This is the ONE.
Borrowed from InspiredTaste.
Ingredients
145g (10 Tbsp) butter
200g (1 cup) sugar
65g (3/4 cup) 100% cacao powder
1/4 tsp sea salt
1 tsp vanilla extract
3 Tbsp ginger powder
2 large eggs
70g (1/2 cup) flour
75g (2.6oz) chopped dark chocolate (or chocolate chips or nuts)
Directions
1.  Place a mixing bowl on top of a pot of simmering water and melt the butter, sugar, and cacao powder while whisking.  This will help it melt gently without burning while nicely infusing the butter with the chocolate.  Set aside to cool.
2.  When cool, stir in the salt, vanilla, and ginger powder and mix well.  I used a wooden spoon.
3.  Drop the eggs in one at a time, beating well each time.  The mixture should go from grainy to glossy, but still nice and thick.  Beat this mixture very very well.
4.  Gently stir in the flour until fully incorporated, then stir in the chopped chocolate or nuts.
5.  Line a baking dish with parchment paper.  Mine was 20 x25 cm (approx 8x10 inch).  The smaller the dish, the taller the brownies. The inverse is also true.  Scrape the batter onto the parchment paper and level it out as much as possible.
6.  Bake at 165°C 325°F for 20-30 minutes.  Mine took exactly 25 minutes.  This may depend on the size of the dish.  Check it after 20 minutes.  A toothpick in the middle should come out almost clean.  The top should be crinkly.  That's good stuff.
7.  Let cool all the way before slicing.
I sliced too soon, but that's ok.
The sugar can probably be reduced to 180g.
The best is to pop in the fridge until cold enough to slice and peel off the parchment paper.. otherwise.. it is a delicious gooey mess and you'll have more on your fingers than in your portions.
This freezes and defrosts very well, too, from what I've heard, but they don't last long enough in this house for me to try that out...


Print Friendly and PDF

Friday, July 22, 2016

Mexican Flan with Rapadura Caramel

My inner Abuelita feels the need to go traditional Mex and my outer Experimental self feels the need to add a touch of Steph... with burned fingertips...
I was recently gifted a package of rapadura, unrefined sugar crystals from sugar cane, also known as panela.  It is blondish brown (not cassonade) and has a deep lasting taste, similar to molasses.  If using sugar at all, it makes sense to use the queen of it all, Rapadura, you will adorn my Flan.

Serves 8 (or fills a 24x10x6 cm mould)

Ingredients
1 cup rapadura (panela) sugar
3 eggs + 3 yolks
1 cup whole milk
1 Tbsp cornstarch
1 can sweetened condensed milk
1 cup heavy cream
1 tsp vanilla extract
1 Tbsp orange flower water
pinch cinnamon

Directions
1.  Prepare the caramel.  Pour the cup of rapadura sugar into a pan and heat on medium high, continuously stirring, until it melts into a liquid caramel mixture.  The continuous stirring makes sure it doesn't burn, but do not overcook it or it will burn.
2.  Pour the liquid caramel into the bottom of your mould.  Do not wipe the remaining caramel off your utensils with your fingers.  It burns.  I learned that the hard way.
3.  Prepare the flan mixture.  Beat the eggs and yolks together.  Stir the cornstarch into a bit of milk until it dissolves completely and leaves no chunks.  Then add to the eggs and beat well.  Add the rest of the ingredients an beat into a homogenous mixture.
4.  Preheat the oven to 175°C 350°F.  
5.  Pour the flan mixture into the mould over the rapadura caramel.
6.  Place the filled mould in a larger pan and fill the pan halfway up the mould with boiling water.  This is called a Bain-Marie.  Who is Marie?
7.  Cover the entire contraption with foil and place this whole ordeal (carefully) in the oven and cook for 1h10 or until the middle is only slightly jiggly.  I wonder if this would work in the crockpot...
8.  Refrigerate for at least 4 hours.

To serve, slip a sharp knife on all sides of the mould to loosen up the flan from its sheath.  Then, place a serving dish upside-down onto the mould and flip it all over.  It should slide out of the mould onto the dish.. with that lovely rapadura caramel dripping down on the sides.

Serve in slices.. and be satisfied.

Print Friendly and PDF

Thursday, April 21, 2016

Cardamom Chocolat Mousse with GOLD

So I finally got a good picture of some Mousse au Chocolat..
But this time, I used the 4 hand method with the Brother and used cardamom to spice it up. 
Since this was a special occasion.. it was carefully dusted it with GOLD.. you know, to make it proper to serve to the Father for his 62nd birthday..

Print Friendly and PDF

Thursday, December 31, 2015

Pomegranate & Ginger Flan Patissier

It was my turn to host NYE this year.  I had a spectacular feast of wasabi lump eggs, oysters on the half shell, shrimp, homemade egg rolls, crocodile steak in green coconut curry, and lovely French cheeses.  It was a fusion of cultures within each course.. a perfect representation of this year.  To top it off, I wanted something beautiful.. and no.. no Buche.  I'm not a buche type of girl.
After researching a bit on different traditions, I found that it brings good fortune to eat round things on NYE and New Year's Day.  In the dessert section, it is often round cakes.  Pie is round.. right?  I am a pie type of girl.. but what?
I finally settled on something simple.. a Parisian Flan.  Alone, it is an everyday type of dessert.. but I decided to lace it up in a ruby crusted corset to make it sexy enough for the occasion.
Round fruits are also signs of good fortune.. and pomegranate fits right into that category.  Plus, it makes me think of precious rubies scattered all over my plate.
I also learned that eating pomegranate seeds promotes fertility.. hmm... interesting.
One never knows what the year to come has in store for us.  I never in my life would have imagined living the events that happened in this past year.
Life is Beautiful
Serves 8-10
Ingredients
shortcrust:
100g (3.5oz) butter, cubed
100g (3.5oz) buckwheat flour
125g (4.4oz) flour
pinch salt
1 Tbsp nutritional yeast
1 packet vanilla sugar
2 Tbsp cane sugar
1 tsp ginger powder
1/2 tsp cinnamon
1 egg yolk
5 cL (approx 2 floz) water
Use the method, then pre-bake for 10 minutes at 190°C

Filling:
75cL milk
20 cL cream
70g (2.5oz) cornstarch
4 egg yolks + 1 whole egg
90g (3.2oz) cane sugar
2 tsp freshly grated ginger
1/4 tsp salt
1 tsp vanilla extract
30g (1.1oz) butter butter
seeds from 1 pomegranate
handful chopped candied ginger

Topping:
seeds from 1 pomegranate
drizzle of pomegranate molasses

Directions
1.  In a mixing bowl, whisk part of the milk with the cornstarch until evenly dissolved, then beat the rest of the milk, eggs, sugar, fresh ginger, and salt until even without lumps.
2.  Pour the mixture into a pot and heat on medium high on the stovetop.  Whisk continually and the mixture will thicken.
3.  Remove from heat and whisk in the butter, pomegranate seeds, vanilla, and candied ginger.
4.  Pour the mixture into the pre-backed shortcrust and bake for 40 minutes at 180°C 350°F.
5.  Let cool!  This step is important.  You want it to be chilled or at room temperature.  The chilling can be done in the fridge.
To serve, cut a slice and spoon some fresh pomegranate seeds onto it.  I love the look of fresh pomegranate seeds.. it's studded with rubies!
Then to make it extra fancy, drizzle some of that sexy pomegranate molasses onto the plate.
My artistic father would be proud of this creation.

The result is a mixture of textures and tastes.. sweet, sour, crunchy, nutty, spicy.  It is the perfect jewel for a perfect end to the most incredible year I've lived since being in France.
Happy New Year to all!

Print Friendly and PDF

Monday, December 28, 2015

Three-Ginger Pecan Pie

Pecan pie has been on my mind for a few years now.  I have some old Thanksgiving memories of a tooth-achingly sweet but absolutely fabulous pie with pecans forming a top crust and a gelatinous custard underneath I could never figure out.  Coming from the desert, I would joke that it was cockroach pie because the intact pecans reminded me of the local Palmetto roaches that like to hang out in the swamp coolers.  I know.. this is not a very appetizing intro.. but I used to refuse to eat dates as well for the same reason.  Once I got past that little though, bliss became me.
The only reason I hadn't made pecan pie until now is that almost every single recipe called for corn syrup and cornstarch.
I know it's psychological, but I cannot knowingly put corn syrup into one of my desserts.  Plus, I can't handle very very sweet desserts.. at least not as much as I could when I was younger.  It actually horrified me when I found out what that jiggly sweet stuff was under the pecan crust.
So, I completely stopped looking for pecan pie recipes.
It's funny because it's when you stop actively looking for love that it hits you in the face.  A recipe literally called out to me with the magic word: Ginger.
It has 3 types of ginger; fresh, powdered, and candied, maple syrup instead of corn syrup, and no corn starch.  Plus, I could cut out all the refined sugar if I wanted because it wouldn't dramatically change the texture.
This one was a winner.. and I'm very happy I decided to go through and make myself a new pecan pie memory..
Adapted from David Lebovitz.
Serves 8
Ingredients
Shortcrust:
100g (3.5oz) butter, cubed
125g (4.4oz) buckwheat flour
125g (4.4oz) flour
pinch salt
1 Tbsp nutritional yeast
1 packet vanilla sugar
2 Tbsp cane sugar
1 tsp ginger powder
1/2 tsp cinnamon
1 egg yolk
5 cL (approx 2 floz) water
Use the method, then pre-bake for 10 minutes at 190°C

Filling:
3 Tbsp butter
juice from 1 lime
1/4 cup milk
3/4 cup maple syrup
2 tsp freshly grated ginger
1 tsp powdered ginger
1/4 tsp salt
1 1/2 tsp vanilla extract
3 eggs
225g (7.9oz) pecans, toasted and chopped
50g (1.8oz) chopped candied ginger

Directions
1.  Melt the butter in a saucepan and add the milk, maple syrup, lime, salt, fresh ginger, and powdered ginger.  Remove from heat, add the chopped pecans, and let infuse for about 10 minutes.
2.  In a mixing bowl, beat the eggs well with the vanilla extract.
3.  Add the infused mixture into the beaten eggs along with the chopped candied ginger and mix well.
4.  Pour the filling into the pre-baked shortcrust.  Bake at 350°F 180°C for about 40 minutes.
The recipe says it should jiggle.. mine didn't really jiggle, but after cooling for about 1 hour, it was very easy to cut into slices.
It was the most fabulous tasting dessert I've ever made.
It is probably better to eat it in the afternoon with tea, for after a heavy meal it is a bit hard to go through with your desire to eat 2 slices.
Ginger is really getting a hold on me this season!

Print Friendly and PDF

Friday, December 25, 2015

Banana Cream Pie

I know this doesn't look like anything sexy enough for a holiday dinner.  I wasn't planning on the banana I used as a topping to turn brown during chilling time.  Of course I should have known it.. but I just wasn't thinking.
This was, however, a mouthful (or several mouthfuls) of pure banana bliss.  Even non-dessert lovers ate their entire slice after an entire holiday meal!
I'm always weary of custards because you never really know how they're going to turn out until it's too late for a plan B.  If it says to chill 1 hour and you only let it chill 1 hour.. well, you're probably going to be out of luck.. because NOTHING sets in just 1 hour.  Those are lies.. all lies.
Also.. who tries a "needs time to set" recipe for the first time on Christmas Eve?  Someone crazy.. that's who.  Me.
Ingredients
Shortcrust:
80g butter, cubed
125g buckwheat flour
125g flour
pinch salt
1 Tbsp nutritional yeast
1 packet vanilla sugar
2 Tbsp cane sugar
1/2 tsp cinnamon
1 very ripe mashed banana
1 egg yolk
2 cL water
Use the method and bake for 30 minutes at 190°C
Filling:
75g cane sugar
1/3 cup cornstarch
1/4 tsp salt
1 1/2 cups coconut milk (or normal milk)
1 1/2 cups cream
3 egg yolks
1 tsp vanilla extract
2 Tbsp butter
1 banana sliced lengthwise
3 bananas sliced into 1/4 inch rounds
Directions
1.  Whisk together in order the sugar, cornstarch, salt, milk, cream, an egg yolks.
2.  Pour the mixture into a saucepan on medium to high heat.  Whisk continuously until the mixture thickens, about 6 minutes.  You don't want it to be clumpy, but evenly thick where it will not drip off a spoon.
3.  Remove from heat.  Whisk in the butter and vanilla extract until dissolved.  Let cool.
4.  In your pre-baked shortcrust, spread a hefty layer of custard on the bottom.  Add in the banana rounds in a layer.  Repeat until you run out of custard and bananas.
5.  If you want to make it like mine, add the last banana sliced lengthwise on the top of the last layer of custard.  This step can be done right before serving to avoid the browning.
6.  Chill in the fridge for at least 3-4 hours.  I let mine for 11.
After 11 hours, this baby was NOT runny.
It was a silky delectable consistency full of ripe banana flavor without being overwhelmingly sweet.
Just a perfect end to a delightful evening with Friends that are more like Family...

Print Friendly and PDF

Sunday, November 22, 2015

Persimmon Apple Cobbler with Green Chiles

This last week I've been trying to figure out a way to make an All American dessert to go with my Kale Chips and Chili.  I usually go with Pumpkin Pie but one of my guests had already witnessed that.. so I had to find something else to fit the theme.  I also wanted to use Persimmons because they are beautiful as adornments to their leafless trees and are really in season.  When I stumbled upon a cobbler recipe using green chiles.. it literally called out to me and took over my brain cells.  I twisted and turned the the idea in my head for an entire week, trying to figure out if I should make a pie, make individual ramekins of cobbler, make a crumble, or just go with the whole messy looking thing and call it "la bonne franquette," which means.. please don't mind the look, just enjoy.
Well, I'm happy I did because I discovered cobbler.  I don't remember ever eating anything called cobbler and I certainly have never made it before, so with a major cutdown on the original sugar amount (it called for more than double what I used) I had something nice and caramelized on top but creamy .. and slightly spicy on the inside.
This dessert could not have been more Me.
Inspired by HomesickTexan
Ingredients
Filling:
2 apples (I used Gala) peeled, cored, and diced
2 persimmons, peeled, cored, and diced
1-2 jalapeños, roasted, peeled, seeded, and diced
1/2 tsp cinnamon
1/4 tsp fivespice
1/8 tsp nutmeg
Juice from 1 lime
2 Tbsp dried pomegranate seeds
Crust:
100g (3.5oz) butter
50g (1.8oz) buckwheat flour
50g (1.8oz) oats
20g (0.7oz) wholewheat flour
75g (2.6oz) brown or cane sugar
2 tsp baking powder
Pinch salt
3/4 cup whole milk
Directions
1.  Toss all the filling ingredients together and place in a buttered pie dish, spread evenly.
2.  To make the batter, mix all the ingredients except the butter together.
3.  Melt the butter in a pan on low heat until completely melted.
4.  Pour the batter mixture over the butter off heat.  Do not stir.
5.  Pour the batter with the butter into the pie dish over the filling.
6.  Cook at 350°F 180°C for 45 minutes until the top is caramelized.
Eat warm!

When the cobbler is still warm, it will be hard to get it to slice like a pie.  It doesn't matter.  Just serve and enjoy!  Another variation is to make individual servings... but who wants to go through all that trouble when you just want to relax and have a good time?
Next time I will use even less sugar because I don't think it really needs it.  The fruit is so naturally sweet that it seems almost sacrilegious to take the attention away from it...

Print Friendly and PDF

Monday, October 19, 2015

Pear and Cocoa Bean Tart

It is pear season here in France, and although pears are not the fruit I go crazy nuts for, they can be quite sexy when paired with the right ingredients and served in the right crust.
Pears, Chocolate, and Ginger.. oh yes.. NOW we're talking!
I wanted to make something French for my American visitors.. which is quite hard because I mostly get off on making pumpkin pie, cookies, and burfi.. things all very familiar to my VIP guests.  While trying to come up with something not so out of the box, but something I had never thought to make, my trip to the market and the myriad varieties of pears on the stalls had me flowing with ideas.  In France, pears and chocolate are a typical dessert.  Usually the pear is poached and then dipped in a chocolate syrup.. or served with ice cream, chocolate, and whipped cream.  I'm pretty sure a chocolate & pear pie is a thing, too.. but I'm CERTAIN that they never put cinnamon or ginger in their desserts.
Which is why I was so happy to do it.. and why this dessert came out so classy!
Serves 8
Ingredients
Shortcrust:
100g (3.5oz) room temperature butter, cubed
130g (4.6oz) flour
100g (3.5oz) buckwheat flour
1 Tbsp nutritional yeast
Pinch salt
3 Tbsp cane sugar
1/2 tsp cinnamon
1 tsp ginger
1 egg yolk
5 cL water
Use the method, then pre-bake at 190°C 375°F for 10 minutes

Filling:
4 small pears, peeled, cored, and sliced crosswise (I used the Louise-Bonne variety)
1 egg + 1 egg yolk
Cream
1/2 tsp cinnamon
Pinch nutmeg
1 tsp ground ginger
1 packet vanilla sugar (or 1/2 tsp extract)
1 Tbsp cane sugar
15g (0.5oz) Crushed cocoa beans
40g (1.5oz) Dark chocolate shavings

Directions
1.  Beat the egg and extra yolk together in a mixing bowl until frothy, then beat in the cream, cinnamon, nutmeg, ginger, and sugar.
2.  Sprinkle 3/4 of the chocolate beans and shavings at the bottom of the pre-cooked shortcrust, then lay the pear slices, pressing them down diagonally onto the shavings.
3.  Pour the egg and cream mixture over the pear slices and sprinkle with the rest of the chocolate.
4.  Bake at 190° for 40 minutes or until golden.
5.  Let come to room temperature before serving (refrigerate for at least 1 hour).

This is probably the prettiest dessert I've every made.  I love the architecture of the slanted slices topped with dark chocolate.  It's also quite tasty and not too sweet, which is perfect for me.
The cocoa beans played a nice role presenting their deep roasted flavor that paired well with the pears and filling.  I've made this twice for completely different populations and I will be making it again with different fruit.. as long as I keep it pretty!

Print Friendly and PDF

Sunday, August 2, 2015

Hibiscus Spice Popsicles

I finally got my hands on some popsicle moulds!  Now all I want to do is use my bullet and freeze everything all the time!
I've been playing around with the hibiscus popsicle idea for a few years now.  I don't know why it took me so long.. maybe I was expecting to be making them somewhere other than my home, but either way, the only way to be sure to go through with an idea is to tackle it yourself.
As you may know, hibiscus has a natural hydrating and has a cooling effect as well, which makes it perfect for a hot day when you double the cooling effect with the freezing.  It is also used in diuretics but I don't really care about that part.
My hunt for these moulds was quite an event as well.  I went to 3 or 4 stores before finding something decent where the stick was long enough to hold what was going to be frozen on it.
This recipe is similar to a regular Agua de Jamaica, but a bit more intense on the hibiscus and spices infused.  A frozen treat needs to be more potent because the cold numbs the taste just a bit.  The usual remedy to this is to add more sugar.. but I'd rather just add some spice...
Mmm that deep red color makes me want to rub it all over my face!
Yield 20 popsicles + leftover iced tea
Ingredients
1/2 cup hibiscus flowers
2 star anis
4 cloves
2 Tbsp sugar
1 stick cinnamon
1/2 inch piece ginger
1vanilla stalk
1 1/ 2L water
Directions
1.  Place everything but the water in a large enough mixing bowl.
2.  Boil water and pour over the hibiscus and company.  Steep for 15 minutes, then strain through a very fine mesh.
3.  Pour into popsicle moulds and freeze for at least 12 hours.
Enjoy your refreshingly intriguing treats!

I love the deep red color of these popsicles.  The addition of vanilla was interesting.  It made it almost Caribbean in my mouth.  I felt it more in the iced tea than the popsicle, however.
Next time I would add more ginger and cinnamon.. and maybe a little chile for extra punch.. but then I'd have to think twice about sharing with my dog...
If you're not into frozen treats, this works perfectly as iced tea or hot tea as well.

Print Friendly and PDF

Sunday, May 31, 2015

Spiced Mousse au Chocolat

I've been somewhat intrigued by the texture of snow or stiff egg whites once they are chilled.  Mousse is so mysterious because you can break down pretty much anything and fold it into magically snowy egg whites and have this airy yet decadent dessert.  It is one of the reasons I liked the Tiramisu process and outcome.  Here is a traditional French recipe with just enough tinkering to make it my own.  I've been eating Mousse au Chocolat since I was very young, but only while visiting family in France.  I ended up thinking it was just something too impossible to recreate at home (yes I was very very young to be thinking that).  Yes, my mother is still afraid of raw or runny American eggs, just as she wouldn't eat any type of steak with a touch of pink in it.  She would only trust the French eggs from the neighbors yard but still would never have them raw or runny but for this tiny blissful exception.  After returning home to California after a summer in France, we would talk about all the wonderful things we ate and salivate just thinking about the next time we would get to spoon a bit of velvety chocolate mousse into our mouths.
Time went by and Mousse au Chocolat has been ever present in my life since moving to France, so I never really had the urge to make it.. Until very recently with my snowy eggwhite infatuation.  The first time I made Chocolate Mousse, my brother helped me.  I don't know why but this dessert is just a family affair.  Epwhen we were younger we would each be assigned a step in the process, and the best part, of course, was the clean up.. Or the licking of the mixing bowls and whips.. Full of smooth chocolately raw egg goodness!
Serves 4
Ingredients
100g (3.5oz) dark chocolate (I used 75% and 80%)
1 Tbsp butter
1/2 tsp ground cinnamon
1/2 tsp chile powder
4 small or 3 large eggs, yolks separated
50g cane sugar
Directions
1.  Beat the egg yolks well with the sugar.  Set aside.
2.  In a separate mixing bowl, make snow with the egg whites and a pinch of salt.  Make sure they are nice and stiff.  Set aside.
3.  Break the chocolate into pieces in another separate bowl along with the butter, cinnamon, and chile powder.  Place the bowl on a pot of simmering water, making sure the bowl only touches water and not the bottom or sides of the pot.  This is called a "bain marie."  I don't know who Marie is, but it helps the chocolate melt gently without being scorched by direct heat.  Whisk as it melts into a nice house mogenous mixture.
4.  Here comes the tricky part.  It works better with 4 hands if you can organize that.  Turn the heat off the simmering pot, but keep the bowl on the hot water.  Carefully pour the yolk/sugar mixture while continuing to whisk.  If you do this correctly, the chocolate will not clump and the yolks will not curdle.
5.  With your 4 hands, fold the chocolate mixture into the snowy egg whites.  Do not whisk.  You want to keep that fluffy snow texture.  Do this gently until all the chocolate is incorporated.
6.  Pour into one large serving dish or 4 small portions, depending on if you're planning on serving this family style, or fancy style.
7.  Chill for at least 4 hours.  This will make those egg whites set and become a firm mousse texture.  I had some hardened chocolate I just flicked over the top of my mousse before refrigerating.  That happened because I did this with only 2 hands.  Yes, my mousse helper happens to be too far away to fly over from Phoenix for this small but delicious event.
Enjoy chilled.
The spices are subtle, but you can feel them there.  Chocolate is so much better when enhanced with cinnamon and chile!
Ooh I think next time I'll play around with the spices and add cumin or ginger to the mix!

Print Friendly and PDF

Saturday, May 9, 2015

Tiramisu with Grappa

After spending almost a week in Milan, I was able to check off my list of things to eat in situ: pizza, risotto, calamari, octopus, sardines, and gelato.  I didn't eat any pasta but I wasn't really trying to.  The pizza is ok but not better than what we can get here in France.  The gelato was amazing.  That texture is just to die for!  Octopus is usually served marinated in a salad or as a carpaccio, which is awesome.  The calamari was out of this world.. More on that in the next post.  What I didn't check off my list is tiramisu.  Between the olive oil tasting, the salume from different regions, and the Nocellara del Belice olives, I never found the opportunity to eat tiramisu in its mother country.  No problem.. I bought some grappa during my travels!  Since I've never made this dessert, I decided to include it in my Eataly dinner party.. Made the authentic way, with grappa.
Grappa is the distilled part of the grape leftovers after the juice is used to make wine.  It's kind of like eau de vie of grapes..
Yield 6 servings
Ingredients
3 eggs, yolks and whites separated
pinch salt
1 packet vanilla sugar
100g (3.5oz) cane sugar
250g (8.8oz) mascarpone
approximately 24 biscuits cuillère (sponge lady fingers)
25cL (1 cup) expresso or strong coffee, cooled
3 cL (1 floz) grappa or marsala
dark chocolate shavings for garnish
Directions
1.  Beat the yolks with the sugar and mascarpone until homogenous.
2.  In a separate mixing bowl, beat the egg whites with a pinch of salt until stiff.. or as I like to say, make snow.
3.  Gently fold the snow into the mascarpone mixture.
4.  Prepare your assembly.  Mix the grappa and coffee together in a dish.  Dip each lady finger into the coffee grappa mixture.  Don't drown them.  Just a quick dip.
5.  Lay the dipped ladyfingers into your mould.  Tiramisu doesn't hold well, so use individual moulds if you want it to be pretty when served.
6.  Spoon the mascarpone mixture over the ladyfingers.  It should cover them.
7.  Repeat until desired layering.  I made 3 layers, which was perfect and I reached the top of my mould.
8.  Refrigerate for at least 4 hours for it to "set" in a similar way as mousse au chocolat.  During this time it will firm up.  It's actually better the next day.
Before serving, add some chocolate shavings or cocoa powder for garnish.

The texture was exactly what I was hoping for.  With desserts like this, you don't know until you serve if it worked or not.  The next day was even better because it was much much firmer.  I'd recommend doing this early in the morning for a dinner party or even doing it the night before for best results.  The grappa was a bit strong.  I didn't mind, but I might use only 1 cL next time.. just for the aroma.

Print Friendly and PDF

Friday, March 20, 2015

Coconut Ginger Pie

Ginger gives life meaning.  When I create, there must be ginger involved.  It gives any item intensity and can be used in savory as well as sweets.  I particularly like to snack on candied ginger, or have it for breakfast with a few cashews with my dates and oats.  I love to add it to fried spices along with garlic to extract that pungent aroma and breathe it in.  I like it pickled with sushi, and raw in cocktails or off my fingers after having grated it.  It heats me deep from within, and I firmly believe that regular consumption of the root can keep you away from most common ailments.
This is why I chose to integrate it into my coconut pie.  With all that coconut and ginger, there is very little need for sugar or any oter taste enhancers.  You can just let nature reveal itself piece by piece as you enjoy the heat that flows through your body..
Ingredients
Ginger Buckwheat Crust:
100g (3.5oz) room temperature butter
1 Tbsp nutritional yeast
2 Tbsp cane sugar
pinch salt
1 tsp ginger powder
100g (3.5oz) buckwheat flour
130g (4.6oz) T80 flour
1 egg yolk
5 cL (2oz) water
Make the crust using the method, then pre-bake it at 190°C 375°F for 10 minutes

Coconut Ginger Filling:
4 eggs, beaten until foamy
110g (3.9oz) cane sugar
1 can coconut milk
1 inch piece ginger, sliced into thin strips
2 cups desiccated coconut

Directions
1.  Whisk together the filling ingredients.
2.  Pour into the pre-baked crust and bake at 180°C 350°F for 40-45 minutes or until just set.
3.  Remove and let cool for at least 1 hour.
Serve at room temperature or cold.

I wasn't sure how gingery this would come out since I did a complete freestyle evening with this recipe.  I'm happy to say the ginger was not too strong, but present enough to be felt.  It did not overpower the coconut, but rather infused in a synchronized dance.
The texture was incredibly interesting as well.  The desiccated coconut worked as a thickener and absorbed the liquid.  It had the texture of semolina halwa or couscous, but with the comforting flavor of coconut.

Print Friendly and PDF

Wednesday, December 24, 2014

Tangerine Chess Pie

This is a staple in the southern states today but it's origins source it from New England dating back to colonial times.  It may have gotten its name from being kept in a chest during travelling.  Aah yes, a pie chest.  That's the type of thing I can imagine myself owning.
I chose this recipe for Christmas dessert because oranges and tangerines symbolize prosperity and wealth.  There are many tales as to why that is, but whatever the reason, you may have noticed that those fruit seem to be plentiful this time of year.  In France, they seem to be tossed around and offered.  In the US, they are commonly placed in Christmas stockings.  One tale mentions that St. Nicolas had given gold to a poor family of 3 daughters so they could offer dowry to their future husbands.  He had offered this in stockings that had been hung to dry above the fireplace.  Another tale mentions that the orange or tangerine offered a nice exotic treat post WW2, in place of chocolate.  Either way, there was no way anyone will ever get me to make Buche or Yule Log.  Even if it's "traditional,"  it's just not my thing.  This fruity pie is the perfect way to express my desires.
Inspired by SouthernLiving.
I had to halve the sugar on that original recipe because it was just too much.  I'm not sure how any reasonable person in their right mind could eat something that sweet.
Serves 6-8
Ingredients
1 homemade shortcrust (I used half buckwheat, half T80), pre-baked 10 minutes
150g (3/4 cup) brown sugar or cassonade
1 packet vanilla sugar or 1 tsp extract
45g (approx 1/4 cup) melted butter
4 eggs, beaten
1 Tsp flour
1 Tsp cornmeal
2 tsp tangering zest
1/3 cup freshly squeezed tangerine juice (3-4 tangerines)
1 Tbsp lemon juice
supremes from 3-4 tangerines (pssst.. this is the hardest part)
Directions
1.  Whisk together everything but the supremes.
2.  Pour into the pre-baked shortrust and bake at 175°C 350°F for 40 minutes or until the custard has set and the top is golden.
3.  With your nimble little fingers, decorate the edges with the supremes.  I used 4 tangerines and probably got about 6 decent wedges.
Hey, it's not ALWAYS about the looks.  It's about the Love..
4.  Let cool 1 hour.

Now.. lets talk about the taste.  This is a very sweet dessert.  It's sweeter than I'm used to, so I'm glad I halved the sugar.  It's a perfect holiday dessert because of its decadence.  It's generous flavor embalms you with that acidic citrus touch.  You can taste the light squeeze of lemon and all that tangerine zest.  If I would have done a better job with the supremes, it is something I would be proud to offer at a restaurant... even a French one!

Print Friendly and PDF

Sunday, November 9, 2014

Granny Smith Tart with Fig Lining

It is no longer peach and apricot season.. and figs have been weaning away from the stalls for some time now.  Fall is the season for apples and pumpkin, sugar and spice.  How can you spread one last drop of summer into a fall dessert?  Use some of your summer preserves.. if you are so lucky to have some.  This summer, I made many offerings to others and was, in turn, rewarded with several gifts of various forms.  Homemade fig preserves was one of those gifts I've been enjoying from time to time on some bread with goat cheese, or even in some thumbprint cookies.  I hadn't given those preserves their proper turn at sublimation, yet.. until this tart.  Mixing figs and apples is just as genius an idea as mixing apples and cinnamon.. and while we're doing that, add in some cinnamon and ginger.. because it is fall, after all.
Serves 6-8
 Ingredients:
3 Granny Smith apples, peeled and sliced into wedges
1/4 tsp ginger powder
1/4 tsp cinnamon
2 eggs
3-4 Tbsp fig preserves
30g cassonade or brown sugar (omit if your preserves are very sweet)
1 handful slivered ground almonds
dash milk
shortcrust (I used half buckwheat, half T80 flour and added cinnamon and ginger)
Directions:
1. Cover the rim of the uncooked shortcrust with foil, poke the bottom a few times with a fork and pre-cook it for 10 minutes in the oven at 190°C 375°F.
2. In a large mixing bowl, whip together the eggs, sugar, 1 1/2 Tbsp of the fig preserves, and a dash of milk.
3. Spread the remaining 2 1/2 Tbsp fig preserves into the precooked crust
Lay the wedges down
Sprinkle on the almond slivers
 and pour in the egg mixture.
4. Bake for 1 hour at 175°C 350°F.
 5.  Let cool at least 30 minutes before attacking it.
This apple tart is exactly my type of dessert (until I get a sorbetière.)  It's not too sweet, just enough fruit, a bit of spice from the ginger, a crust that always gets rave reviews... with a naughty mix of fig and apples to make it unique.

Print Friendly and PDF

Thursday, September 11, 2014

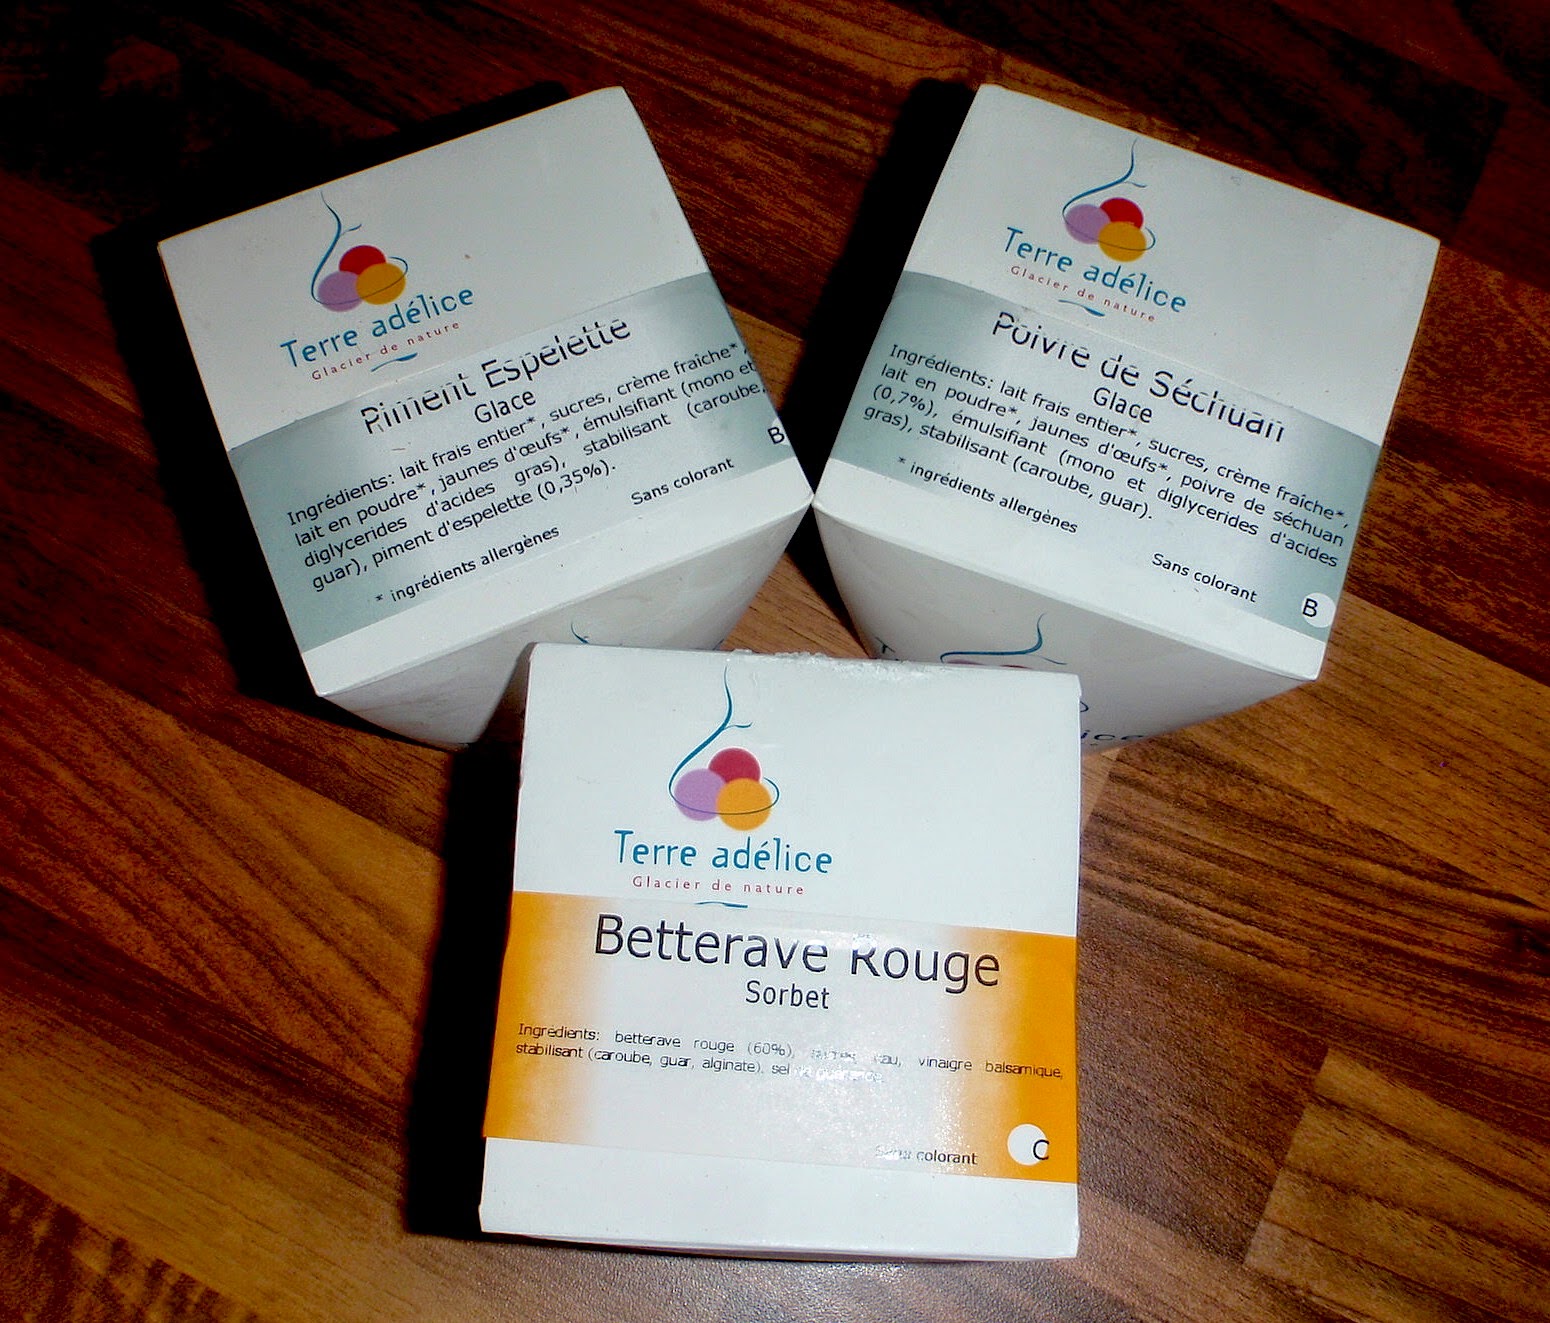
Ma La Ice Cream at Terre Adelice

I'm a sucker for ice cream.  Not just any ice cream, mind you, and if you know me even a little bit I may have already mentioned to you the existence of piment d'espelette or tomato ice cream.  You may have been appalled, but I may then have piqued your curiosity.  Opportunities involving such bizarre mixtures in dessert should never be passed up in one's life, because one does not know when that opportunity may come up again...especially when one has been waiting years for that 2 hour drive to happen so one could blissfully slurp that chili pepper ice cream while admiring the beautiful view of the Monts de l'Ardeche.
I've been frequenting the Terre Adelice here in Lyon for quite some time, enjoying flavors such as wasabi, goat cheese, bell pepper, pain d'epices, cucumber, ginger, pine nut, sesame.. and I'm not finished naming them all.  Their ice cream is such high quality and most of the time, organic, that I always must taste a different flavor every time I'm in the area.  Their website shows all the different flavors they make, and after consulting it for the first time, I felt lust at first sight.
I absolutely had to try the Piment d'Espelette ice cream.
Unfortunately, the one in Lyon doesn't carry that flavor (because it must be so rarely requested, being that we are in France, the country of wimpy palets.. hehe) so I had to seek out the social chair, about 150km south of here in a lovely region called Ardeche.
 This desire has been haunting me for quite some time.  I even went near the actual city of Espelette in search of an ice cream glorifying their precious chili pepper but to no avail.
The social chair is only open everyday during July and August.  The rest of the year it is only weekday afternoons and closes at 5pm.  This is the reason it took me so long to make the trip... but today was my lucky day...
Upon arriving I saw the Terre Adelice signs and followed the one that showed the "store" and tasting area.  I had to ring a bell for the girl to come down and open up for me.
As she opened the doors, I felt myself drool.  I had been imagining the mix of spicy sweet with numbing sweet.. the perfect Ma La dessert.. for ages.  When I saw the scoop section, I almost cried.  There were only the traditional flavors available.  Vanilla, chocolate, peach..
WTF!
Please, lady, I just made a 2 and a half hour detour coming home from a business trip for your piment d'espelette and sichuan pepper ice cream and you're offering me vanilla?
I was only expecting to leave with my 2 scoops and then be off with a photo and a salivary memory.
Instead, I was off with 3 pints.  Piment d'espelette, Sichuan pepper, and beet.  No tasting these flavors, since nobody ever asks for them.
Ha (I thought to myself) I have an ice chest in the car, and I don't really care if it melts, I'm bringing some of that goodness home.

And in the end, it worked out better this way, because I will get to indulge over and over again in this sweet spicy numbing earthy dessert.
I would have driven (and did by the way) all across the country for this.

I do realize that those chiles in the photo are chile de arboles... but I didn't have any (fresh or dried) piment d'espelettes.  Oh my Chile de Arbole ice cream would be an extreme flavor.. I'm going to have to incept that idea into the people that harvest those fresh...

Print Friendly and PDF

Sunday, August 24, 2014

White Peach Pie with a Kick

This looks suspiciously like the Red Plum Pie I made last week.. well, that's because it's almost exactly the same pie, except that instead of red plums, I used white peaches.. but I left the skin on, hence the pink hues.
That.. and I added chili powder, which was an excellent decision.  It weens away the people that can't appreciate art, and leaves more for the connaisseurs...
Serves 8
 Ingredients:
1 lb (450g) white peaches, pitted and sliced into wedges
1/4 tsp chili powder
1/4 tsp cinnamon
2 eggs
1/4 cup (50g) cassonade or brown sugar plus 2 Tbsp for sprinkling
1/4 cup (50g) ground almonds
dash milk
some cookie crumbs for sprinkling (mine were orange anise cookies)
shortcrust (I used half buckwheat, half T80 flour and spiced it too)
Directions:
1. Cover the rim of the uncooked shortcrust with foil, poke the bottom a few times with a fork, sprinkle it with some sugar, and pre-cook it for 10 minutes in the oven at 190°C 375°F.
2. In a large mixing bowl, whip together the eggs, sugar, ground almonds, and a dash of milk.
3. Lay the wedges into the crust
 and pour the almond mixture in.
4. Bake for 10 minutes at 220°C 425°F, then sprinkle on the cookie crumbs
and reduce to 175°C 350°F for 40 minutes or before the cookie crumbs start to burn.
 5.  Let cool at least 30 minutes before attacking it.
Perfection.. not too spicy, but you can feel it there, tickling you.. waiting to consume you..

Print Friendly and PDF