Search this blog

Translate

Saturday, August 29, 2015

Roasted Ladyfingers

Okra has always had a special spot in my heart.  I grew up eating it in the US, but unlike most Americans, I always ate it as a Gujarati dish.  I had it only once the American way in Louisiana in a Gumbo, which was intriguing to me and also very tasty.  I had it again several times in India as a subzi with the Father.  We happily realized we were the only 2 of the group wild about okra so we didn't have to share as much.  There is something about those little pods that make me wild.  I love their cross section.. I love the way their seeds are round and full of wetness.
I also love the way they can be completely transformed by a small gesture.
Example:  Stir too often on stovetop and they will conserve their slime.
Add acidity and the slime will be dissolved
Add salt during cooking and slime will be enhanced
Bake, stuff, or fry.. and be transported to another land...
 To a non-believer, okra pods might look like a chile.  This is a normal remark for someone not familiar with chile other than in a hot sauce bottle.  In the photo above, you can clearly see that it has nothing to do with chile.  A chile contains capsaicin (the heat effect) and is from a completely different family.  Okra is a seed pod of the mallow family of flowering plants.  No heat, just texture and vitamins!
You know they've got to be a naughty vegetable when they are also known as Ladyfingers.  We all know what lady's fingers can procure..
I bought the okra knowing I'd be roasting them, but not knowing exactly which cultural direction I'd be going.  Naturally, I went Indian.  This could have gone a number of ways.. with some herbs and garlic next to a steak.. with some za'tar next to some roasted eggplant, pickled... oh wait.. that's not roasting is it?  
I'm getting distracted here.
I wanted tandoori flavor.. so I used some Tandoori spices for flavor and it was probably the best decision of the day..
Serves 3 as a side
Ingredients
450g (1lb) fresh okra, tops cut off and sliced lengthwise
1 Tbsp olive oil
sprinkle fleur de sel
juice from 1/2 lime
 Directions
1.  Toss the sliced okra with the olive oil, fleur de sel, and tandoori masala and lay on a baking sheet, cut side up in one layer.
2.  Bake at 200°C 400°F for 20-25 minutes
3.  Squeeze lime juice and serve.
I served mine with some Tandoori Chicken, Sweet Potato Fries, and some Chana-Toor Dal.
This meal was relatively hands-off.. which is nice when you have remodeling happening!

Print Friendly and PDF

Tuesday, August 25, 2015

Thai Baby Eggplant with Golden Eggs

Life is strange.  I went months searching and hoping and imagining getting my hands on some baby eggplants.. purple, white or green, but my deepest desire was the Thai green eggplants.  I've always been on the lookout, but I've been less active in my search these days than I have been in the past.
When I least expected it.. BAM, they fell from the sky.  Literally.. they are imports by air.  Luckily, they landed in good hands.  They came accompanied by something I'd never heard of.. pea eggplant labelled "very small eggplant."  These babies are the cutest things I've ever laid my culinary eyes on.  Eggplants that look like fresh green pepper?  Beloved Thai green eggplants I've been dreaming of for years?
Come to mama babies!
I couldn't help but make a dish subliming the eggplant.  I didn't want something where they would be lost in the middle of a crowd.  I wanted the eggplant to be the main event.  The strangest part of this story is that I was inspired by a recipe from a book translated into French.  This never happens.  My brain creates in English.  I can follow recipes written in French, but they never speak to me.  This one did.  It opened up to the eggplant page almost naturally and it seduced me in the blink of an eye... and then I had to kidnap it and take it into my world.
Inspired by p 508 (Stir-fried quail eggs with eggplant) of Thai Food by David Thompson.
Serves 2
Ingredients
4 eggs or 10 quail eggs, steamed (or hardboiled) and shelled
4 Tbsp oil
1/2 tsp turmeric
1 tsp palm sugar
1-2 tbsp fish sauce (nuoc nam)
approximately 450g (1lb) Thai baby eggplant, halved and soaked in salted water
handful pea eggplant
handful green peas
2 fresh Thai red chiles
juice from 1/2 lime
handful chopped basil
paste:
2 dried red chiles, soaked
2 keffir lime leaves, fresh (or soaked dried)
2 tsp chopped galangal (I left this out)
1 stalk lemongrass, chopped
1 tsp combava zest (I used lime zest)
2 shallots, chopped
3 cloves garlic, peeled
1 tsp dried shrimp or shrimp paste
Directions
1.  Make the paste by crushing all the ingredients with a mortar and pestle... or blitzing it in your magic bullet.  Set aside.
2.  Make the golden eggs.  Heat the oil in a wok, then add the turmeric.  It should fizz.  Then add the eggs and cook, rolling them around until they obtain a nice blistered skin and a deep golden color.  Set aside and remove all but 3 Tbsp of oil.
3.  Heat the oil again and add the paste.  Cook until a nice aroma starts wafting, then add 1 Tbsp fish sauce and the sugar and stir.
4.  Drain the baby eggplant and add to the wok.  Coat well, then add the pea eggplant.  Cook, stirring for about 5 minutes on high, then lower the heat to a simmer, add the green peas, lime juice and the chiles and cover for another 10 minutes.
5.  Taste and add more fish sauce if needed.  The eggplants should be tender.
6.  Before serving, add the golden eggs back in and heat through.

Serve sprinkled with fresh basil.  This would be a perfect match for steamed jasmine rice!
The Thai baby eggplants are slightly sweet and hold their texture while exuding tenderness.  They are adorned by the curry paste in their most intimate crevices.  The pea eggplants were surprising.  They are bitter when eaten alone, but in a mouthful of several times, they give a nice balancing flavor.
This was an exhilarating experience to say the least.. almost a Reminiscence..

Print Friendly and PDF

Sunday, August 16, 2015

Spicy Homemade Pickles

Pickling is a "thing."  It's been a "thing" since I can remember.  I've loved being served a spear alongside a burger or tuna sandwich as much as I've loved buying a whole dill pickle at the snack bar in its brine its individual plastic bag in its brine and taking a big bite into it.. feeling the crunchy tanginess fill me with happiness.
Another thing that brings a little smile to the corner of my eye is the verb "to pickle."  I've always jokingly said that French is rich in grammar but poor in vocabulary.. mostly to get a reaction out of my French friends.. but then I keep stumbling upon examples of the wealthy English vocabulary.  The French word for pickling is "confire" with is the same word used wether you are slow cooking meat in its fat or making jam.  If you say you've been spending the afternoon pickling in French, they have no idea what you are talking about without more input.
Ha!
The only problem with pickling is that you can make them in 10 minutes.. but then must wait at least 48 hours before munching on them.  I'm ok with the 10 minutes.. because when I have the urge.. I want it now.. but I rarely know that I'm going to want pickles 2 days ahead of time.  when I want them.. I want them.
I hacked myself by making these the day before I went for a week vacation.  This way, I indirectly forced myself to not open the jars to let the veggies enough time to soak in their deliciously spicy tangy brine.  I used cucumber and carrots, but zucchini would be nice here as well.  The whole idea is to keep the water-vinegar-kosher salt ratio the same.  I made 1 pint but you can easily double or triple it depending on your ultimate desires.
I may do this next time I need to go out of town on business!
Yield 1 pint (1/2L)
Ingredients
1 cucumber, cut into spears
1-2 carrots, cut into sticks
4 cloves garlic
2 green chiles, seeded and halved
2 tsp fresh dill
2 tsp yellow mustard seeds
1 tsp freshly ground black pepper
juice from 1 lemon
2 tsp kosher salt
1 1/4 cup water
1 1/4 cup cider vinegar
Directions
1.  Prepare your pint jars (or 2 half pint jars) with the cut veggies, garlic, chiles, dill, mustard seeds, black pepper, and lemon.
2.  In a pot, bring the water, vinegar, and salt to a rolling boil
then pour into the prepared jars.  You might not use all of the brine.  Top off the jars and close the lids.
3.  If you want to process, this is the time.  If not, wait at least 48 hours in the fridge before digging in.  These will keep 3-4 weeks in the fridge unprocessed.  This waiting time is the hardest part.. seriously.
Have as a snack or alongside a nice burger, sandwich, or salad.
I love the zesty snap the cucumbers and garlic had.  I was only planning on eating the cucumbers and carrots, but I just discovered how amazing pickled garlic is!!

Print Friendly and PDF

Sunday, August 2, 2015

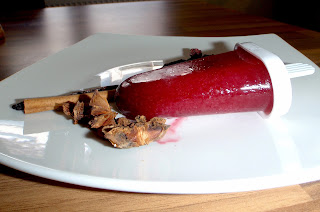
Hibiscus Spice Popsicles

I finally got my hands on some popsicle moulds!  Now all I want to do is use my bullet and freeze everything all the time!
I've been playing around with the hibiscus popsicle idea for a few years now.  I don't know why it took me so long.. maybe I was expecting to be making them somewhere other than my home, but either way, the only way to be sure to go through with an idea is to tackle it yourself.
As you may know, hibiscus has a natural hydrating and has a cooling effect as well, which makes it perfect for a hot day when you double the cooling effect with the freezing.  It is also used in diuretics but I don't really care about that part.
My hunt for these moulds was quite an event as well.  I went to 3 or 4 stores before finding something decent where the stick was long enough to hold what was going to be frozen on it.
This recipe is similar to a regular Agua de Jamaica, but a bit more intense on the hibiscus and spices infused.  A frozen treat needs to be more potent because the cold numbs the taste just a bit.  The usual remedy to this is to add more sugar.. but I'd rather just add some spice...
Mmm that deep red color makes me want to rub it all over my face!
Yield 20 popsicles + leftover iced tea
Ingredients
1/2 cup hibiscus flowers
2 star anis
4 cloves
2 Tbsp sugar
1 stick cinnamon
1/2 inch piece ginger
1vanilla stalk
1 1/ 2L water
Directions
1.  Place everything but the water in a large enough mixing bowl.
2.  Boil water and pour over the hibiscus and company.  Steep for 15 minutes, then strain through a very fine mesh.
3.  Pour into popsicle moulds and freeze for at least 12 hours.
Enjoy your refreshingly intriguing treats!

I love the deep red color of these popsicles.  The addition of vanilla was interesting.  It made it almost Caribbean in my mouth.  I felt it more in the iced tea than the popsicle, however.
Next time I would add more ginger and cinnamon.. and maybe a little chile for extra punch.. but then I'd have to think twice about sharing with my dog...
If you're not into frozen treats, this works perfectly as iced tea or hot tea as well.

Print Friendly and PDF