Search this blog

Translate

Showing posts with label Gluten Free. Show all posts

Saturday, December 22, 2018

Celery Soup with Tempered Nigella Seeds


Serves 2
Ingredients
2 Tbsp olive oil
2 small bunches or 1 large bunch celery with leaves, chopped
1/2 celery root (celeriac), chopped
1 yellow onion + 1 red onion, diced
2 cloves garlic, roughly chopped
vegetable stock (didn't measure, sorry)
lots of cracked black pepper
sea salt, to taste
for tempering:
1 Tbsp olive oil
1 tsp nigella seeds
few leaves off celery stalks
Directions
1.  Heat the oil in a soup pot and add the chopped onions, reserving some of the red onion for the topping.  Cook on medium with a pinch of sea salt until onions have sweat, about 5 minutes.
2.  Add the chopped garlic, celery stalks and root with the leaves, reserving a few of the leaves for tempering.  Cook, stirring, for another 5 minutes.
3.  Add the stock to just cover the celery.  I like my soup thick, so this is how much stock I use.  If you like thinner soup, add more stock.  Simmer for 10 to 15 minutes or until the celery is tender.
4.  Blend.  I suppose it is easiest to do with a hand blender, since there is less clean-up than with a normal blender, but you will get a smoother texture with a normal blender.  Just be careful not to burn yourself.
5.  Back in the pot, add lots of black pepper and taste to adjust the salt if needed.
6.  Prepare the tempering.  Heat the olive oil in a saucepan and add some of the reserved celery leaves.  Fry until crispy and set aside.
In that same hot oil, add the nigella seeds and cook on high until they crackle.. then remove them from heat.

To serve, spoon some of the nigella tempering on top of your soup bowl and add some chopped red onions and crispy celery leaves.

Print Friendly and PDF

Friday, May 11, 2018

Brèdes Mafane - Electric Daisies

Every once in a while, I talk about food.
Actually, I talk about food all the time, but every once in a while, I have food conversations with people whose culinary specialties I know nothing about.
Those are the conversations I seek the most because those are the ones that turn me into a human radar for unusual vegetables.
This time, it was a Malagasy conversation about a vegetable called Brèdes Mafane.  The leaves and flowers of this plant are edible and leave a nice tingly feeling in the mouth after eating.  
Not like chile pepper spicy, but like sichuan pepper numbing, or like your mouth vibrating.
OOooOooh!  I like that!
In English, they can be called a variety of things, but my favorite is Electric Daisies.  
These also have excellent anti-inflammatory properties to boot.
Seriously, this vegetable gives EDC a whole new meaning!

Serves 4
Ingredients
1 bunch Brèdes Mafane (approximately 700g or 1.5lb)
2 Tbsp oil
1 large onion, sliced into moons
2 cloves garlic, grated
1/2 inch piece ginger, grated
2 tomatoes, diced
few pinches fleur de sel
1/4 cup water
Directions
1.  Remove the leaves and flowers from the hard stems, rip the leaves, rinse, and dry well.
2.  Heat the oil in a sautée pan and add the onions.
3.  When the onions are soft, add the garlic, ginger, and tomatoes and cook for a few minutes.
4.  Add the brèdes and a few pinches fleur de sel.  Stir to mix evenly, then add the water and lower the heat and cook until the leaves are tender.  It should take about 10 minutes.
5.  Taste and adjust the seasoning and then you are ready to serve.

I served mine with rice and some grilled fish filets.  Perfection.

The broth has such a deep flavor that it doesn't need much more doctoring.  Maybe a bit of chile if you insist.. of course.
As you eat,  let your eyes roll back and listen to the thumping music...

Print Friendly and PDF

Saturday, November 25, 2017

Thanksgiving Nut Roast with Oyster Mushroom Gravy

Thanksgiving is the holiday I miss the most since moving away from my family. It's not about the turkey.. It's really about sharing traditions, learning new ones, being open to other cultures, and feeling all the love and gratitude all around. This is mostly how I live my life anyways, so it's not a surprise. I've experienced it small scale, full on traditional, Mexican style, Southern style, Indian style, and Air-style. Each time has been enriching. Although I haven't "celebrated" this holiday in over 10 years, this year will be MY style... Inventing my own tradition. I'm so lucky to have so many peeps to love all around the world. 
Thank you, family and friends, near and far, for making life so beautiful and my heart swell.

This year is the very first year I've done anything special for Thanksgiving since living in France.  
I decided to go all-veg with a rich Nut Loaf, mashed potatoes & gravy, hasselback sweet potatoes, and green bean cheddar casserole.

Nut Loaf
Serves 8
Ingredients
1Tbsp olive oil
1 onion, chopped
1 pack button or cremini mushrooms, chopped (about 2 cups)
some red wine or sherry to deglaze
2 tsp fresh thyme
2 tsp fresh marjoram
2 tsp fresh tarragon
4 tsp fresh sage
2 tsp fresh oregano
lots of cracked black pepper
1 1/2 cups cooked amaranth
1 1/2 cups cooked and peeled chestnuts, mashed
1/2 cup chopped walnuts
1 cup cashews, blitzed
1/2 cup almonds, blitzed
2 large handfuls shredded gruyère or swiss
4 eggs
2 Tbsp yogurt
chopped parsley for garnish

Directions
1.  In a large wok or sautée pan, heat the oil and add the chopped onion.  Cook until the onion sweats a bit, then add the chopped mushrooms and a pinch of each of the fresh herbs.  Season well with black pepper and add a few pinches salt.  When the juices have been released and starts drying out, deglaze with the red wine, and cook for 2 more minutes.  Remove from heat and set aside.
2.  While this is happening, get your nuts ready.  Aside from the chestnuts which are mashed, the rest should be blitzed.. not into a powder, but well broken down.
3.  In a large mixing bowl, stir together the mushroom onion mix, the amaranth, the nuts, and the rest of the herbs.  If it's a bit dry, don't worry.  Preheat the oven to 180°C 350°F.
4.  In a separate bowl, beat the eggs and yogurt together until frothy.  Then stir in the gruyère
5.  Pour the egg mixture into the rest and mix well.  It should be pretty wet.  You should be having doubts that this is even going to work.
6.  Butter a loaf pan/mould or line it with parchment paper.  Pour the mixture into your mould.  Smooth the top of any air bubbles and if you want to get fancy, decorate it with a few mushroom slices.  My mould was a silicone 24x10x6 cm.  I stupidly cut through it with a knife and had to toss it.. so I have to buy another one because it's the perfect size.
7.  Bake at 180°C 350°F for 1 hour and10 minutes or until it is firm.  Remove from oven and let rest 10 minutes.
8.  Remove from the mould and add some chopped parsley to the serving dish (my serving dish is pitiful, I know).  this roast can be sliced and served as is, but it is much more enjoyable with its Oyster mushroom gravy!

Oyster Mushroom Gravy
Ingredients
1 Tbsp olive oil
1 onion, chopped
250g oyster mushrooms, sliced
1 tsp fresh thym
1/4 cup red wine
3 cups vegetable stock
1 1/2 Tbsp cornstarch
cracked black pepper
2 Tbsp butter

Directions
1.  In a medium sauce pot, heat the oil and add the chopped onion.  Cook until the onion sweats a bit, then add the sliced oyster mushrooms with the thyme.
2.  Cook until it starts drying out a bit, then deglaze with the wine and add the stock and simmer for about 20 minutes while it reduces and the flavors concentrate.
3.  In a separate bowl, stir the cornstarch into a few tbsp cold water (to make sure it doesn't get lumpy), then add this to the sauce pan.  It should thicken.  Once it is desired thickness, remove from heat.
4.  Stir in the butter.  This is the most crucial step!

Serve over the Nut Roast.. and over some mashed potatoes.  This gravy is KILLER on mashed potatoes!

I hope everyone is having safe and happy holidays


Note:  This recipe is very versatile and can work in many different ways.  The different nuts can be subbed for others with varying proportions, the amaranth can be subbed for quinoa or rice.  I'm sure there can be a reasonable substitute for mushrooms if one does not like them as well....

Print Friendly and PDF

Sunday, November 12, 2017

5-Ingredient Salted Peanut Butter Cookies

I have my go-to peanut butter cookie recipe that I make interchangeably with tahini depending on what I have on hand.  I think everyone has their classic recipe that they are happy with.  The thing is.. sometimes, another one just jumps at you and begs you to be tried.
This is what happened with this one.  It seemed too good to be true, but too intriguing not to try.  I've never done a flourless cookie before.  Nor a butterless.  Come on.. we're not on a diet here!
But this cookie is not a diet cookie.  It is just peanut butter greatness in its perfect form.
It is the way peanut butter cookies were meant to be made.

Yield 33 Tbsp sized cookies
Ingredients:
240g (8.5oz) cassonade or light brown sugar
2 large eggs, at room temperature
1 packet vanilla sugar or 1/2 teaspoon vanilla extract
450g (1 lb or 1 3/4 cups) natural smooth peanut butter
fleur de sel to finish
Directions:
1.  Beat the eggs, then beat the sugar into the eggs.  Go for it.  Beat it good.
2.  Add the vanilla, then peanut butter.  Mix very well, then put in the fridge to chill for 15 minutes or while the oven heats.
3.  Preheat the oven to 180°C (356°F).
4.  Line a baking tray with a cookie sheet.  Mine was silicone.  Scoop Tbsp sized balls onto the sheet.  Sprinkle with fleur de sel, and bake for 18-20 minutes.
5.  Remove and wait for 2 minutes before transferring to a cooling rack.
6.  Very important.  Let cool completely before eating.
These cookies are crunchy on the outside and in the center, depending on the cooking time, you get a nice melty chewy center.
Plus, they are beautifully domed and oh so sexy!

I made a few changes to the recipe from SK.  She uses 335g of sugar and that was just not thinkable, so I reduced to 240g.  They are still sweeter than I prefer, so next time I will go for 200g and they will be perfect.  
She also uses Skippy processed peanut butter with sugar explaining that the processed stuff gives the best results.  I used Dakatine peanut butter without sugar.  The ingredients are 97% peanuts, emulsifier, and salt.
She also chills the dough in the freezer before scooping and after scooping, explaining that it helps the cookies keep their dome shape.  I did not do this because of freezer space, but keeping the dough in the fridge between batches gave me the perfect domes I wanted.
I snuck a few pieces of broken dark chocolate into a few of the cookies to surprise myself later on.. teehee!!

Print Friendly and PDF

Monday, July 10, 2017

Fish Tacos on Homemade Tortillas

Fish Tacos.
This made up 75% of my intake in college.  I could eat them everyday and not get sick of them.  I craved them when I was too sick to eat them and will seek out every single fish taco joint in California just to get a sneak peak of the chef's heart.
There are no words...
This being my favorite food for such a large part of my life, the only 2 reasons I had not made them before this year are:
1.  Before living here, I had easy access to them, so never a need to make them
2.  After living here, I had NO access to valid corn tortillas, or masa harina.
  What has changed?
I thought of buying masa on one of my trips back home and decided to try to make tortillas myself.
Major Breakthrough of the Year here!
So, making corn tortillas is actually not so difficult.  You just need to know the ziplock trick.  It's probably even easier with a tortilla press, but hey, it's not a requirement.

Yield 20 6 inch corn tortillas
Ingredients
2 cups masa harina (do not sub corn flour)
1 1/2 cups warm water
1/2 tsp kosher salt
Directions
1.  Mix everything together into a warm ball.
2.  Let rest for 30 minutes, covered with a kitchen towel.  During this time, the masa will absorb more moisture.
3.  Divide the mixture into 20 balls.. or wing it and make small balls that fit into the palm of your hand (I have small hands)
4.  Cut a large ziplock bag so you can open it like a magazine.  Place each ball in between the plastic and press into a tortilla.  Use a rolling pin to help, pressing from the inside toward the outside.
5.  Cook on a flat slightly oiled surface, flipping once.  I don't quite know about the cooking time.. just don't burn them or they will break when you use them as a vessel for your fish tacos.
6.  Place them in a tortilla warmer until ready to use.  If you don't have one, keep them wrapped in a clean kitchen towel.

Sooo easy!
I'll get to my fish taco recipe soon.. with that spicy Chipotle sauce and Guacamole.. mmMMmmMmm!!

Print Friendly and PDF

Sunday, December 11, 2016

Tandoorified Cauliflower "Steak"

Does that mean you can make thick slices of cauliflower that don't fall apart and grill them?
I cannot believe how much diversity you can find in vegetables!  This is one of my many gifts this week.  But this one, I procured for myself.
(The other ones were indoor skydiving, a dinner cruise, and the new Steve n Seagulls album).
So, the only downside is that you can only make 2 "steaks" out of 1 cauliflower head.  The rest are just florets.. but I'll tell you what to do with those.. it's actually not really a problem.
Serves 2 steaks + 2 servings of florets
Ingredients
1 head cauliflower (mine was green cauliflower)
2 tsp tandoori spices
2 Tbsp olive oil
juice from 1/2 lime
chopped cilantro for garnish
Directions
1.  Make the slices.  Remove the outer leaves of the cauliflower head without cutting the stem.  Place it upside down on the cutting board, stem up (like a head stand) and slice right down the center of the stem to have 2 halves.. like a human brain.  Then slice each half once more, making a 1.5 to 2cm steak with each half.  The rest will break off as florets.  Keep those aside.
2.  In a saucer, stir the tandoori spices and olive oil together.  Brush this mixture generously all over the steaks.  Toss the rest of the mixture with the florets.
3. Take care of the florets.  Preheat the oven to 400°F 200°C.  Squeeze just a touch of lime juice over the florets, place them in an oven proof dish or sheet pan, making sure they are well separated, and bake for about 25 minutes.
4.  Now for the steaks.  Heat up your grill, plancha, or griddle pan to high heat.  Grill the steaks for about 2-3 minutes on each side, until they start to get grill marks.  Drizzle a touch of lime juice will this is happening.
5.  Remove from the grill/plancha/griddle and place in the oven.  I griddled on a cast iron skillet and just transferred the skillet to the oven.  Cook for about 15 minutes.  This will have the outside crispy and charge and the inside tender enough without being mushy.
This is perfection.
6.  Serve the steaks drizzled with lime juice and chopped cilantro.  The florets can be served the same way, but without the "steak" look.
I served mine with some Toor Dal, basmati rice, and some sauteed spinach.

Let me tell you about that spinach real quickly.
I took some nigella seeds (also known as black onion seeds) and threw them into some hot olive oil, then added some sliced garlic, and then threw in the spinach and cooked until it wilted.  Then I seasoned with a bit of fleur de sel and added 1 Tbsp dried pomegranate seeds for crunch.
I don't know where that idea came from, but it was a great idea and nicely complemented the rest.

So about those steaks.. there is something ultimately satisfying about tandoorifying vegetables.  The char marks from the grill give the veggies that superior dimension and tandoori spices complement that texture perfectly.
The result is eye-candy.. we rarely see the cross-section of cauliflower heads, nature is truly beautiful.

Print Friendly and PDF

Wednesday, December 7, 2016

Roasted Delica Morreti and Feta Quiche

Keep the skins on.
That's the secret.
The best squash varieties are by far Ms. Butternut and Ms. Delica, pictured blow.
 
Both can be held in one hand, do not need to be peeled if roasted, do not become mush when cooked, and have a distinct sweet flavor that is not watery or pumpkiny.
In 3rd and 4th place come Mrs. Bernettine and Mrs. Sucrine du Berry, pictured below. 
 They are both larger versions of the first two with the same qualities, but need to be held with 2 hands.  They are perfect for pie or larger families.
Ms. Red Kuri (Potimarron) is all the rage in France, and it is very tasty, but on my list, it comes 5th, pictured below.
Although it can be held in 1 hand, there is not much flesh and once cooked, it doesn't stay as firm as the others.  The distinct full flavor is less present as well.
I love my life.

So with this in mind, my full bodied Delica was cubed, skin on, brushed with olive oil and a pinch of fleur de sel, and roasted on a sheet pan with parchment paper for about 30 minutes at 400°F 200°C.
The rest is just a quiche with a garlic panko almond crust.
Ingredients
crust:
3 Tbsp panko (use something else if GF)
1 clove garlic, grated
pinch fleur de sel
few shakes red pepper flakes
few cracks black pepper
3 Tbsp ground almonds
1 Tbsp olive oil
the works:
1 cubed oven roasted Delica or something of the sort
1 onion, sliced into moons (preferably roasted with the squash)
100g feta, cubed
appareil:
3 eggs well beaten
3/4 cup milk
3/4 cup yogurt or cream
1/2 tsp dried thyme
pinch fleur de sel
pinch nutmeg
few cracks black pepper
Directions
1.  Make the crust directly in the baking dish by mixing everything but the olive oil together.  Then pour in the olive oil and spread out the mixture evenly in the bottom of the dish.
Pre-toast the crust by placing it in the oven at 400°F 200°C for about 10 minutes.  Remove the dish and get ready for the next step.
2.  Place the works into the dish, making sure to arrange everything to your liking.  The feta should be evenly distributed and not all clumped on one side.  Apply yourself.  This is easy.
3.  Make the appareil by beating everything together until foamy.  Pour this into the dish with all the other people waiting.
4.  Cook at 350°F 180°C for about 40-50 minutes.
5.  Remove and let cool.  This is important.  At least 15 minutes.  This is also the hardest part.  During this excruciating time, make a salad or something.

I served mine with a salad.
The skin?  Ha!
It makes it crispy and utterly enjoyable without clearly being identified as skin.
I shall never remove skin from any of the smaller squashes again!

Print Friendly and PDF

Wednesday, November 23, 2016

Cardamom-Roasted Red Kuri Squash with Marinated Limes and Black Chickpeas

I love squash season.
It makes me happy.
I also love that you can eat the skin.
I just discovered this.  When it is well roasted, most squashes skin is edible, and even quite enjoyable!
Since this discovery, I've making a squash dish once a week.  Actually, I had already been making weekly squash dishes, but this makes it so much more exciting for me.  No tough peeling!
Lucky for me, there is a whole chapter on Squash in Ottolenghi's Plenty.  This one is mostly his recipe, but I added some sweetly spiced black chickpeas and some quinoa to make it a filling meal.  If those are left out, this can be an appetizer.

Plenty, page 65
Serves 4
Ingredients

Roasted Squash:
1 red kuri or butternut squash, seeded and sliced int 1-1.5 cm thick slices, skin on
2 Tbsp cardamom pods, powdered with a mortar and pestle, pods removed
1 tsp allspice
3 Tbsp olive oil
few pinches fleur de sel

Marinated lime:
2 limes
1 Tbsp olive oil
pinch fleur de sel

Tahini Yogurt Sauce:
1 greek or plain yogurt
1 Tbsp tahini
1 Tbsp lime juice
2 Tbsp water

Topping:
2 sliced green chiles
handful chopped cilantro
crumbled feta

Black chickpeas (not from Plenty, this is my own thing):
1 cup dry black chickpeas, soaked overnight
1 star anis
2 black cardamom
1 green cardamom
1 bag black tea
2 dried red chiles
1 inch piece cinnamon
1 tsp black peppercorns
2 Tej Petta (Indian bay leaf)
1 tsp salt
6 cups water

Directions
1.  Place all the "Black chickpeas" ingredients in your slow cooker and cook on low for at least 7 hours.  This is very hands off.  If you don't have a slow cooker, cook in a pressure cooker under pressure for 15 minutes, opening only after cooling.  Otherwise, simmer stovetop for 1 hour and 15 minutes.  This is why I love my crockpot.
2.  Whenever you feel ready, preheat the oven to 210°C 410°F.  In a small dish, mix the powdered cardamom, allspice, olive oil, and salt together.  Brush this mixture onto the squash slices and place on a baking sheet with parchment paper.  Cook this for 20 minutes or until tender when poked.  This doesn't need to be served piping hot.  It's actually better warm.
3.  While that is happening, make the marinated lime.  Trim off the tops and tails of the limes, stand them on a cutting board, and cut the skin off following the natural curve of the fruit.  This should remove most of the bitter white part as well.  Then quarter the limes from top to bottom and cut each quarter into 1-2 mm slices.  Place these slices in a small bowl with the olive oil and fleur de sel.  Set aside.
4.  Make the tahini-yogurt sauce.  Whisk together the yogurt, tahini, and lime juice.  The tahini should tense up, but then relax.  Add water as you stir.  If the sauce is too thick, add a bit more water. You should be able to pour it.

To serve, I put some quinoa and some of the drained black chickpeas in the plate, then arrange some of the roasted squash slices over it all, spoon some of the lime slices with their juices, and scatter the garnish of sliced fresh green chiles, cilantro, and feta.

This seems like so much, but really is hands-off except for the sauces and lime.  The oven and crockpot do most of the work.  The stove-top only had quinoa going, and the rest was just lingering cooking time.
I like using the full potential of my equipment.  It makes all the "hard work" looking types of meals like this one so effortless, but so beautiful.  The textures of all the combination of elements is surprising with each bite.  This is hands down state of the art.  I would have dedicated a chapter of my life to squash as well.  As would any brilliant person.
There is something about that orange color....

Print Friendly and PDF

Sunday, November 6, 2016

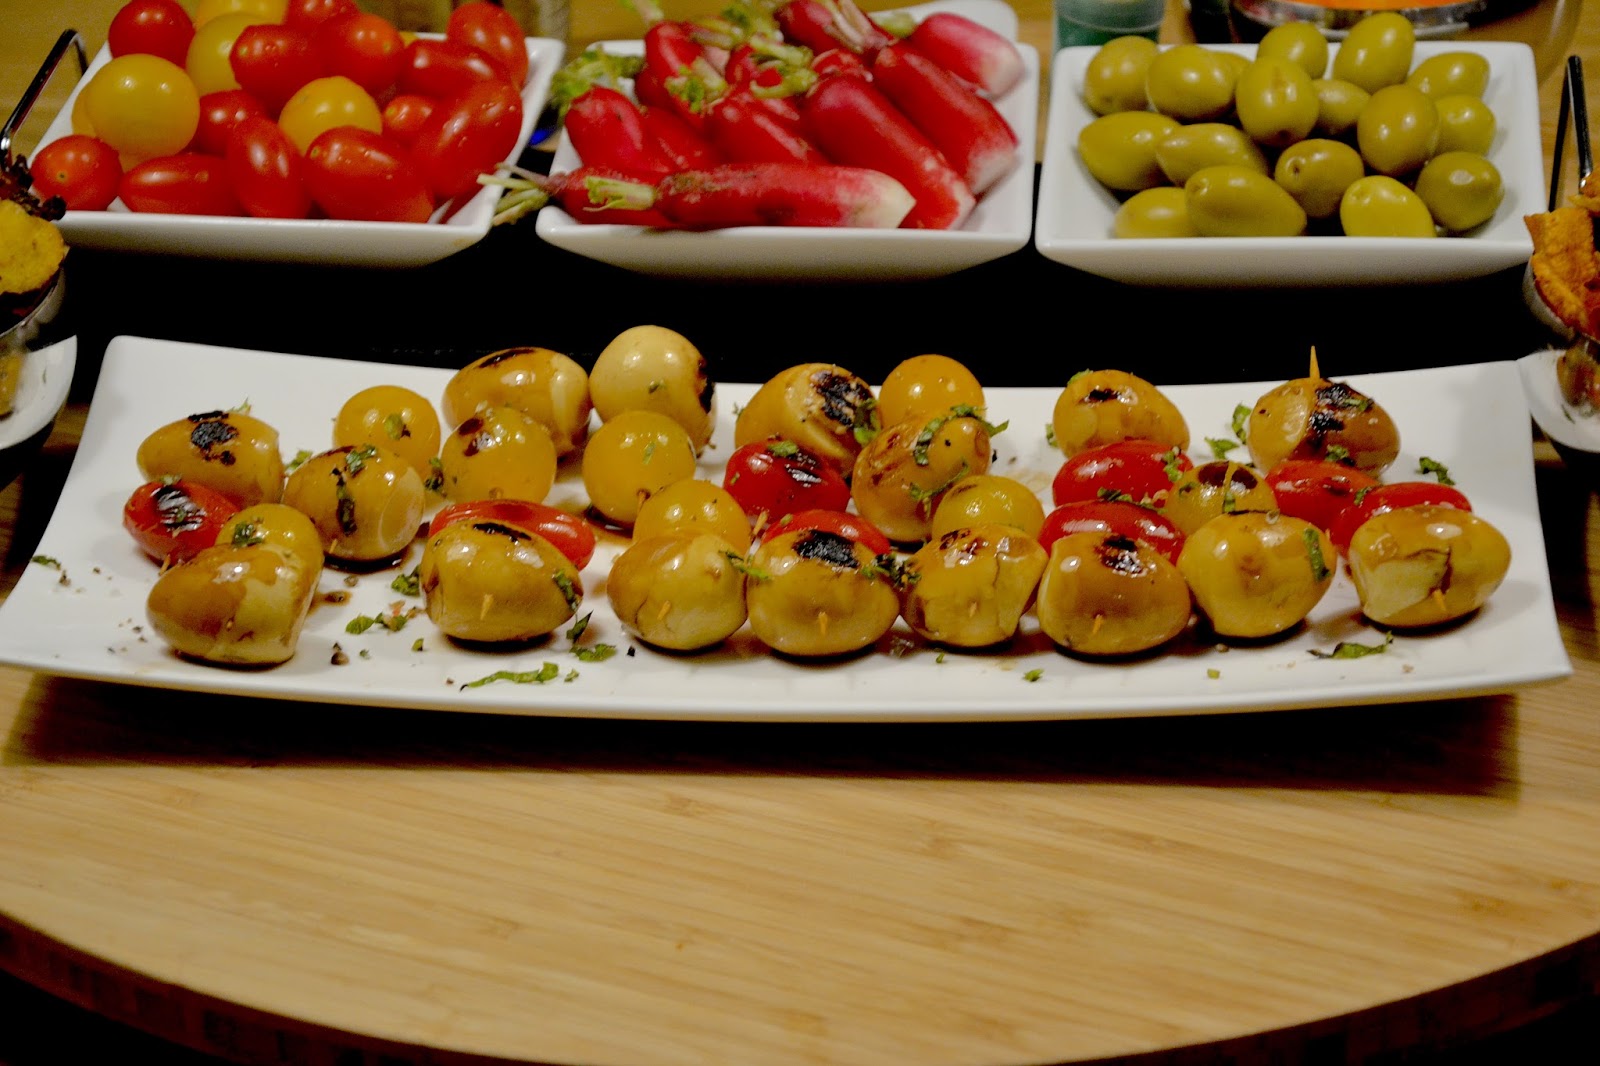
Griddled Marinated Quail Egg Skewers with Basil Salt

So apparently, you can give a woman a fish, and she'll feed you for a day.  Teach a woman how to fish, and she'll feed you for a lifetime... until there are no more fish to be caught, and she'll have to teach her how to dig up mushrooms.
Oh man, that started out nicely but I killed it.
Besides the overfishing bit, I believe this to be true.  These marinated eggs are the result of a certain method of fishing I learned earlier this year.  The fishing lesson was Asian Style with dark soy sauce, and my new creation is Balsamic & Olive oil with Basil salt.
I never would have imagined doing this to quail eggs if it wasn't for that very first discovery, so thank you Yotam for releasing your genius in me.
Griddled marinated cherry tomatoes are also the bomb.  Thank you, Me.
Makes 18-24 skewers (depending on how many quail eggs are packed together)
Ingredients
pack of fresh quail eggs
1 cherry tomato per quail egg
toothpicks for skewers
Marinade:
3 Tbsp balsamic vinegar
juice from 1/2 lime
1 Tbsp olive oil
pinch salt
Topping:
6-7 leaves fresh basil, finely chopped
few pinches Pink Himalayan Salt or other special salt
few cracks black pepper
Directions
1.  Soft boil the quail eggs.  To do this, I placed them in my steamer basked and steamed on high heat for 3 minutes, then let them cool before peeling.  They were perfect.. not too liquid, but velvet cream style.
2.  Make the marinade by mixing the balsamic vinegar, lime juice, salt, and olive oil.  Make the skewers by placing 1 egg and 1 cherry tomato on a toothpick.  Place the skewers in the marinade.  Let marinate for at least 1 hour.
3.  Get ready to grill.  I  used my stovetop griddle pan.  Drain the eggs from the marinade and place on the very hot griddle pan for about 1 minute, making sure to turn them at least once so they get the char marks on 2 sides.  Don't discard the marinade.  Use it on a salad or drizzle it on some grilled veggies.  Don't be wasteful.  Balsamic vinegar is delicious.
4.  Top with some cracked black pepper, pink Himalayan salt, and finely chopped basil.  Don't use table salt.  If you don't have Himalayan salt, use another specialty salt or at the very least, fleur de sel.  You don't want this to have an overly salty taste  but you want it to have texture with the special salt.
Serve at happy hour or as an appetizer.

The marinade was not as strong as the Asian style griddled eggs, but the slight balsamic hint of flavor was definitely there, and much appreciated by my tasters.
This works out so perfectly because you can really taste the grilled part.  The slight char marks make a big difference in taste and texture.  This really is a fool-proof situation here.
I love the bite size-ness of quail eggs and I LOVE that they are easy to find here.  This would transfer well on large skewers on a bbq with other things as well.

Print Friendly and PDF

Sunday, October 9, 2016

Mixed Vegetable Korma

This weekend, I needed a taste of India.
Fresh curry leaves have been located somewhere in Lyon, but I don't know exactly where... all I know is they made their way into my hands.
For as long as I have been cooking Indian food (which means a reasonable number of years) I've been longing for curry leaves.  When I first went to India I tried to source some but I didn't know what to call them in Hindi.  Now I know, it's Kadi Patta.  But over there, they sold me Tej Petta which I later figured out are bay leaves.  I thought all was lost when I finally discovered the Indian supermarket in Lyon where they (sometimes) carry dried curry leaves in little baggies.  After cooking with them for the first time, I became enamored.  They add such a distinct flavor to daals and vegetable stir fries, they're almost like a secret ingredient, unable to be replaced or substituted.  They were my little best kept secret... until I was told that they were seen fresh in town.
Fresh curry leaves?  But they grow only in hot climates and only stay fresh for a few days!  How can this happen in Lyon?  Everyone I know that cooks with fresh curry leaves doesn't buy them.. they grow them.. in India, California, and Malaysia.. never in France.
So when they were gently handed to me as proof that when you really long for something, it becomes reality, I may have concealed my happiness in order not to make a scene in public.
This offering surpasses all others.
This offering is more than just a thing, this is the deepest understanding of my desires.
Thank You.
Inspired by VegRecipesofIndia
Serves 6-7 as a side
Ingredients
Spice paste:
1 inch piece cinnamon stick
2 cloves
1 tsp fennel seeds
1 green cardamom
1/2 Tbsp coriander seeds
2-3 dried red chiles, deseeded
1 tsp poppy seeds
6 Tbsp grated coconut
6-8 cashews
1/2 Tbsp chickpea flour
4 cloves garlic, chopped
3/4 inch piece ginger, grated
1/2 cup water for grinding
Korma:
3 Tbsp oil
1 onion, chopped
1 tsp freshly grated turmeric
2 sprigs fresh curry leaves
spice paste
1 carrot, peeled and chopped
1 large tomato, diced
2 large handful fresh green beans (about 1 cup), tailed and cut in half crosswise
1 handful snap peas
1 1/2 cups cauliflower florets
1 red bell pepper, sliced
1 cup water
2 Tbsp yogurt (optional)
salt to taste
chopped cilantro for garnish
Directions
1.  Make the spice paste.  Dry roast the cinnamon, cloves, fennel, cardamom, coriander seeds, chiles, poppy seeds, and cashews until fragrant, then add the coconut, and chickpea flour and dry roast a few more seconds.  Transfer to a blender with the rest of the spice paste ingredients and grind into a thick paste.  Set aside.
2.  Prepare the Korma.  Heat the oil in a wok or heavy based pan, then add the onions, turmeric, and curry leaves.  Cook until onions are translucent.
3.  Add the spice paste and fry while stirring, making sure it doesn't burn.  
4.  When the oil starts to separate, add the carrots, tomatoes, and 1/4 cup water.  Cover and simmer for about 10 minutes.
5.  Add the rest of the vegetables along with a few pinches of salt.  Cook on medium heat, stirring for another 15 minutes.  Add water as needed.
6.  Before serving, stir in 2 Tbsp plain full fat yogurt.  This step is completely optional and only adds decadence to the dish.  It is perfectly delicious without the yogurt.  Heat through, then remove from heat.
Serve hot or warm topped with chopped cilantro.

I served mine in a thali along with some saffron basmati rice, toor daal, rotis, and some whole roasted tandoori chicken.
Now I just need to get the intel on where exactly to find these next time... for everyone has their secrets and this one was not shared with me...

Print Friendly and PDF

Thursday, September 29, 2016

The Seppia of my Life

 Words cannot do this justice.
One must experience this to fully understand the meaning of life.
Cuttlefish, Seiche, or Seppia, however you like to name it, is my all-time favorite living being to enjoy grilled on the plancha.  Whenever I can get my hands on some fresh ones or have it at a restaurant, you can bet it's going to be in my belly.
This is the first time I've cooked such a big one.  The plate shows only half of it (because I unfortunately had to share) but it was a beauty.
The preparation is methodic, but each step gets me more excited until the very first bite where all I can feel is total bliss.  This is powerful stuff.  It pushes my serotonin button and makes my eyes roll back.
The best part is I finally picked my first of 3 beef heart tomatoes to join me in my nirvana-state.
They were perfect.  Just lightly seasoned with Himalayan pink salt, some pepper, and garden parsley.
Oooh!
So how do you prepare Cuttlefish?
Well, you can have your fish monger clean it and remove the skin (which is easier).. or, you can do it yourself... just be careful not to poke your knife into one of the eyes or it will squirt everywhere and might disturb the moment.
The important part is to remove the bone (or plume) and eyes, then pull the skin off and you're done.
For the plancha:
If it is a large one like mine, cut the body in half to make 2 steaks, and score each side diagonally with a knife.
Rub some grated garlic, hot pepper flakes, fleur de sel, and black pepper all over it, then drizzle with olive oil and let it marinate until you're ready to grill (while you're preparing the rest of your sides).
Then, when the plancha or griddle pan is hot, cook it while pressing down (because the sides will curl up) for about 2 minutes on each side.  You should see some nice grill marks.
Then remove and squeeze some lime juice on it and it's ready to go.
Mmmm.. look at that beauty.  I spoke to it at the store before, on the ride home, and while I was preparing it.
It sacrificed itself for me, and I am every so grateful for having experienced this moment...

Print Friendly and PDF

Monday, September 5, 2016

Garden Tomato and Eggplant Cake Tatin

Living off the fatta the land..
My baby eggplants are just starting to yield multiple eggplants at a time.  For now, 3 is the most I was able to pick at once, but my next harvest will surely be around 6.
Imagine me jumping up and down smiling clapping my hands with my braids flip flopping all over the place.
That is the image of how the idea of harvesting my own vegetables makes me feel.  Baby eggplants are so cute.  I read that if you harvest them too soon or let them grow too big, they will be bitter.  Since they start out purple, it's hard for me to know exactly what the right size should be since.. well, they are supposed to be baby eggplants.  So far, I think the right size is slightly smaller than my fist.  I have a small fist, though.  I guess the size of a roma tomato.  The skin should be glossy.  If it's not glossy, it may be too ripe.
Anyway, as I was harvesting, my lovely neighbor offered me some of her ripe and juicy beef heart tomatoes off her vine.  The stars were aligned in my favor that day.  What a happy couple tomatoes and eggplants make.
I think I'm in love with the night shades...
Serves 6-8 as an appetizer
Ingredients
2 big juicy beef heart tomatoes, sliced thickly
3 baby eggplants, halved (sub 1 small eggplant, cut into 1 inch cubes)
few pinches dried thyme
cracked black pepper
few pinches fleur de sel
drizzle olive oil
Batter:
2 large eggs
1 cup buttermilk (I put a plain yogurt in a measuring cup and topped off with milk)
2 Tbsp olive oil
1 Tbsp sugar
1 tsp freshly cracked black pepper
pinch fleur de sel
1/2 tsp dried thyme
1 1/2 cups cornmeal
1/2 tsp baking soda
2 tsp baking powder (sub 1 tsp baking soda if GF)
 Directions
1.  Prepare the topping.  Place the tomato slices and eggplant pieces on a baking sheet and sprinkle with thyme, black pepper, fleur de sel, and drizzle with olive oil.  Roast in the oven at 200°C 400°F for about 20 minutes.
2.  Prepare your baking dish.  Cut a circular piece of parchment paper to put at the bottom of your baking dish.  Place the roasted tomato slices and eggplant pieces onto the parchment paper.  This is going to be the top of your cake once it's flipped.
3.  Prepare the batter.  In a mixing bowl, beat the eggs with the buttermilk, olive oil, and sugar.  In a separate mixing bowl, put all the dry ingredients and mix with your hands to evenly distribute.
4.  Carefully pour the wet ingredients into the dry ingredients and mix until just combined.  Don't overdo it.
5.  Pour the batter (it should be somewhat thick) into your baking dish over the tomatoes and eggplants on the parchment paper.  Use a spoon to spread it evenly across the dish.
6.  Bake at 200°C 400°F for 20 minutes.  The top should start to look golden and the sides should be starting to pull away.
7.  Let cool 10 minutes, then run a sharp knife around the sides to loosen the cake from its mould.
8.  Flip onto a plate, and cover until ready to serve.
9.  When ready, remove the layer of parchment paper and slice.
Serve warm or cold.  I served mine with a salad and called it a meal.  The leftovers were partly eaten for breakfast and partly cut into little cubes and served at happy hour with a toothpick the next day.

This lovely cake is slightly sweet, due to the corn flour.  It is a surprising combination that works quite well and has an interesting presentation.  The batter is just a blank palette for any other combinations now.. zucchini slices.. added feta, caramelized onions, spinach, broccoli.. ooh I'm getting all kinds of ideas.  Oh dear.. jalapeño cake is going to happen... ooOoh!
So now you can have your cake... and eat it too!

Print Friendly and PDF

Friday, September 2, 2016

Black Bean & Beet Veggie Burgers

Shortly after purchasing a burger press, I figured anything could be shaped into a burger.  It didn't always have to be ground beef.  I could mix different meats, hide edible surprises inside patties, or even go all veg.  Why not give it a try?
Making an all veg burger is quite a challenge.. but only because I'm calling it a burger.  Calling it a burger means it should resemble meat.  In a meat burger, there is outer char, juicy inside, texture, and doesn't need much seasoning to be delicious. Trying to replicate all those aspects is a long process, but if you plan ahead and make enough to freeze individual patties, you are a total winner.
Just like me.
The reward for all your efforts is to have it on a bun with all your favorite fixings.  Nothing can beat that reward.  Plus, this one is made with beets.  So you can beet that... haha.
Recipe adapted from TheKitchn
Serves 8
Ingredients
2 Tbsp olive oil
1 onion, diced
4 cloves garlic, grated
2 Tbsp apple cider vinegar
3 red beets, roasted @ 200°C 400°F for 50 minutes, then peeled, grated, and squeezed
1/2 cup quinoa, rinsed, cooked, and cooled
1 1/2 cup dried black beans, cooked (or 2 cans, drained) and separated into 2 portions
1/4 cup dried figs (or pitted prunes)
3 tsp smoked paprika
2 tsp mustard
1 tsp ground cumin
1/2 tsp ground coriander
1/2 tsp dried thyme
salt/cracked black pepper
1 tsp Worcestershire sauce (sub balsamic vinegar if vegetarian)
1/4 cup oats, blended into flour
1 egg (optional)
Directions
1.  Heat the olive oil in a pan and add the onions.  When the onions are translucent, add the garlic.  Cook until the onions are brown.  Don't burn them.  Deglaze with the apple cider vinegar.  Remove from heat and set aside.
2.  Pulse one of the 2 portions of black beans with the dried figs.  You want them roughly chopped, not pureed.
3.  In a mixing bowl, add everything but the egg and ground oats.  Mix with your hands until the mixture is homogenous.
4.  If using, add the egg and mix well, then add the ground oats and combine well.
5.  Refrigerate this mix for at least 2 hours, at most 2 days.  It will be easier to form the patties when cold.
6.  Shape the burgers into patties.  I used my burger press with parchment paper (meatless burgers are sticky).  If you don't have a burger press, use about 1 cup of the mixture per burger.
7.  To cook, use a plancha, bbq, or griddle pan.  I used my cast iron griddle pan on high for 3 minutes on each side.  It should stay together if you don't poke it too much.  It won't stay together the way a beef patty would, though, so keep that in mind.  I was able to get some nice grill marks on mine.
Serve on a bun with your favorite fixings.
I like mine with lettuce, onion, tomato, a bit of cheese, some mustard and samurai sauce, a chipotle chile, sometimes avocado, and always an egg.

I have to admit to how proud I am of these burgers.  All I wanted was to get a bit of char on there, and feel like I'm biting into something.  Of course, the texture is not the same as a beef burger, but it's not too far off.. and it definitely deserves its place on the grill.
I'm almost out already, so I'm going to be making a bigger batch soon.

Print Friendly and PDF

Sunday, August 28, 2016

Chickpea and Tomato Salad with Quinoa

They have declared a "heat wave" all over France.
It's true, it's hot.  It's officially a heat wave according to the government.  This means that for at least 3 days in a row, the highs have been over 32°C (90°F) and at night the lows haven't dropped under 20°C (68°F).  I have trouble calling it a heat wave because I grew up in Palm Springs, where these temperatures are relatively mild.  We call it springtime.
But to normal non-desert living people, yes, this is a heat wave.
So, the reason it is so "unbearable" here is that A/C is a rarity.  Some people have it, but most don't.  They don't even have it on public transportation.  The air is stuffy, and for those living in big cities, there is no air.  The buildings and concrete just make it hotter.
Also, not everyone has a pool here and people think drafts will kill you.  The lady sharing my office violently shut the window in the morning because I was letting a refreshing morning draft of 21°C into the office.
Running around in your underwear is not really a thing either.  It really should be though.
Anyway, it may go without saying, but I do not have A/C either, and my average indoor temperature is about 28°C (82°F).  To avoid making that number skyrocket, I've been avoiding the oven and trying to keep my stovetop activity to a minimum.
This is why having a crock pot is a blessing.  It doesn't add one degree to the indoor temp.. plus if it did, I could take it to the garage and run it down there.. which I can't do with my stovetop or my oven.  I also love coming home to a lovely wafting aroma.
This can only mean one thing...
It's bean time.

Serves 4-5
Ingredients
1 1/2 cups dried chickpeas, soaked overnight and rinsed
2 bay leaves
few pinches salt
1 tsp ground cumin
2 dried chile de arboles (or any dried chile)
6 cups water for chickpea cooking
2 Tbsp olive oil
1 fresh chile, sliced into rounds (I used a red Morrocan chile)
1 clove garlic, sliced
1 tsp caraway seeds
1/4 tsp turmeric
2 zucchinis, sliced into rounds and quartered
pinch fleur de sel
few cracks black pepper
1 cup quinoa, rinsed
1 cup water for quinoa cooking
3 large juicy tomatoes, chopped (or lots of halved cherries)
2 chopped shallots
2 cloves garlic, grated
handful chopped parsley
handful chopped cilantro
juice from 1/2 lime
few pinches fleur de sel
1/4 tsp ground cumin
lots of freshly cracked black pepper
1 Tbsp cider vinegar
2 Tbsp olive oil
handful cubed feta (leave out if vegan)
Directions
1.  Cook the chickpeas with the bay leaves, some salt ground cumin, chile de arboles in 6 cups of water.  I used a crockpot.  It's the best hands off method I've found to cook beans.  I left them on low for 6 hours.  You can simmer for 45 minutes in a normal pot but I've never done this.  You want them to still hold their texture, but be creamy on the inside.  Do not cook them to mush.  When done, remove the chile de arboles (to add to your plate), discard the bay leaves, and drain the chickpeas.  Set aside.
2.  Prepare the good stuff.  Heat 2 Tbsp olive oil in a pot (the same one you will be cooking the quinoa in).  Add the fresh chile slices and fry for about 1 minute.  Remove the chile slices and set aside.
3.  In that chile infused oil, add the caraway seeds and cook for another 30 seconds, then add the turmeric and wait for it to fizz.  Add the zucchini slices along with the garlic slices, a pinch of fleur de sel, and some black pepper.  Cook, stirring for about 5 minutes.  Remove the zucchini mix and set aside.
4.  If no oil is left after removing the zucchini, add 1 Tbsp more olive oil and the rinsed quinoa.  Toast the quinoa for about 1 minute, making sure not to burn it, then add 1 cup water.  Reduce heat to a simmer, cover, and let cook until the water is absorbed (about 10 minutes).  Then remove from heat and set aside.
5.  Now you are ready to assemble your salad.  Toss the drained chickpeas with the tomatoes, shallots, grated garlic, herbs, lime juice, cumin, black pepper, fleur de sel, vinegar, and olive oil.
6.  To serve, put the warm quinoa at the bottom of the plate or dish, then top with the chickpea salad.  Add the cooked zucchini, chile slices, and feta as garnish.

For extra heat and smokey flavor, add those chile de arboles from cooking the chickpeas to your plate.

When you start to interact with your dinner, you will feel several emotions at once.
The cold tomatoes contrasting with the warm chickpeas sets off dizzying hallucinations.  The quinoa cooked in in fused chile oil with caraway reminds you that life is beautiful.  The chile may be mild, may be not.  The uncertainty of each bite makes your heart skip a beat.
And then you remember why you love the way summer "heat waves" make you create.

Print Friendly and PDF

Saturday, August 27, 2016

Green Split Pea and Spinach Salad

To this day, I have only ever cooked split peas (green or yellow) to make Dal.  It's what they were put on this Earth for.  It's their primary mission.  
It always weirds me out to see recipes using bacon and ham hocks paired with split peas.. or even mashed split peas (unless it's a happy hour dip).  It's just as weird to me as seeing someone eating mussels with a fork and knife.
I was actually going to make dal last night with these green split peas when the melon I was munching on started putting refreshing ideas into my head.  It persuaded me to step out of my comfort zone and try them cold.
Cold?  Eww!
I let my heart take over my brain and added all the things that would make me happy at that precise moment.
It turned out to be a glorious event.  The little cold split peas presented themselves on a whole new level to me.  They explode in flavor when cold and paired with raw, dried, and pickled things!
A completely different experience than eating them hot.  I felt like I was being introduced to someone new.
Serves 2
Ingredients
To cook:
1 cup dried split green split peas, thoroughly rinsed
4 cups water
pinch salt
few cracks black pepper
To toss:
2 large handfuls fresh spinach, rinsed and dried
1 tomato, chopped
6 sundried tomatoes, chopped
1 shallot, minced
2 Tbsp capers
6-8 pepperoncini (or as many as you're comfortable with)
2 Tbsp chopped parsley
2 Tbsp chopped cilantro
juice from 1/2 lime
2 Tbsp olive oil
1 Tbsp balsamic vinegar
few pinches fleur de sel
lots of freshly cracked black pepper
nice handful cubed feta (leave out if vegan)
Directions
1.  Cook the split peas in the water with a pinch of salt and some black pepper.  Bring to a boil, then simmer for about 15 minutes, or until the peas are tender (not mushy).
2.  Drain, rinse, and toss with everything but the spinach.
3.  To serve, place a handful of spinach at the bottom of the plate or dish, then serve the split pea salad on top.

Such simple things bring so much joy..

Print Friendly and PDF

Monday, August 22, 2016

Aloo Gobi with Broccoli and Mutter Sabzi

India has been calling me by my first name recently.
She's been putting ideas into my brain, marinating them all day, then releasing them on the weekend.
I never get bored chit chatting with the Ba's from different regions.. in my head..

Loosely inspired by TheChefandHerKitchen.
Ingredients
1-2 Tbsp oil
1 tsp cumin seeds
pinch hing (asafoetida)
1/4 tsp turmeric
1 green or red chile, slit
1 onion, chopped
1 tsp grated ginger
1 tsp grated garlic
1/2 small head broccoli, cut into florets
1/2 small head cauliflower, cut into florets
2 medium potatoes, steamed, peeled, and cut into large cubes
1/2 cup green peas
1 tomato, chopped
1 tsp ground coriander
1/2 tsp ground cumin
1/2 tsp garam masala
1/2 tsp amchur (dried mango powder)
1/4 tsp chile powder
1 Tbsp besan (chickpea flour)
pinch salt
chopped cilantro for garnish

Directions
1.  Heat the oil in a wok or heavy based pan.  Add the cumin seeds and wait until they start to crackle, then add the hing and turmeric.  They should fizz.
2.  Add the slit chile and chopped onion and cook until onion is translucent, then add the ginger and garlic and cook for another minute, stirring.
3.  Add the broccoli and cauliflower florets and stir.  Cook for about 5 minutes until almost tender, then add the potatoes and peas.
4.  Cook on high, stirring, for another 2-3 minutes, then add the tomatoes.
5.  Mix the ground spices and besan together and sprinkle all over the vegetables.  Mix gently, then remove from heat and cover.
6.  Let sit for at least 5 minutes before serving.

I served mine topped with chopped cilantro with Kala Chana Masala, Basmati rice, and Rotis.

Print Friendly and PDF

Sunday, July 31, 2016

Ensalada de Nopales

Say whaaaaat???
These couldn't have happened at a better time.  As I was planning a Baja Fish Burrito evening, I spotted nopales in the "exotic" section of my grocery store.  The dormant Baja Abuelita inside of me woke up and ripped out of my ribcage with such fierceness she took control of my nimble fingers and guided me through the process...
Usually, in France, the "exotic" section is Vietnamese, North African, or Antillais.  I usually find basics but then go to specialty stores for actual Chinese or Indian products.  Mexican food is destined to the boxed fajita items and jarred guacamole in the dry section.  Never in my life have I seen Nopales on this side of the Atlantic (which only means I've never seen them, but doesn't mean they're not here, somewhere).
As you may have imagined if you know me by now, I squealed with joy, right in the middle of other grocery shoppers.  It just naturally came out of me.  They were in a small basked next to the okra, and there were probably only 15 pads, spines already removed.  They didn't look the freshest (brown spots and floppiness), and I probably wouldn't have bought them looking like this in the US, but here,  this was the glowing treasure that came all this way just to be prepared by me.  It was a sign with big neon lights and blinking messages of love and tenderness.  It couldn't be any other way.
With all this positive energy happening around me, shoppers started to gather round as I selected about 1 lb of nopales.  
"What is that?"
"Is it edible?"
"How on Earth does one prepare this?"
"Can you describe the taste/texture?"
Everyone was intrigued.  Here in France, they eat the prickly pear fruit (Figue de Barbarie) but nobody would have ever thought to eat the Mickey Mouse Ears (Oreilles de Mickey) as they are called here.  The glory was all mine as I explained how, on top of being delicious, they are very nutritious and provide many health benefits.
So now, off I went for the preparation phase.  I've eaten nopales millions of times, but I'd never prepared or cooked them myself before.  There was always some woman higher up in the hierarchy who had the pleasure of preparing them long before I started to cook for myself.  I looked up boiling times on the internet and let the Baja Abuelita guide me for the rest.
It came from the heart, and it was perfect.

Ensalada de Nopales
Serves 3-4 as a small side salad

Ingredients
500g (approx1lb) whole nopales
To boil:
1/2 onion
2 chile de arboles
2 cloves garlic, peeled
small bunch cilantro (with stems)
pinch salt
1 tsp ground cumin
1 tsp dried oregano
lots of freshly ground pepper
To toss:
1 Tbsp minced jalapeno chile (optional)
1 small shallot or 1/4 red onion, minced
handful sliced cherry tomatoes
1 clove garlic, grated
juice from 1/2 lime
pinch fleur de sel
2 Tbsp olive oil
1 Tbsp freshly chopped cilantro leaves
crumbled queso fresco or feta for garnish (optional)
Directions
1.  Prepare the nopales by scraping the spines and as much brown off with a knife.  Cut the stem part off.  Rinse well, then slice them into green bean sized pieces.
2.  Place them in some water with the "to boil" ingredients.  Bring to a boil and simmer for about 10 minutes.  This is to remove the "slime".  They can be eaten raw, but Abuelita said to cook them for my first time.  I still ate a piece raw and it wasn't bad.  I like the texture.
3.  Drain them, remove the boiled onion, garlic, and cilantro, and rinse.  Let cool while you do your other Baja kitchen activities, such as make guacamole, cascabel salsa, mango corn salsa, marinate the fish, make the white sauce, make black beans, rice, etc.  OooOo.
4.  Toss the nopales with the salad ingredients and refrigerate until ready to eat.  This can be a completely vegan salad without the queso fresco.. obviously.

Invite your Baja Abuelita to join you at the table.
This is all thanks to her, by the way..

I had this alongside some Fish Burritos last night.

And then made myself an egg & nopales breakfast burrito this morning.
Best. Breakfast. Of. My. Entire. 33. Years.

Print Friendly and PDF