Search this blog

Translate

Tuesday, December 31, 2013

Sopa de Albóndigas Curiosas

A perfect NYE lunch in preparation for the major eating that will be going on later, this is basically Tortilla Soup, but adapted to what I had on hand.. meaning no black beans, no chicken, no tortillas.
I did, however, use
red onion, half a sliced fennel bulb, tomatoes, avocado, carrots, corn, cilantro, chili powder, cumin, oregano..
and leftover Broccoli Cauliflower Balls I used as dumplings or albondigas.
Topped with a sliver of fresh goat cheese, a squeeze of lime, and a few drops of Oolala and 
OOooOoohh nice.

I love all the different textures in this soup, especially how the avocado gives it a creamy contrast.

I was in the mood for Mexican.  I'm searching for a Mole recipe that would work without necessarily using tomatillos, pasilla chilies, and ancho chilies (which I haven't found yet in Lyon) but still being authentic.
I have some 100% dark chocolate that would be perfect to use in this since it's practically inedible.
I'm not saying 100% dark chocolate is inedible, but I recently changed from Pralu to Bonnat and I just don't find the Bonnat one very palatable.

Does anyone have a good recipe for me?  Or some pasilla and ancho chilies?


Print Friendly and PDF

Monday, December 30, 2013

Cavatappi with Kale Pesto and Fennel

I thought it would be greener, but don't be fooled.  This pasta is drenched in vitablasting kale.
I improvised as a way to use up the rest of the pesto from the pizza, and after rummaging through the fridge, I saw the fennel that was calling out to me
"Eat me please!"
It just so happens that the two go wonderfully together and since its so healthy, I'll be using the combo over other things in the future.
Serves 4
Ingredients
Kale Pesto:
1/2 bunch washed raw kale
4 cloves peeled garlic
1 handful parmesan
handful roasted pumpkin seeds (or pine nuts if you have them)
1/4 cup (I admit I didn't measure) EVOO
dollop of heavy cream
lots of freshly cracked pepper
Blend it
Pasta:
3/4lb cavatappi cooked al dente
4-5 Tbsp kale pesto
1 chopped tomato
some red pepper flakes
1 small fennel bulb, sliced
1 Tbsp EVOO
Reserved pasta cooking water
Directions
1.  Sautée the fennel slices in some EVOO for about 5 minutes, then add the tomatoes and cook until slightly mushy.
2.  Add the pesto and heat through.
3.  Toss with the al dente pasta.  Add some cooking water to make it more saucy or creamy.

Serve with some red pepper flakes to make it extra delicious!!

Print Friendly and PDF

Broccoli Cauliflower Bouchées

It sounds a bit classier to call them bouchées rather than bites.. especially when reading with a French accent..
I'm not sure these need much introduction.  Seriously, everybody loves a good mouthful of broccoli and cauliflower, right?  Well I do, and when prepared this way, even your toughest veggie haters will love them.  Besides the fact that there is cream cheese and parmesan in these, they are relatively healthy.  They're baked, not fried, so that counts for something.. and it also makes it easier to convince yourself that it's ok to eat them while watching Breaking Bad at 11 pm instead of as the appetizers they were meant to be.  I love how I imagined these.. and then they materialized.
If only I could make that work with one other thing...
Makes 20 bouchées
Ingredients
about 300g (10 oz) mix of cooked broccoli and cauliflower, chopped
1 large onion, sautéed in 1 Tbsp EVOO
2 beaten eggs
1/2 cup organic corn flour
4 Tbsp cream cheese
1/2 tsp piment d'espelette powder (or chili powder)
lots of fresh cracked pepper
handful parmesan
handful shredded swiss
Directions
1.  In a mixing bowl, mix the eggs, corn flour, cheeses, and spices until the mixture is homogenous.
2.  Stir in the onions, broccoli, and cauliflower.  If it's too liquify, sprinkle more corn flour or parmesan.
3.  Refridgerate for 1 hour.  That gives time for the batter to thicken.
4.  Preheat oven to 180°C (350°F).
5.  Make little balls with the batter and place them on a parchment lined baking tray.
Like so.
6.  Bake for 35-40 minutes.

Be careful, they're hot!
And they're addicting!

Print Friendly and PDF

Saturday, December 28, 2013

Pintade Pizza with Kale Pesto

There are many many things you can do with holiday leftovers..
Leave them as they are and keep eating the same meal over and over again,
make an omelet out of them
make a burrito or tacos (by the way, who was the genius who defined tacos in Lyon? tssk)
toss them into pasta or fried rice
sandwiches
soup..
this list can go on forever, and that's a good thing.
The last of my guinea fowl or pintade is going to be a fancy topping to my pizza.
I don't have any basil, so my sauce is going to be kale pesto.. because I don't do tomato sauce on homemade pizza.  Well, not yet anyway.
Ingredients
Dough:
100g all purpose flour
130g whole wheat flour
5g (1/2 tsp) salt
12 cL (4 fl oz) warm water
5g sugar
10g (2 tsp) yeast
2 tbsp EVOO
Cornmeal for rolling and base
oil for hands and bowl
Toppings:
Kale pesto
 
Griddled zucchini
Leftover shredded pintade or chicken or turkey
Sliced mozzarella
Roasted tomatoes
Parmesan + Shredded Swiss
Egg yolks after about 10 minutes at the highest oven temperature, then cooked 3 minutes all together
Chili oil or flakes for garnish

I reposted the dough ingredients, because it's my basic recipe I use for all my pizzas.

Satisfyingly delicious..
The kale pesto didn't have an overpowering kale flavor, which is good because it's kind of supposed to be an illusion.
We'll see more of that kale action over pasta very soon...

Print Friendly and PDF

Friday, December 27, 2013

Bagels from my Oven

I haven't had a decent bagel since living in the US.  Actually, longer than that because Florida doesn't really have extraordinary bagels the way San Diego does.  Purists would argue that New York is the only place to get a "real" bagel.
In any case, I haven't seen anything "real" here in France, although there are some pretty decent attempts popping up in Lyon.  Bagel shops are becoming trendy in Europe, which is great, but please stop putting that cheap nasty salty smoked salmon on them.. Pretty please?  Lox are not heavy in smoky flavor and in my opinion, are not interchangeable with smoked salmon!  I suppose putting a sashimi cut of salmon would be more appropriate than smoked.  Bah!
Anyway, when I saw that the Amateur Gourmet made his own bagels, the idea of making and eating bagels has been lingering around.  The only thing I was waiting for was an opportunity to buy malt syrup.  The original recipe calls for malt syrup, which I couldn't find anywhere here in France (seriously.. all over France) and couldn't find in Quebec either.  I supposed I could have purchased some online, but that's cheating.  My desire to start my bagel project surpassed my desire to obtain malt syrup, so I looked up substitutes, and it so happens that molasses is a worthy replacement.  Bingo!  I have molasses.
Let the bagel making begin!
Makes 12 small bagels.
Ingredients
4 cups American bread flour (I used 200g T110 whole wheat + 315g T65 white)
1 Tbsp kosher salt
1 1/2 cups (35 cL) warm water
4 tsp sugar
1/4 oz (7g) or 2 1/4 tsp active dry yeast
2 Tbsp malt syrup (I used 1 Tbsp molasses)
a very well oiled bowl
Toppings:
Black sesame seeds
White sesame seeds
Poppy seeds
Dried shallots
Flax seeds
Whatever other seeds you see fit
Directions
1.  Stir the sugar into the warm water and sprinkle the yeast on top.  Let it sit a few minutes until it foams, then stir in the malt syrup or molasses.
2.  Meanwhile, sift the flours and salt together.
3.  Pour the water yeast sugar into the flour mixture a little at a time, while kneading.  I poured the whole thing in with initially 480g flour.  It was too wet and I had to add more flour (thus the 515g which was perfect.)
4.  Knead and knead and knead for at least 30 minutes.  I don't have a kitchen aid and I'm glad I don't because it would take all the fun and love out of it.  So knead for a long time.  At the end you should have a slightly firm elastic ball that is not too dry.
5.  Place the ball into a well oiled bowl, making sure to cover the whole surface of the ball with oil.  Cover with a towel and let sit for at least 1 hour.  I let it for 2 because I had some errands to run.  During this step, it should rise, but not crazy insanely over the top.
6.  Punch the risen ball down, knead a bit, then separate the dough into 12 equal pieces.  Mine were approximately 75g each (about 2.6 oz.)
7.  Make a bagel shape with each ball of dough.  I flattened it a bit, then poked a hole through it and pinched it together against the palm of one hand for the round ring shape, trying to get it as equally distributed as possible.  The original recipe has you roll a log and then pinch it together, but that just risks it falling apart.   I find my method easier.  You want the hole to be a little larger than a quarter (or a 2€ haha)
8.  Do this to each piece and let them rest at least 10 minutes in a warm place.  I put them in my cold oven while I put the water to boil.
9.  In a large pot, bring some water with a handful of sugar to a very active simmer (not a full out boil).
10.  Reshape the raw bagel if needed before boiling.  Boil by 3 or 4 for 30 seconds on each side, then remove onto a rack so the they can drip dry.
They will shrivel a bit, but that's ok.
11.  While still "wet" sprinkle desired toppings over the bagels.  I did some all sesame, all poppy, all shallots, then I did a mix of everything including the flax seeds.
12.  Once they are all decorated, they are ready to be baked.  Preheat oven to 410°F (210°C).  Place the bagels on parchment paper with enough separation between them.
13.  Bake for 20 to 25 minutes, rotating once so that they have a nice caramel colored crust on top.
14.  Let cool on a wire rack for at least 30 minutes before digging in.

Your house will smell so good the neighbors will start wandering in and you'll have to politely shoo them away.
These are a good breakfast size, but I'll definitely make them bigger next time.  They were a little dense, but wonderfully chewy the way a bagel should be.  I'm guessing my flour did not have as much gluten as "bread flour."  This is a quadruple thumbs up recipe that tops any of the bagel places in Lyon (or in CA for that matter).

My stomach is growling as I imagine my "everything" bagel smeared with philadelphia cream cheese and dill, topped with thinly sliced salmon (yes, raw) sliced tomato, red onion slices, and capers…
Oh yes the pearly gates have let me in…
I just had 2 of these for dinner.
I'm realizing how lucky I was to have a lunch like this almost every day during my youth.  My mother used to pack all kinds of different bagel sandwich creations for me while others got PB & J..

Breakfast tomorrow morning will consist of a sesame seed bagel with cream cheese, roasted turkey, avocado, and an egg with some hot sauce.. just like old times =)

Print Friendly and PDF

Wednesday, December 25, 2013

Grilled Lobster with Fennel Kumquat Avocado Salad

I had my mind set on buying rock lobster (langouste) this season.  Actually, I always have my mind set on buying rock lobster, except it's not always readily available year round and it's usually expensive.  I don't think I've had it in 4 years.
This year, it was extremely expensive.  It would have cost around 50€ for just 1.. and I'm not alone.
Strangely enough, North American lobster is a bit cheaper.  Around 16€ live and whole.  My only issue with live animals is that I'm much rather pet them than kill them.  I couldn't really imagine myself throwing that adorable lobster into a pot of boiling water.
I know that's what you're supposed to do.
I just won't do it.. and the man in the house won't do it either, so that makes it tough to cook lobster at home.
Until…
I stumbled upon something called Lobster Popsicles.
Seriously.  In France, they call them Lobster Popsicles (probably since they're North American).  It's basically a cooked lobster frozen in its saltwater brine for ultimate freshness.  I think it's the best thing they've ever invented!  Look at this guy!
I had already decided I wanted to grill them on my griddle pan once defrosted.  I was so happy about having them that I needed to find a dressing to serve them with that would be perfect, delicate, and holiday worthy.
Fennel salad.  Yes, it's perfect with seafood, and it will blow your mind paired with this grilled lobster.
Serves 3
Ingredients
3 defrosted or whole cooked lobsters
some EVOO for brushing
1 grated garlic clove, for brushing
fresh cracked pepper
Salad:
1 large fennel bulbs, sliced thinly
handful of kumquats, sliced thinly
1 avocado, cubed
juice from 1/2 orange
squeeze of lime juice
1 Tbsp EVOO
drizzle of basaalmic vinegar
1/2 tsp piment d'espelette
pinch of fleur de sel
fresh cracked pepper
handful chopped cilantro
Directions
1.  Make the fennel salad.  Toss all the salad ingredients together.  Let sit for at least 1 hour.
2.  Cut cooked lobster in half lengthwise, brush with olive oil, garlic, and cracked pepper and grill 3 minutes meat side down, then flip and grill another 3 minutes to heat the meat through.  Make sure the claws touch the griddle too, so they warm up.

Bam.
Holiday fancy pants meal.
Soooooo delicious!
Make sure you have a nutcracker or some time of crab cracker for the claws.  It would be a shame to let that wonderful meat go to waste.
My favorite part of this meal (besides the mere fact that it was lobster) was eating with my hands and getting it all over the place.

Print Friendly and PDF

Grilled Scallops on Roasted Carrot Orange Purée

I recently rediscovered a way of cooking carrots which brings out their best natural taste, by roasting them.  The taste was so extraordinary I saw myself eating at a fancy restaurant.. except for the presentation.  I'm pretty sure a fancy restaurant wouldn't serve carrot sticks the way I did.
They would probably serve halves.. hmm.
Anyhow, carrots are a perfect pair with roasted scallops, and to take absolutely nothing away from the nobility of scallops, I decided to make a purée while still keeping that over the top roasted carrot flavor..
and to make it even more fancy, use whole cumin seeds and orange juice.
This may seem like a quick task, but there are certain steps not to be skipped if you want that amazing flavor.  Another guarantee is to buy the carrots that come in bunches with stalk and stems from the farmer's market. 
I labeled this seafood and vegetarian because you don't necessarily have to pair it with scallops.  It's delicious on its own.
Serves 3-4 as an appetizer
Ingredients
1 lb scallops
1 large fresh bunch carrots (around 1 1/2 lbs), peeled and halved
1/2 tsp cumin seeds
juice from 1 orange
1 Tbsp chili oil
1 Tbsp EVOO
pinch of fleur de sel
few cracks fresh pepper
1/2 tsp ground piment d'espelette
1 Tbsp cream (optional)
chopped cilantro for garnish
Directions
1.  Toss the carrots in the chili oil, fleur de sel, pepper, and piment d'espelette.
2.  Heat the EVOO in a frying pan and add the cumin seeds.  Cook until they crackle.  The aroma should be seeping out of them.
3.  Add the carrots.  Toss well to get the cumin well distributed.  Cook on high for about 5 minutes.  This will sear them somehow.  It's essential.  I didn't have a big enough pan for all the carrots, so here is about half of them.
4.  Transfer the carrots to an oven proof dish without overlapping them.  Add 1/2 of the orange juice.
5.  Roast in a 200°C 400°F oven for 40-50 minutes.  Remove and let cool a bit.  They should be beautiful.
6.  Take the tails off if you wish and mash them with the other 1/2 orange juice and cream if using.  Try not to eat it all.
7.  When ready to eat, heat a bit of EVOO in a frying pan and grill the scallops.  Be gentle with them.  Do this for about 2 minutes on each side, then squeeze some lime juice on them and serve with the carrot purée.

Bliss..
This is definitely something I'll make again.  It has so much flavor it will impress even the toughest of guests.. and I suppose it's good for children as well since they seem to prefer mashed veggies.. but I don't know much about that obscure part of life.
It's also a nice alternative to the classic "Coquilles St. Jacques" everyone busts out during the holidays.. drowned in wine and béchamel, which take away all the noblesse of the St. Jacques.

Print Friendly and PDF

Tuesday, December 24, 2013

Miso Ginger Sesame Roasted Guinea Fowl

 What was that you said?
Guinea fowl seems like such a bad word.  In French, it's called Pintade, which I prefer.  I'm definitely getting fancy this holiday season.
I believe I've mentioned somewhere that I've never cooked a whole holiday bird with stuffing and the works.. and that fact saddened me upon realizing it.  Back in the US, the holiday cooking was never my job so I watched, and at best, chopped, but I never did any of the glorious stuff.  Here in France, I've either been invited to massive tables or cooked for 3.  
What's the point of doing a whole turkey for 3?
Well, here in France, holiday birds aren't narrowed down to just turkey.  they have a full array of crazy things and a larger selection of birds to choose from.  I've done kangaroo, wild boar, doe, deer, and lamb, but this year, I'm doing a bird.
Guinea Fowl.  It's a small little thing perfect for 3 and doesn't necessarily break the budget.
I'm going to make it memorable by smothering it in a sexy miso marinade, stuffing it with nashi (asian pear) and yam, and slow roasting it to perfection.
Ooh
Ingredients
1 guinea fowl or pintade of 1.6kg (3 1/2 lbs)
Stuffing:
1 nashi pear, cut into cubes
1/2 yam, peeled and cut into cubes
1/2 red onion, minced
1 Tbsp orange juice
1 Tbsp sesame seeds
pinch of salt
fresh cracked pepper
Marinade:
2 Tbsp dark miso paste
1 Tbsp EVOO
1 Tbsp rice vinegar or Mirin
1 Tbsp grated ginger
3 grated garlic cloves
1 Tbsp black sesame
1 Tbsp white sesame
Directions
1.  Make the marinade by mixing all the ingredients together in a bowl.
2.  With a knife, slice little slits into the pintade's skin.  Massage the marinade as much in between the skin and flesh of the bird as possible.  Smother it all over and well on the inside as well.  Place in a freezer bag with the rest of the marinade (if any left) and let infuse a few hours or overnight.  I did it overnight.
3.  Make the stuffing by cutting all the stuff into small pieces and adding the juice, salt, pepper, and sesame seeds.  Stuff all that good stuff into the bird's cavity.  It feels very offensive to do this, but it's for a good cause, I promise.
4.  Preheat the oven to 200°C or 400°F.  Place the stuffed pintade in an oven proof dish backside down.
Here she is all smothered with miso and stuffed right before going into the oven.  Isn't she lovely?
Cook for 20 minutes.
5.  Turn that lovely bird over, so it is breast side down.  Usually the breast gets dry during roasting.  Cooking it breast side down will minimize this effect since they will be cooking in all the juices.
6.Turn the heat down to 120°C or 250°F and cook for 4 hours, basting regularly.
Needless to say, she was perfect.
She was moist (even the breast) tender, meat falling off the bone delicious with a very very slight miso flavor that is not overpowering but lets this little lady shine as she has never shone before.
I served this with some green beans and thick cut yam "fries" tossed in olive oil, ginger powder, piment d'espelette powder, sesame seeds, and fleur de sel.
Oh, and don't forget to precede by these fines de claires
MmmmMm noblesse in my mouth.
Everybody loved it, and this size of a bird is actually enough for 4.  I have one portion leftover.
I'm so proud of myself I've been trying to call my mother to explain my process, since she is a self proclaimed "Reine des Dindes" which means, queen of turkeys, but in French has a negative connotation that she apparently doesn't mind.  But alas, there is no way of getting a hold of her… she must be too busy partying or singing...

Print Friendly and PDF

Maple Hazelnut Pie

This is not the first maple recipe I've done since my business/pleasure trip to Quebec, and it sure isn't my last, but it is definitely the one I've been most looking forward to.  I have a very limited supply of maple products from the family operated Cabane à Sucre, so to make it last forever, I've decided to use it in holiday desserts.
I'm not a buche person.  Don't try to convince me using words like "tradition" because buche has never ever been part of my tradition.. and the ones that have were gross.  You might as well just eat butter by the spoon and top it with sugar.  That's what buche tastes like to me.  Last year I made Cinnamon Rolls and nobody missed their beloved buttery buche.
Back to the pie.
There are very few ingredients in this pie, so it is essential to use the best quality you can find.  My maple syrup is authentic hand crafted and purely organic.  If you use store bought, make sure you use pure and the darkest you can find.  Light tends to be thinner, and you don't want a runny pie.
Ingredients
1 1/2 cups (35 cL) pure maple syrup
1 cup (23 cL) heavy cream
1/4 cup (30g) corn starch
1/4 cup cold water
30g powdered hazelnuts (optional)
That's all folks!
Directions
1.  Whisk together the water and the corn starch, then add the powdered hazelnuts.  There shouldn't be any lumps.  Set aside.
2.  In a saucepan on high heat, whisk together the maple syrup and cream, then add the corn starch mixture.
3.  Bring to a boil while stirring continuously.  Boil for 2 minutes while stirring.  It should thicken.
4.  Pour into a cooked pie crust.
5.  Refridgerate until set.
The photo above is after having just poured the hot filling into the hot crust.  There will be a long waiting time before we can dig in.
I checked after about 3 hours, it should be ready.  To be on the safe side, do as I did and give yourself at least 6-7 hours just in case.

Oh dear this was too much for me to handle.  I couldn't quite finish my piece.  I don't think I'm cut out for real desserts.  Too rich, to sweet.. too much.  The scoop of vanilla ice cream was bland next to it.
In the future, I'm going to stick to cookies, muffins, and sticky buns.

I was expecting it to have the texture of pumpkin pie, but it was a instead a gooey texture kind of similar to pecan pie without the pecans.  It's not a texture I appreciate much and it was just toooooo sweet.  I'm disappointed in this dessert.  I don't think the addition of hazelnuts made it worse.  If you're into overly sweet things like this, I'm pretty sure it's a winner.. but even sugar pie is not this sweet, and this one is sugar free...

The crust was delicious though!

**update
I changed my mind.  This pie gets better the longer it sits.  Make it 2 days ahead of time if you can, and serve very very small slices.. definitely not the size of slice pictured above.
In bite size pieces and on a relatively empty stomach, this pie is a gift from heaven.
Just don't eat it after a huge heavy holiday meal.. more as an afternoon snack.
I finished every last crumb of this beauty.  If I do make it again, I'll add an egg and bake it with the filling so the texture will harden a bit.

Print Friendly and PDF

Monday, December 23, 2013

Homemade Shortcrust for Pie or Quiche

 This may be a touch premature, since I haven't cooked or eaten it yet, but it feels like such a victory just to have rolled it out and fit it into my 27 cm pie tin.  This is my very first time making my own pie crust.  Apparently, once you do this, you never go back to the store bought stuff.
I used this video as a tutorial.  It seemed so easy there was no way I could not try it.
I laced it with Pain d'Epices spices to go with the maple filling I'm going to dress it with tomorrow.  Right now, it is chilling in my fridge.
Ingredients
250g (8.8 oz) flour (T65 or all purpose)
125g (4.4 oz) cubed room temperature butter
2 Tbsp sugar
1 tsp Pain d'Epices spices (or pumpkin spice)
1/2 tsp salt
1 egg yolk
5 cL (1/4 cup) warm water
Directions
1.  Sift together the flour, sugar, spices, and salt.
2.  Add the cubed butter, and lightly sprinkle the flour over it with the tips of your fingers, then continue to mess with it until the butter dissipates into the flour, and you have a sandy mix.
3.  Here's the technical part.  In French, they call it "sablage" which means sanding, but not in a sandpaper type of way, more of a light sprinkling of sugar type of way.  To do this, use both hands and rub the flour-butter between your palms, getting the butter thinner into the flour mixture.  Do this for a few minutes until the mixture is sandily homogenous.
4.  Make a well in your sand.  Add the water and egg yolk.  Mix with the tips of your fingers and gradually incorporate the flour mixture.  It should eventually come nicely together into a ball and the mixing bowl should be clean.
5.  Here's another technical part.  Place your ball of dough onto your countertop and dig the palm of your hand into it while sliding as far as you can.
The French call it "fraiser" which means to mill.  Do this a few times.  It is to even out the mixture.  Roll it back into a ball and let it rest at least 10 minutes.
6.  Next is the rolling part.  In the video, he does this directly on the countertop, but I tried and when it came time to transport the lovely thing into my pie tin, it broke and I had to roll it out again, but this time over a sheet of parchment paper.  That way, I just placed the parchment paper right into my pie tin and there it will stay, even during cooking.  Why complicate life?
7.  Press your dough into your pie tin and refridgerate under plastic wrap while you prepare whatever filling you are planning to use.  I'm leaving mine overnight, but I wouldn't leave it much much longer.

So does it take 5 minutes just like the video says?  No, but it seems to give a nice result.
It's going to get cooked tomorrow, naked, after having been stabbed a few times with a fork for 15 to 20 minutes at 200°C or 400°F.
This crust is delicious.  I can't wait to experiment with a savory version or for my beloved pumpkin pie which never lets me down.

Stay tuned for the maple filling!

Print Friendly and PDF

Sunday, December 22, 2013

Restless

I have too many leftovers to start cooking or baking right now.. especially since that will mean having more leftovers
which usually isn't a problem
but I'm going to be mega cooking for the holidays and I don't like to waste food
gaah!
Can't time go faster so I can get to work?

I'm so excited about making my own pie crust and spiking it with Pain d'Epices spices..
and then pouring in a heavenly mixture of reduced maple.

And making my special miso-ginger-sesame marinade and massaging my guinea fowl (pintade)
and stuffing it with yams and apples
and cooking it to juicy perfection.. which isn't easy I hear, but I have a good maternal source for cooking whole birds.

And then the next day preparing my terre et mer scallops and orange-carrot mousse appetizer..

and only after all that is over and the leftovers are eaten can I make my batch of bagels and buy red onions, capers, and lox.. or just raw salmon because smoked is not going to cut it.

after which I will surely be craving some Lebanese excellence such as falafels, hummus, and feta.  Yes oh yes!

Which will surely give way to a tandoori craving.  I wonder if I could do a whole chicken with tandoori marinade instead of just legs… hmmm.. 

and then the long week will have hopefully passed where I can again get to work for the NYE order of samosas and chutney for 6.. plus extra for freezing and redistributing to the correct people..

and maple caramel sticky buns.. oooh

Maybe I'll fast for a day.
haaa or not

and finally I will able to prepare the ultimate dessert which will be critiqued by my VIP reference:
Kaya Pie (with homemade crust of course)

That's my vacation plan and I'm counting down the hours and it's killllliiiinng me!

Print Friendly and PDF

Friday, December 20, 2013

Chicken Tagine with Preserved Lemons

Driving home from work today, I had a sudden desire for a dish using preserved lemons.  I've never experienced them before.  The more I thought about them, the more precisely the image of what they would be used for formed in my mind.
I started salivating.
During the last kilometer of my commute, I gave in and stopped to buy some.
I wanted tagine badly.  I've never made it and don't have the necessary cooking equipment, but I'm pretty sure I can do a good job without the actual clay tagine pot.  After tasting the potent sauce simmering as I write, I'm certain I've done an excellent job.
Serves 4
Ingredients
6 chicken thighs, skinned
3 tbsp EVOO
2 red onions, thinly sliced
3 cloves garlic, crushed
2 tsp grated ginger
1/2 tsp saffron, soaked in warm water
1 tsp ground cinnamon
Juice from 1/2 lemon
2 preserved lemons, quartered
2 tbsp chopped flat leaf parsley
3/4 cup water
3 tbsp pitted olives (which I didn't have, but its ok)
Few pinches salt
Some fresh cracked pepper
Chopped cilantro for garnish
Directions
1.  Heat some oil in a heavy based pan or tagine.  Cook the onions with a pinch of salt until translucent.
2.  Add the garlic, ginger, saffron with the water, cinnamon, and juice from the lemon.  Cook 1-2 minutes on high, stirring.  Pleasant aromas should be wafting.
3.  Add the preserved lemons, parsley, and a small handful chopped cilantro.  Stir well.
4.  Nestle the chicken pieces into the happy sauce you just made.  Sprinkle a bit of salt, some fresh pepper, add the olives (if using) and lower the heat.  Pour on the water and cook on low, covered, for about 1 hour, turning the pieces once during the process.

The chicken should be perfectly cooked with all the flavors of the happy sauce.  Serve topped with chopped cilantro over couscous or bulgur as I did here.
This was quite delicious, and as I mentioned, potent with preserved lemon flavor.  Next time I will remove the lemon quarters before eating, because they do tend to take over the whole dish when you pop a piece into your mouth.  When you take a "normal" bite, you can feel the deep flavors infused with cinnamon and saffron, which pair so nicely with the chicken and cilantro.
Cilantro is really the best herb ever invented.  Have I ever mentioned that before?
I can't say I'm a tagine expert, but I do trust my tastebuds and instincts and I think this is pretty close to the real deal… I'll have to consult some of my Moroccan homies to make sure.

Print Friendly and PDF

Tuesday, December 17, 2013

Grilled Savoy Cabbage

 Ooo Santa knocked early at my door.
A few weeks ago, I imagined grilling meat and veggies in the winter, meaning off-plancha.
Today, my imagination brought me a cast-iron griddle pan to reality.  And it's my very first Le Creuset cookware, which is apparently the champagne of cookware.  This piece of work is a 24cx24cm heavy enameled all stove types oven save and dishwasher safe ribbed pan which will sear the juices into your meat and veggies so they keep their flavor within, releasing the grease between the ribs and able to be poured out if needed.
So to pair with my big ass steak (seriously 4-5 servings)
 I decided to grill the other half of my savoy cabbage hanging around in my fridge.  It's the season, right?
There really isn't anything to this, besides the fact that it is naturally delicious with very little fuss.  The griddle gives you the BBQ taste without the coal or wood that you can do indoors (after removing your smoke detector).  The act of grilling seals the flavor into the cabbage and lets it develop its natural sweetness.
Oooh
All you do is cut your cabbage into wedges.  My half cabbage made 6 wedges.  Make sure you leave some core onto the wedges so the cabbage doesn't fall apart.
Drizzle with some excellent EVOO, fleur de sel, fresh cracked pepper, and rubbed with a bit of garlic and piment d'espelette.
Then grill on the griddle pan for a few minutes each side.. until nicely colored.
Then serve with whatever you want.  I served with a slice of grilled chuck roll (basse cote) marinated in the same fun stuff as the cabbage + some rosemary.
This is one of those meals where you can appreciate each ingredient naturally and individually without much fuss but with soooo much flavor.
Win-win.

Print Friendly and PDF

Palak Paneer Remix

Stolen from Dassana, who's style I'm slowly discovering and immensely enjoying.
This Palak Paneer is quite different than the one I've been making.  It feels more like the "restaurant" version and has more finesse, probably due to the fact that I blended the spinach and did not fry the paneer.  I used a lot less cream, and didn't feel like it was missing anything.
Lets just say that from now on, when I make Palak Paneer, it will be this recipe.. by far.
Ingredients
Purée:
1 bunch fresh spinach (300-400g or 10 frozen cubes)
1 slit green chili
1 garlic clove
1/2 inch ginger
some water for blending
Curry:
2 tbsp canola oil
1/4 tsp cumin seeds
1/4 tsp turmeric
1 bay leaf
pinch of hing (asafoetida)
1 small chopped onion
pinch of salt
4 large garlic cloves, grated
1 small chopped tomato
1/2 tsp chili powder
1/2 tsp garam masala
1 tsp kasoori methi (crushed fenugreek leaves)
1-2 Tbsp cream
200g paneer
1 cup water or as needed
Directions
1.  Cook the fresh spinach by soaking it in boiling water a few minutes, then draining.  If using frozen, thaw it.
2.  Make the purée by blending the spinach, green chili, garlic, ginger an some water.  Set aside.
3.  Make the curry.  Heat some oil in a wok and add the cumin seeds until they crackle.
4.  Fizz the turmeric and hing, then add the bay leaf.
5.  Add the onion with a pinch of salt and cook until translucent, then add the garlic and tomato, and cook until it mushed.
6.  Add the chili powder and garam masala and stir until incorporated.
7.  Add the purée and turn the heat to a simmer.  If it's too thick add some water.  I added about 1 cup.
8.  Add the methi and cream.  Stir, taste and adjust the seasoning.
9.  Add the paneer and heat through.

Serve in a thali with naan or rotis.  In the dish, to make it pretty, dip a knife into some cream, and run it through the plate.  You should have a pretty trace of cream.. or a real mess.. but a delicious mess.
Didn't "they" once say: 'If it doesn't get all over the place, it doesn't belong in your face'?
I believe it goes for everything in life...

Print Friendly and PDF

Monday, December 16, 2013

Tadka Channa-Toor Daal

There are no words worthy of describing this daal.  It looks just like any other toor dal mix, but the depth of the flavor of split chanas is just amazing and pairs (or groups) nicely with the north Indian thali I had prepared.  I can't believe I've never tasted or made chana dal before!  It has absolutely nothing to do with Chole or whole Kala Chanas.
This one is a whole other dimension of tastes and textures.
Adapted from SMTC.
Serves 4-6
Ingredients
3/4 cup split chana dal (split black chickpeas)
1/4 cup toor dal (split pigeon peas)
4 cups water
Tadka part 1:
1 tbsp canola oil
1 medium onion, chopped
1/4 tsp turmeric
1/2 tsp ground cumin
1 tsp ground coriander
1/2 tsp garam masala
1/2 tsp chili powder
Pinch of salt
Tadka part 2:
1 tbsp canola oil
1/2 tsp black mustard seeds
1/2 tsp cumin seeds
Pinch hing (asafoetida)
Few curry leaves
2 gloves garlic, grated
1 tsp grated ginger
1 slit or minced green chili
Lime juice and cilantro for garnish
Directions
1.  Thoroughly wash the daals until the water runs clear, then soak for at least 30 minutes.
2.  Cook in a pressure cooker with the water for 10 minutes under pressure.
3.  Meanwhile, prepare the tadka part 1.  Heat the oil in a wok and fizz the turmeric.
4.  Add the onions with salt and cook until translucent, then add the spice powders.  Mix well and add to the cooked daal.
5.  Make the tadka part 2.  Heat the oil in a wok and add the mustard and cumin seeds.  Cook until they crackle.
6.  Add the hing.  Wait for it to fizz, then add the garlic, ginger, green chili, and curry leaves.  Cook 1 minute, then add to the daal.
7.  Add the juice of 1/2 lemon or lime, then taste and adjust the seasoning.

Serve with lime and chopped cilantro (if you have it).
I've been eating this daal for several meals in a row and I still crave it just as much.  It is really a complete discovery, yet feels so comfortingly familiar...

Print Friendly and PDF

Saturday, December 14, 2013

Cabbage Kofta Curry

I don't think I've ever in my life fried as much as I do now, especially since I gave away my fancy deep fryer.  I used to do real fries in the deep fryer but then realized they taste so much better out of the oven, and there is also much less clean up.  The reason I despised the deep fryer so much was most probably because of the clean up, especially since the fries are not for me.
So why do I keep frying up Indian snacks and dishes? 
Well, for one, it's actually worth it, and for two, when I fry with my wok, I store the filtered oil in a jar and wash the wok right away.. So there is literally no messy sticky clean up, and best of all I don't get yelled at, and I have more space on my countertop for more enjoyable things such as rolling out rotis or pizza dough.
Aah it feels nice to let that out.
So today I prepared some cabbage kofta curry which I will be eating tomorrow since I'm invited to a dinner party tonight.  I'm not complaining, but there is some sort of tragedy in making a delicious vegetarian meal full of flavor and then storing it without indulging... And then eating Raclette instead.
Am I a bad person for feeling this?
I stole this from VegRecipesofIndia
Serves 4-6
Ingredients
Kofta:
3 cups (240g) finely diced savoy or regular cabbage
1/4 tsp turmeric
1/4 tsp chili powder
1/4 tsp garam masala
1 tsp ajwain (carom seeds)
Pinch of hing (asafoetida)
Pinch of baking soda
Pinch of salt
1 tbsp plain yogurt + more if needed
1 cup besan (chickpea flour)
Few tbsp water if needed
Oil for frying
Curry:
2 tbsp oil
1 inch piece of cinnamon
3 cloves
1 black cardamom (I didn't have this..too expensive apparently)
2 green cardamoms
1 bay leaf
1 large chopped onion
1/2 inch piece ginger, grated
3 cloves garlic, grated
3 medium tomatoes, chopped
1/4 tsp turmeric
1/4 tsp chili powder
1/2 tsp coriander powder
1-2 cups of water as needed
1/2 tsp kasoori methi (dried fenugreek leaves)
2 tbsp cream or yogurt
Chopped cilantro for garnish
This is a really long list of things, but if you're like me, you magically have everything on hand except maybe the cabbage, but it's in season so go buy one.
Directions
1.  Make the kofta.  In a mixing bowl, mix the cabbage with the spices, salt, and 1 Tbsp yogurt.  Let sit for 30 minutes or more.  This step extracts the moisture from the cabbage.
2.  Add the baking soda and chickpea flour and mix well.  If it needs more moisture, add some more yogurt.  If your individual sized yogurt is finished and it still needs more moisture, add a bit of water.  How to know if it needs more moisture?  Try to make a ball in your hand with the batter.  If it just holds together by itself, it's perfect.  If it completely fall apart when you let go, add a little water until you reach that consistency.
3.  Heat some sunflower oil to medium-high heat.  Drop small balls of batter into the oil and fry until golden all over.  Remove from oil onto paper towels and set aside while you prepare the curry.
4.  Make the curry.  Heat the 2 tbsp oil in a wok and add the cardamom, bay leaf, cinnamon, and cloves.  Fry until fragrant.
5.  Add the onions with a sprinkle of salt and cook until translucent, then add the ginger and garlic.  Cook a few minutes until the raw smell dissipates.
6.  Add the tomatoes and cook until they become mushy, then add the turmeric, chili powder, and coriander powder.
7.  Take this lovely mixture off heat, and pass through a food processor (or magic bullet).  If you taste it at this point you may just faint of pleasure.  It's really a curry I'll be using for other things in the future.  It's just heavenly.
8.  Place the blended mixture back in the wok and add 2 cups of water.  Bring to a boil, then simmer until it reaches the consistency you like.  I seriously didn't time it and I wanted this curry thick.  Mind the fact that it will thicken with time.
9.  Add the methi and a bit of cream.  Taste and adjust the seasoning if you need to.  I didn't need to.
10.  Add in the fried cabbage kofta and heat through.

Serve garnished with cilantro (if you have it) and make it pretty next to other pretty things.
From left to right:
Cabbage Kofta Curry

Print Friendly and PDF

Wednesday, December 11, 2013

Kadhai Paneer

There is something about paneer that feels mysterious to me.  It's cheese, yet it doesn't melt.  It takes on any flavor you marinate or cook it with.  It has all the protein qualities of tofu without all the weird hormone stuff.. well assuming you buy whole organic milk from a cow you've met.
I wonder if it would be any good with goat's milk.  Hmm.. I'm going to have to look into that.
Anyway, here's something rather simple but extremely tasty and a perfect addition to a little weeknight thali.  This recipe comes (again) from SMTC.
Serves 4
Ingredients
14 oz (400g) cubed paneer
To dry roast and grind:
1 Tbsp coriander seeds
1/4 tsp fenugreek seeds
1 dried red chili
1/4 tsp whole peppercorns
1/2 tsp cumin seeds
For curry:
1 Tbsp canola oil
1 small chopped onion
2 chopped tomatoes
5 garlic cloves, grated
1 green chili, minced
salt to taste
cilantro for garnish
Directions
1.  Heat the oil in a wok and add the onions.  Cook until translucent, then add the garlic and chili.
2.  Cook for 1-2 minutes, then add the tomatoes and ground spices.  Cook until tomatoes become mushy, then turn down the heat.
3.  Add the paneer and coat well.  Turn heat down to low and let the flavors penetrate into the paneer.  Cook for 10 minutes, then taste and add salt if needed.  Garnish with cilantro.

That's it?  Yea there's not much to it, but the flavors are amazing.

I served mine with Yellow & Green Split Dal and Samosas.
Life just keeps getting better and better...

Print Friendly and PDF

Monday, December 9, 2013

Samosa all-out Homemade

Since Sunday I've been having the Samosa itch.
I think I found a winner here and I followed the recipe to the letter.  I've made samosas before, but this time, I'm making my own dough and using spices I didn't have before such as asafetida, amchur, and ajwain.
I had a taste of the filling and I'm not sure I've ever had anything as spot on as this.
It's a weeknight tonight.  Have I lost my mind?
Yes I think I have..
and this was a success
a major major success!
Now I feel invincible and absolutely nothing can stop me…
The secret is in the dough.  You really can't have an authentic Indian samosa with store bought chinese wrappings or tortillas because of the ingredient that gives the samosas their distinct "I'm from India" taste.  Ajwain.  Some people say you can sub oregano, and you probably can and come out with pretty decent samosas, but the fact is you'll always be wondering what slight touch is missing to make them just perfect.  Ajwain is used frequently in doughs and pakoras.  They look like cumin seeds, but have nothing to do with cumin, so please don't sub cumin for ajwain…ok?
Thanks again to ShowMetheCurry.. women who make Indian cooking attainable in the average home… not that my home is average.
Makes 12 samosas
Ingredients
Dough:
1 1/2 cups (230g) all purpose flour
1/2 tsp salt
1/4 tsp ajwain, ground in a mortar
2 Tbsp canola oil
2 Tbsp lemon juice
1/4 cup +2 Tbsp warm water
Filling:
1 1/2 lb steamed, peeled, then cubed red potatoes
1tsp coriander seeds
1 tsp fennel seeds
1/2 tsp garam masala
1/2 tsp amchur (mango powder)
1/2 tsp sugar
10 sprigs chopped cilantro
1tbsp freshly grated ginger
1 tbsp minced green chili
Juice from 1/2 lemon
1/8 tsp hing (asafoetida)
1/2 tsp cumin seeds
1/2 cup frozen peas
2 Tbsp canola oil
salt to taste
Sunflower oil for frying
Directions
1.  Soak the coriander and fennel seeds in some water and set aside while you make the dough.
2.  Make the dough by sifting together the flour and salt, then adding the ajwain.  Oil your hands and add the oil to the flour mixture, mixing well to avoid lumps.
3.  Add the lemon juice and water, a bit at a time, while kneading.  At the end you should have a ball of firm elastic dough.  Sprinkle a bit more water if needed since flours are all different.  I used T65 type.  Knead well, wrap in plastic, and set aside at least 30 minutes.  I left mine overnight in the fridge.  If you do this, make sure you bring it back to room temperature before working it.
4.  While you're waiting, make the filling.  Drain the soaking seeds and add them to the cubed potatoes along with the garam masala, amchur, sugar, cilantro, ginger, chili, and lemon juice.  Mix well.
5.  Heat the oil in a wok.  Add the cumin seeds until they sizzle, then fizz the hing and add the peas.  Cook 1 minute.
6.  Add the potato mixture and heat through, making sure to coat well.  Taste and add salt if needed, then turn off heat and set aside while you work the dough.
7.  Work the dough.  Give it a good kneading, then divide it into 6 pieces.  They should be the size of golf balls.  Mine were about 55g each.
8.  Roll each ball out as thin as you can without breaking it.  I did it as I would have rolled rotis, but the dough really does not behave like roti dough.  It's a lot tougher, probably because of the lemon.  You want it in a circular or oval shape.
Isn't my rolling pin lovely?
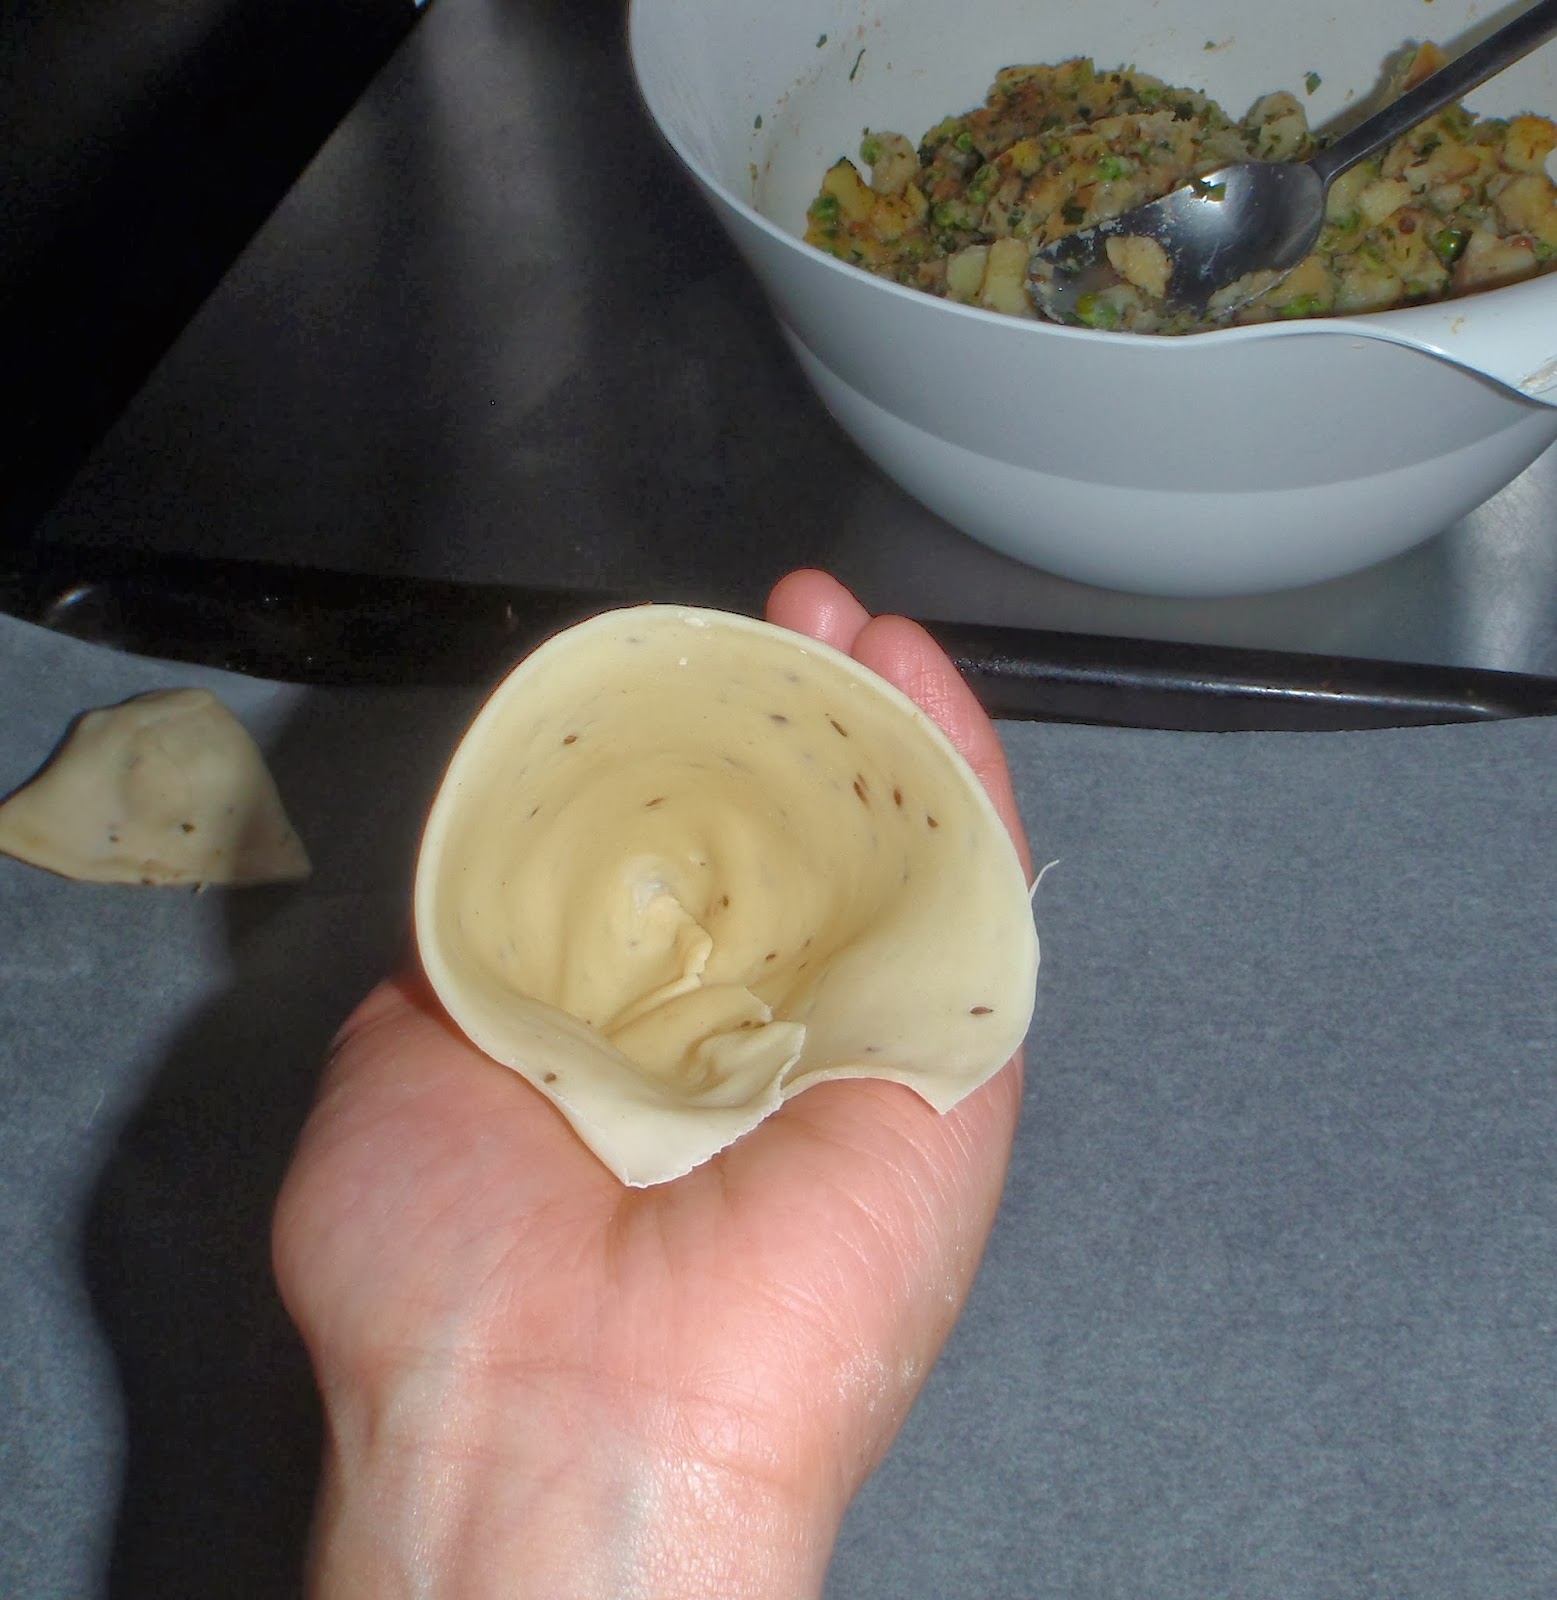
9.  At this point, just watch the video because it's hard to explain with words.  I'll give it a shot.
Cut it in half.
Make a cone with one of the half circles of dough using the round part as the tip.  Brush some water over one part to seal the edges together.
You should have a nice pocket ready to be filled.
10.  Fill the cone with the potato mixture.  Try to pack it in well so that there is minimum room for air bubbles.
 Pinch the ends and seal the samosa shut using water again.
Repeat this process for all the samosas.
11.  In some frying oil heated to medium heat, fry each samosa until lightly golden.  If the skin bubbles up right away, the oil is too hot.  Remove from oil onto paper towels.

Serve warm with magic green chutney, tamarind chutney, or as I did along with some split dal.

Print Friendly and PDF

Sunday, December 8, 2013

Cardamom Molasses Cookies

Spice haters, look away.
Cardamom is making a grand entrance into the cookie world!
I usually use cardamom in Indian dishes and desserts.  It's definitely something you can't miss.  Its distinct flavor that lingers in your throat and makes you want more is so indescribably pleasurable that there is absolutely no reason it can't be one of the main characters in a cookie.
Cinnamon, step aside (but don't go too far, we love you too).
These are basically like the Maple Snaps or Gingerbread Cookies, except where the maple syrup went, Grandma's Molasses goes, and where the other spice mix went, Cardamom is the predominant one.
Ready?
Ingredients
2 1/3 cups (300g) whole wheat flour
1 1/2 tsp freshly roasted and ground cardamom
1 tsp Pain d'Epices spice mix (or use allspice)
1 tsp baking soda
1 tsp corn flour
1/2 tsp salt
1/3 cup (60g) butter softened
3/4 cup (150g) real moist dark brown sugar, packed
1/2 cup (130g) pure molasses
1/2 tsp freshly grated ginger
1 egg
1/2 tsp vanilla extract
granulated sugar with ginger and cardamom powder for garnish
Directions
1.  To make 1 1/2 tsp freshly roasted cardamom, roast 6-7 pods on dry heat until the aroma develops, then grind in a mortar & pestle or coffee grinder.
2.  Sift together the flours, baking soda, salt, and dry spices.
3.  In another recipient, beat the butter and dark brown sugar.  Whisk together, then add the molasses and vanilla.
4.  Add the egg and ginger and beat until homogenous.
7.  Add the dry ingredients into the wet ingredients, stirring constantly until you have a blob of cookie dough.  You definitely want to refridgerate a bit so it will be easier to handle.
7.  Preheat the oven to 350°F 175°C.  When you're ready, make 1 Tbsp sized balls of cookie dough, roll in the granulated sugar mixture, and press onto your cookie sheet.

8.  Cook for 10 minutes, then let cool on a wire rack.

These are seriously my favorite cookie creation.
It completely reflects my personality.. somewhat American, somewhat Indian, yet full French butter and flour.. two of the basic ingredients French are known to be the best at...

Print Friendly and PDF

Friday, December 6, 2013

Prasopita Terre & Mer

I'm in a leek phase.
I love the look of them.. like rebel vegetables sporting the unkept hairdo.
I love them in soups, the way they deepen the flavor.. I love them on pizza, with mussels, scallops, chicken.
I love the way they smell raw, and how the aroma is enhanced as they are cooking.
It's not a surprise that Prasopita, a dish made almost entirely of leeks, has found its way several times into my humble home.
This time, though, I only had 1 1/2 leek, and some leftover sautéed mushrooms, so I altered it a bit.

Ingredients:
1 1/2 leeks, sliced into rounds and thoroughly washed
3 Tbsp EVOO
3 Tbsp tarragon
4 cubes frozen spinach, thawed
1/2 cup sautéed mushrooms (optional)
2 filets code, cubed
1/2 cup mix of quinoa and bulgur, soaked for at least 30 minutes
3 eggs, beaten
1cup (100g) grated Gruyere/Swiss or Kasseri cheese
3 Tbsp breadcrumbs
7 oz (200g) cubed feta
Salt/pepper
Directions:
1.  In a wok, heat the oil and fry the leeks for approximately 5 minutes.
2.  Add the tarragon and spinach.  Stir and cook for another 10 minites or until almost tender.
3.  Add the quinoa and bulgur and incorporate.  Add some salt and fresh pepper.
4.  Turn off heat and stir in the grated cheese, most of the feta, fish, and beaten eggs
5.  Preheat oven to 425°F-220°C.  Sprinkle the breadcrumbs into a baking dish and transfer the leek mixture into the dish.
6.  Arrange some feta cubes over the surface of the dish.  Cook for 30 minutes, then let cool for at least 10 minute before eating.

Print Friendly and PDF