Search this blog

Translate

Showing posts with label Appetizer. Show all posts

Wednesday, December 25, 2019

Beetroot Gravlax with Horseradish Sauce

Ok I can't believe I have never done this before.  I've been fantasizing over this for an entire year.. why did I wait this long?  It's so easy!

Inspired by Jamie Oliver
Cure
750g Salmon
200g beets, peeled
100g sea salt
50g sugar
50g horseradish
5 cL vodka
1 bunch fresh dill
zest from 1 lemon
Sauce
3 Tbsp yogurt
2 Tbsp freshly chopped dill
2 Tbsp lemon juice
2 Tbsp mayonaise
3 Tbsp horseradish
black pepper

Directions
1.  Make the cure by blending everything but the salmon and 1/2 bunch dill together.
2.  Rub the cure all over the salmon, then cover with plastic wrap and weight it in the fridge for 48 hours.
3.  Carefully scrape the cure off the salmon and rinse.  Pat dry and lay the rest of the dill over the salmon with some nice and heavy grinds of pepper.  Re-wrap tightly and let sit one more day.  It will keep for up to 2 weeks in the fridge.. but it seriously won't last that long.
4.  Make the sauce and stir.
Just look at that color!  It looks like steak!

To serve, thinly slice the salmon and arrange on a plate alongside the sauce.
You just won the holidays.

Print Friendly and PDF

Saturday, November 10, 2018

Faumon Fumé - Carrot Lox

Here is a predicament:

You promise your pregnant bestie that if she has any unusual cravings, you will provide her with relief.
Then she tells you she hasn't really been having any cravings except for one thing.. Smoked Salmon.
This is one of the things on the list of NO's during her pregnancy because she's not immune to toxoplasmosis so can't have any raw animal products.
What do you do?

Well, I did promise her craving relief, and I do love a challenge, so I hunted down a few vegetarian versions of smoked salmon and mixed and matched until I was pleased with the result.
But it didn't matter if I was pleased.. I was only hoping it would pass her test.

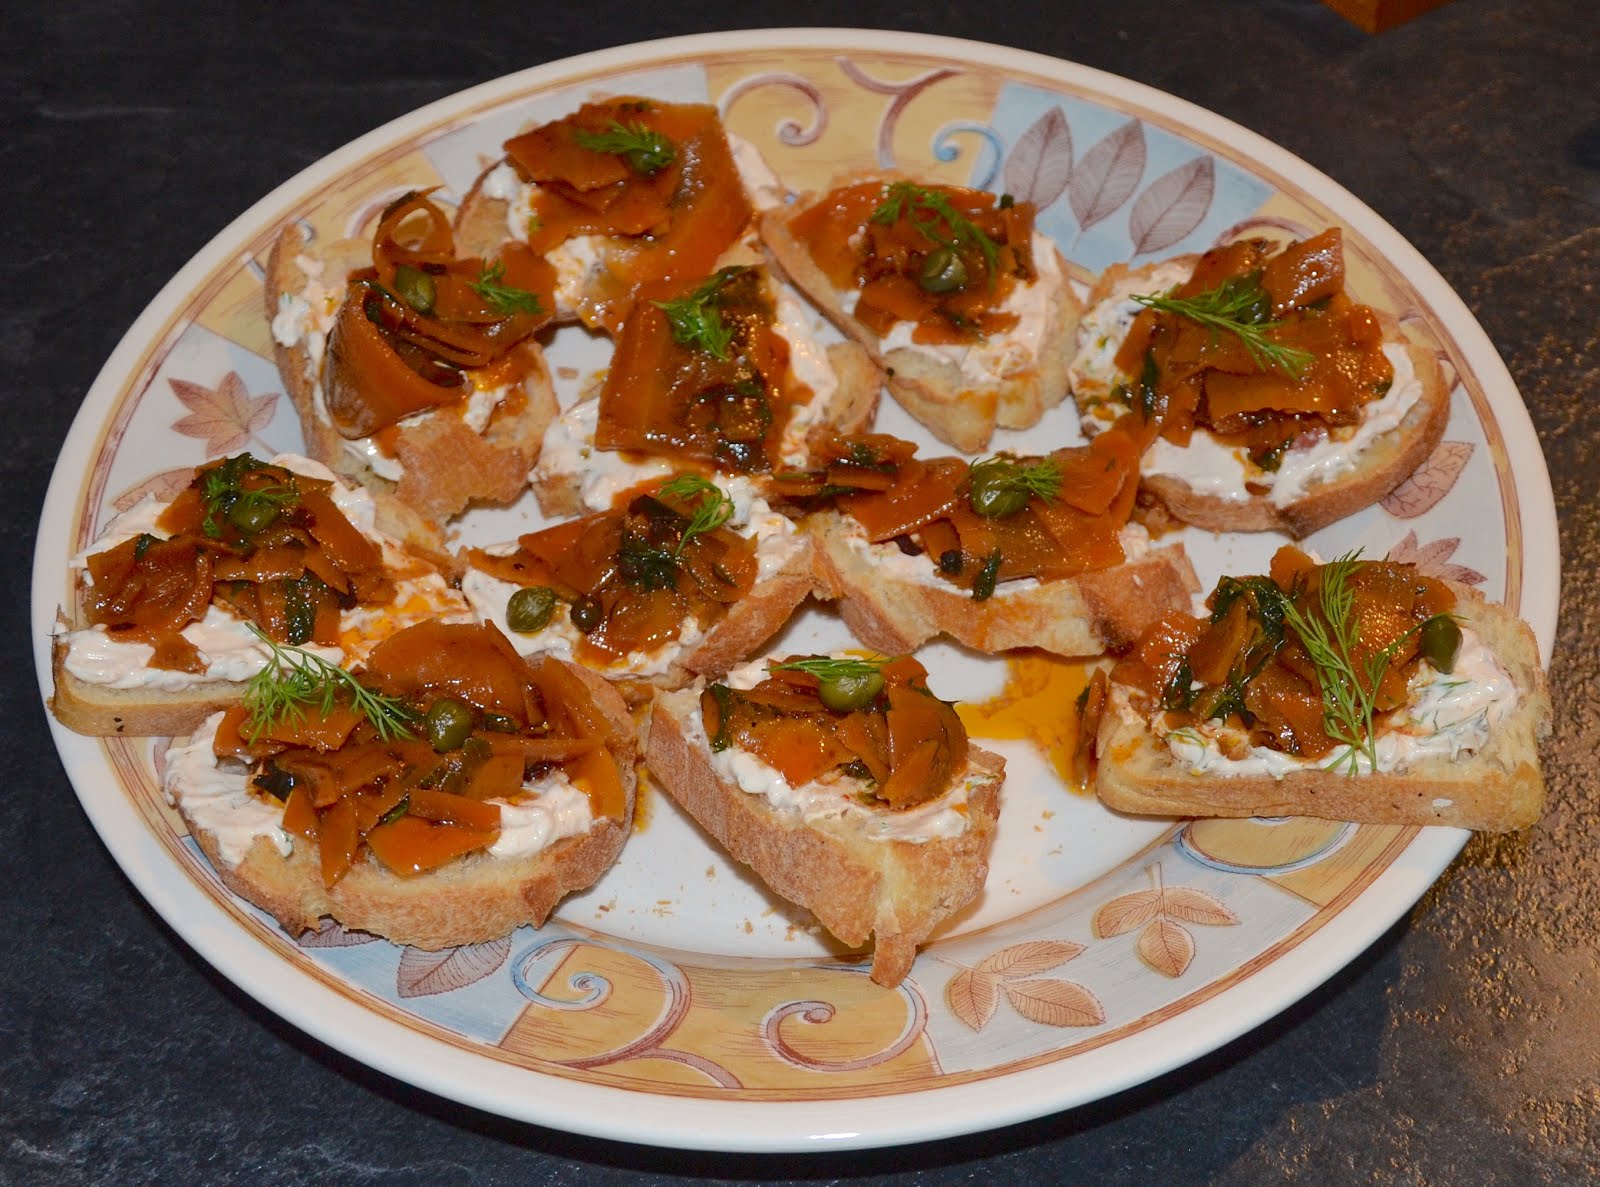
So here I bring to you.. Faumon Fumé made with carrots steamed in smoky Chinese tea.

Ingredients
6 carrots, peeled and sliced into thin strips with a vegetable peeler
2 Tbsp Lapsang Souchong tea
6 Tbsp olive oil
2 Tbsp lemon juice
1 Tbsp maple syrup
3 Tbsp light soy sauce
1 Tbsp smoked paprika
1 Tbsp whole black pepper
1 Tbsp nori seaweed flakes
1/2 bouquet fresh dill
Directions
1.  Place the carrots in steamer basket and the Lapsang Souchong tea in the water to steam.  Steam for 7 minutes.  Do not discard the water.
2.  In an oven safe dish, place the steamed carrots and add the olive oil, lemon juice, maple syrup, soy sauce, paprika, black pepper, and seaweed.  Add some of the steam water (without the tea chunks) until just covered and cook at 180°C 355°F for 15 minutes.
3.  Remove and let marinate with the dill for at least 48 hours.

Your vegetarian lox are now ready to be served!
I served on toast with cream cheese, capers, and a touch of fresh dill.

So did it pass the test? 
You can tell it's not real salmon, obviously, but it replicates the smoky flavor and the texture is not too far off.  This is a great alternative if you can't have the real thing.
This passed with flying colors.  She was absolutely thrilled with the result!  Surprisingly, so was everyone else at the baby shower.. even those who wouldn't even touch smoked salmon with a 5 ft pole.

Print Friendly and PDF

Sunday, December 17, 2017

Russian Cabbage Pie

 
Most people have no idea what to do with cabbage.  Actually, let me correct that.  Most people know exactly one thing to do with cabbage and that's about it.
In France, it goes into Soup.
In the Mexico, it goes on Tacos.
In the US, it is for Slaw.
In India, it goes as a Sabzi with mustard seeds and turmeric.
In Korea, it goes into Kimchi.
What I meant to say is that most people are unaware of the many different ways to work with cabbage.  It is anything but boring.  1 head can give many meals.  It's nutritious, and most importantly.. it tastes like a gift from the ground.  It can be eaten raw, boiled, sautéed, roasted, stuffed, cored, or as a topping.
Let me introduce you to one of the Russian ways to make cabbage the main attraction (other than Borscht).  This "pie" is very filling and the combination with hard-boiled eggs may seem surprising, but it really does the trick.

Serves 6-8
Ingredients
1 Tbsp olive oil
1 tsp caraway seeds
1 large onion, sliced into moons
2 Tbsp butter
1/2 large cabbage, shredded (about 4 cups)
1 bunch fresh dill, chopped
lots of cracked black pepper
salt to taste
3 hard-boiled eggs, chopped

Batter
3 large eggs
3 Tbsp mayonnaise
3 Tbsp yogurt
1 1/2 tsp baking powder
1/2 cup flour
black pepper
1 Tbsp chopped dill

Directions
1.  Heat the oil in a large wok and add the caraway seeds.  Cook until they crackle, then add the onion slices with a few pinches of salt.
2.  Add 1 Tbsp butter and most of the shredded cabbage.  Cook, stirring to coat, then add the rest of the butter and cabbage with a hefty hand of black cracked pepper.  Do this until the cabbage is tender (about 5-7 minutes).
3.  Remove from heat and let cool.  While this is happening, preheat the oven to 180°C 350 °F.
4.  Make the batter.  Beat the eggs well with the mayonnaise and yogurt, then stir in the flour and baking powder until the mixture is even.  Stir in the pepper and chopped dill.
5.  Butter a pie or cake mould and pour 1/3 of the batter in.  Place in the oven and cook for 15 minutes.
6.  While this is happening, go back to your cabbage.  Stir in the fresh dill.  It should have cooled down a bit.
7.  Remove the batter from the oven and start assembling.  Place 1/2 of the cabbage mixture into the mould over the partially cooked batter.  Sprinkle the chopped hard-boiled eggs in 1 layer.  Add the rest of the cabbage mixture on top of the eggs.  Pour the rest of the batter over the cabbage.  You will doubt that a crust will form.
8.  Place the assembled pie into the oven and cook for about 35 minutes.  The top crust should be golden.  Let cool for at least 15 minutes.
Serve warm or at room temperature as an appetizer or as a meal.  I served mine alongside some roasted roots.

The crust is surprising as it packs an interesting mix of flavors and pairs perfectly with the cabbage and hard-boiled eggs.
I'm not going to lie.. almost anything made with cabbage is a win for me, and this dish is no exception to the rule...

Print Friendly and PDF

Tuesday, August 8, 2017

Methi & Chard Gotas with Kadhi

I was finally able to recreate one of my favorite Gujarati recipes after growing my own fenugreek leaves from seeds.
They are actually quite easy to grow, very low maintenance, and quick yield.  They'll grow indoors if it's cold in the winter and replenish the outside soil with nitrogen, so it's nice to grow them in several places one after the other to prepare the soil for something more needy afterwards.
I got garden side-tracked.
I've had these growing up, had them in India, and most recently had them in New Jersey every day for breakfast...which I really looked forward to each morning.
Instead of making me tired of it, it actually sparked my desire to make them myself.
Of course, sourcing the methi (fresh fenugreek leaves) is the hardest part.  You can't just go to the store and buy a "bunch" of methi like you would buy a bunch of cilantro or parsley.  Even cilantro is not always guaranteed here (I just grow that too).
My methi leaves are still a bit too small, but I felt I needed to make this right away because I wanted them RIGHT NOW.
So, I added some finely chopped swiss chard greens (also from the garden).  I have a different thinner Kadhi recipe here as well.  This Kadhi is thick like a dipping sauce.
Serves 2 as a meal, 4 as an appetizer
Ingredients

For Gotas:
1/2 cups packed methi leaves, finely chopped
1/4 cup packed chard leaves, finely chopped
1 green chile, coarsely chopped (add more if you like it extra spicy)
1/2 inch ginger, grated
1 tsp sugar
1/4 tsp turmeric
1/4 tsp ground cumin
1/4 tsp ground coriander
1/4 tsp chili powder
1/4 tsp garam masala
pinch hing (asafoetida)
juice from 1/2 lime
1/4 tsp salt or to taste
1 1/2 cups besan (chickpea flour)
3/4 cups water
1/4 tsp baking soda
Vegetable oil for frying

For Thick Kadhi:
1 1/2 cups buttermilk (half yogurt, half milk)
1 cup water
1/4 cup besan (chickpea flour)
pinch turmeric
1/2 tsp mustard seeds
1/2 tsp cumin seeds
pinch hing (asafoetida)
1 slit green chile
1 sprig curry leaves
pinch of salt
cilantro to garnish
2 Tbsp vegetable oil
Directions

For Gotas:
1.  Mix all the ingredients together gently until it forms a thick mixture.  It shouldn't be liquidy, but shouldn't be dry either.  You should be able to spoon it and have it slowly drip off.
2.  Heat the oil.  You dont need a deep fryer but you need a deep enough layer so the gotis can be submerged.
3.  Carefully spoon 1 heaping tsp of mixture into the oil at a time, frying until it turns golden, then removing with a slotted spoon onto a paper towel.

For Kadhi:
1.  Heat the oil in a wok or tadka or deep sautée pan.
2.  Add the seeds and cook until they crackle, then add the turmeric and hing.  They should fizz.
3.  Add the slit chile and curry leaves and fry for about 1 minute.
4.  Add the besan and buttermilk and cook, whisking until it thickens.  The buttermilk might separate but it's ok.
5.  Add water until the mixture reaches desired thickness.  Add salt to taste and garnish with cilantro.

For eating:
Either pour the kadhi all over the gotas and eat them one by one on your own plate...
or
keep it communal and use the kadhi as a dip..
Either way, enjoy and wish you had made more..

Print Friendly and PDF

Wednesday, December 7, 2016

Roasted Delica Morreti and Feta Quiche

Keep the skins on.
That's the secret.
The best squash varieties are by far Ms. Butternut and Ms. Delica, pictured blow.
 
Both can be held in one hand, do not need to be peeled if roasted, do not become mush when cooked, and have a distinct sweet flavor that is not watery or pumpkiny.
In 3rd and 4th place come Mrs. Bernettine and Mrs. Sucrine du Berry, pictured below. 
 They are both larger versions of the first two with the same qualities, but need to be held with 2 hands.  They are perfect for pie or larger families.
Ms. Red Kuri (Potimarron) is all the rage in France, and it is very tasty, but on my list, it comes 5th, pictured below.
Although it can be held in 1 hand, there is not much flesh and once cooked, it doesn't stay as firm as the others.  The distinct full flavor is less present as well.
I love my life.

So with this in mind, my full bodied Delica was cubed, skin on, brushed with olive oil and a pinch of fleur de sel, and roasted on a sheet pan with parchment paper for about 30 minutes at 400°F 200°C.
The rest is just a quiche with a garlic panko almond crust.
Ingredients
crust:
3 Tbsp panko (use something else if GF)
1 clove garlic, grated
pinch fleur de sel
few shakes red pepper flakes
few cracks black pepper
3 Tbsp ground almonds
1 Tbsp olive oil
the works:
1 cubed oven roasted Delica or something of the sort
1 onion, sliced into moons (preferably roasted with the squash)
100g feta, cubed
appareil:
3 eggs well beaten
3/4 cup milk
3/4 cup yogurt or cream
1/2 tsp dried thyme
pinch fleur de sel
pinch nutmeg
few cracks black pepper
Directions
1.  Make the crust directly in the baking dish by mixing everything but the olive oil together.  Then pour in the olive oil and spread out the mixture evenly in the bottom of the dish.
Pre-toast the crust by placing it in the oven at 400°F 200°C for about 10 minutes.  Remove the dish and get ready for the next step.
2.  Place the works into the dish, making sure to arrange everything to your liking.  The feta should be evenly distributed and not all clumped on one side.  Apply yourself.  This is easy.
3.  Make the appareil by beating everything together until foamy.  Pour this into the dish with all the other people waiting.
4.  Cook at 350°F 180°C for about 40-50 minutes.
5.  Remove and let cool.  This is important.  At least 15 minutes.  This is also the hardest part.  During this excruciating time, make a salad or something.

I served mine with a salad.
The skin?  Ha!
It makes it crispy and utterly enjoyable without clearly being identified as skin.
I shall never remove skin from any of the smaller squashes again!

Print Friendly and PDF

Saturday, November 26, 2016

Juicy Vegetarian Potstickers with Lotus Root Stir Fry

I've made Vegetarian Jiaozi Potstickers before, and I preferred them to the standard meat-filled ones.  I've noticed this on several occasions.. the vegetarian ones are always more surprising.  No two veg jiaozi recipes will yield the same flavor, and that's the beauty of it... there are endless variations possible for equally delicious outcomes.
Since I've been in a cabbage mood this week, when I stumbled upon a cabbage mushroom filling, just the thought of that savory umami madness made me salivate, and off to work I was..

Ingredients
Potstickers: Yield 3-4 dozen dumplings, recipe from TheWoksofLife
3-4 dozen dumpling wrappers (mine were store-bought)
3 Tbsp oil
1 Tbsp grated ginger
1 onion, chopped
1 green chile, diced
2 cups (250g) shiitake mushrooms, chopped
1/4 head or cabbage, shredded (1 1/2 cups)
2 medium carrots, grated (1 1/2 cups)
1 cup chopped garlic chives (or leeks or scallions)
1/2 tsp white pepper
2 tsp sesame oil
3 Tbsp shaping wine
2 Tbsp soy sauce
1 tsp sugar
1 egg or 2 Tbsp oil
Dipping sauce:
1 tsp sesame oil
1 small clove garlic, grated
1 tsp Doubanjiang (broadbean and chile paste)
1 Tbsp black vinegar
1 tsp rice vinegar
juice from 1/2 lime
2 Tbsp soy sauce
few pinches sesame seeds

Lotus Root Stir-Fry: Serves 4 as a side
2 Tbsp oil
1 clove garlic, grated
1 tsp ginger, grated
1 slit green chile
1 lb (apport 500g) lotus root, sliced into 1 cm pieces and placed in a bowl of water
1 large zucchini, halved lengthwise, then sliced into 1 cm pieces
1 tsp sesame oil
1 Tbsp soy sauce
1 Tbsp black vinegar
1 tsp sesame seeds
chopped cilantro for garnish

Directions
1.  Make the potsticker filling.  Heat the oil in a wok or heavy based pan and add green chile and grated ginger.  Cook until fragrant, then add the onion and cook until translucent.  Add the mushrooms and cook, stirring for about 10 minutes on medium heat, until the mushrooms have released their liquid and it has mostly evaporated.  Add the cabbage and carrots and cook, stirring until tender.  This should take about 5 more minutes.  Remove from heat, stir in the chives, pepper, sesame oil, shaking wine, soy sauce, and sugar.  Set aside and let cool.
2.  While the filling is cooling, make the dipping sauce.  Stir it all together and set aside.
3.  Go back to your filling.  You want it to be cool enough to handle.  Stir in the last Tbsp of oil.. or egg.  I used egg because I thought that was a bit too much oil.  I don't regret my choice.
4.  Get wrapping.  Dip your finger in some water and run it along one edge of the wrapper.  Place about 1 tsp of filling in the center of the wrapper, then fold in half and seal by making pleats or ruffles with the side of the wrapper your ran your wet finger on.
Ok, it's kind of hard to explain.  Here's a video that shows the movements.  I did the crescent moon one.  Place them on a floured surface while you finish doing the rest.
5.  Make your stir fry.  Drain the lotus root slices from the water.  Heat the oil in a wok and add the slit green chile, garlic, and ginger.  Cook until fragrant, then add the lotus root slices.  Cook, stirring for about 5 minutes, then add the zucchini slices.  Cook, stirring for another 5-10 minutes, depending on how crispy you like your veggies.  Deglaze with some soy sauce.  Remove from heat and stir in the sesame oil, black vinegar, and sesame seeds.
6.  Cook your potstickers.  In a large flat pan, brush a bit of oil.  Place the potstickers one by one in the pan, making sure they do not touch each other.  Do this in batches if needed.  Let fry for about 1 minute, then add 1/4 cup water, cover, and let steam until the water evaporates (about 2 minutes).  Set aside and repeat.
Now your "hard work" may be rewarded.
Serve as many potstickers per person as desired with a bit of dipping sauce and a serving of stir fry garnished with chopped cilantro.

I only had 25 wrappers, so I ended up with quite a bit of leftover filling.
This was not a problem.. I served it over rice the for leftovers but could have easily worked it into an omelet or stir-fried with rice noodles.
Each day is a new day..

Doesn't it feel good to have magic in your fingertips?

Print Friendly and PDF

Wednesday, November 16, 2016

Leek Fritters with Cilantro Garlic Dressing

Whenever I buy leeks, I never know ahead of time what to do with them.  It always reminds me of a woman I met in a grocery store in Florida while doing my weekly shopping.  I grabbed leeks, and she looked at me with awe and admiration and asked,
"What in the world can you do with those?"
This made me smile inside and out, because I love to share food knowledge with anyone willing to chat with me, and I'm usually on the receiving end of the knowledge, so being on the giving end made my heart warm.
I don't remember what I told her exactly, but I must have given her examples (stew, slice and sautée, use the greens, etc..)
That day, the woman bought leeks for the first time in her life, and I really hope she enjoyed them, because leeks are fabulous.  They are like giant sweet green onions.  No, they aren't like them, they are them.  They pair superbly well with seafood, but they also pair extremely well with themselves!
Naturally, as I cook my way through Plenty, I knew this recipe would be another lesson in life.  The funny part is, as I was cooking, I was reminded of the method of Japanese Okonomiyaki.  This is really like a Mediterranean version of the Japanese pancake.. with a bit of egg snow genius, of course.  Brilliant, as usual.

From Yotam Ottolenghi's Plenty, Funny Onions page 36.
Yield 8 "burgers"
Ingredients

Main Event:
2 Tbsp olive oil
3 leeks, trimmed and sliced into 2 cm slices
5 shallots, diced
few pinches fleur de sel
cracked black pepper
1 fresh red chile, seeded and diced
handful chopped parsley
3/4 tsp coriander powder
1 tsp cumin powder
1/4 tsp turmeric (I used freshly grated)
1/4 tsp ground cinnamon
1 tsp sugar (optional and totally unnecessary)

Batter:
2 eggs, whites separated
150 mL (5 fl oz) milk
30g melted butter
120g (4.2oz) self rising flour (I used normal + 1/2 tsp baking soda)
1 Tbsp baking powder
enough olive oil to cook the patties

Cilantro Garlic Dressing:
1 plain yogurt (125g or 4.4oz)
1 handful fresh cilantro
1 handful parsley
3 cloves garlic
juice from 1/2 lime
pinch salt
cracked black pepper
drizzle olive oil
Directions
1.  In a wide heavy based pan, heat the oil and sautée the leeks and shallots with a few pinches fleur de sel and some cracked black pepper.  Cook, stirring on medium heat for about 15 minutes or until tender.
2.  Transfer to a large mixing bowl and stir in the rest of the "main event" ingredients.  Let cool.  You don't need it to cool down to cold, but you don't want it so hot that the batter cooks as you mix it in.  
3.  While you are waiting for the main event to cool, make the dressing.  Blend the dressing ingredients together.
There, you're done with that dressing.  That took about 3 seconds.
4.  Make the batter.  In a separate mixing bowl, beat the egg yolks with the melted butter, then beat in the milk until homogenous.  Add the flour and baking powder and beat well.
5.  Pour this part of the batter into the bowl with the leeks and stir to incorporate.
6.  In another bowl, make snow with the egg whites.  Or to be less poetic, beat them stiff.  Carefully fold this into the leak and batter mixture.  This is the secret weapon part.
7.  You are ready to cook the patties into fritters or burgers or pancakes or whatever you want to call them!
Heat about 2-3 Tbsp olive oil in your wide heavy based pan and spoon the leek mixture into approx 4 large patties.  These should be burger sized (not oversized burger, but to give an idea).  Cook them for 2-3 minutes on each side or until golden and crisp.  Remove onto paper towels and keep warm while you do the next batch, adding oil each time.

I served mine over some salad and baby spinach with daikon and sweet potato fries, drizzled with the dressing.

This was such a lovely creation.  It was a huge success.  The texture was crispy on the outside, creamy on the inside, full of spice with a bite of garlic in the dressing.
This is real art.

This would do well as an appetizer in smaller "patties" dipped in the dressing as finger food as well.  It is actually so versatile I've been eating it for 3 days and I'm still not tired of it.
Pair it with pasta, with chickpeas, with tomato salad... dream of it, have the aroma follow you to work, look at the remaining patties longingly.. plan to make it again..

Print Friendly and PDF

Wednesday, October 19, 2016

Crispy Leeks with Tangy Yogurt Caper Dressing

Of all the things I could have dreamed of making with leeks, never would I have thought to bread and crisp them.
Cooking my way through Plenty is like following the path less traveled on.  It makes so much sense.  Why wouldn't I bread and crisp leeks?  This man is brilliant.
Adapted from p. 42 of Ottolenghi's Plenty 
Serves 4 as a salad topping or appetizer
Ingredients
3-4 leeks, whites, cut into 5 cm parts
3-4 serrano chiles (optional)
150 mL sunflower oil for frying
Breading:
1 cup panko crumbs
1 tsp coriander powder
1/2 tsp turmeric powder
1/2 tsp chile powder
few cracks black pepper
1/4 tsp fleur de sel
1 egg, beaten
Dressing/Dipping sauce:
juice from 1/2 lime
1 1/2 Tbsp capers
2 small green onions, sliced thinly at an angle
2 - 3 Tbsp yogurt
1 1/2 Tbsp olive oil
pinch fleur de sel
few cracks black pepper
Directions
1.  Bring a large pot of salted water to a boil, then add the leek pieces, reduce the heat, and simmer for about 15 minutes.  You want the leek pieces to be tender, not mush.. but not hard either.  Drain and pat dry (or let dry).
2.  While the leeks are blanching, prepare the breading stand.  Mix all the breading ingredients except the egg together on a plate.  In a separate bowl, have the beaten egg ready.
When the leeks are dry, dip each piece into the egg, then roll around in the breading.  I added 4 serranos from my garden in this step.
3.  Heat the sunflower oil in a sautée pan on high and fry each breaded leek piece for about 30 seconds on each side.  You may need to do this in batches.  They should be nice and golden.  Do this with your serranos as well.  Set aside onto paper towels.
4.  Make the dressing or dipping sauce.  Stir all the ingredients together.
5.  Serve as finger appetizers or as a salad topping.
I did both.  I couldn't help it.
Once salad, and then the leftovers were finger food appetizers.

The texture is insane.  Crunchy on the outside, creamy on the inside, hot vs cold sauce.  The dipping sauce has that tang that pairs perfectly with the crunch.
This will be making an appearance at my next happy hour evening... and I'll make people guess what they are.
Oh and the serrano?  Best decision I've made all week!
This is delicious beyond words.. why didn't I think of this myself?

Print Friendly and PDF

Saturday, October 8, 2016

Caramelized Garlic Tart from Plenty

As I leaf through Ottolenghi's Plenty and marvel at the way his mind works, I stumble upon something that makes me react out loud, the "Funny Onions" chapter.  The more I read the introductions and the compilations of his recipes, the more I realize that this is the real way to compose.  I tend to focus one one ingredient that I want to make shine, and then create the recipe around that one ingredient, with other vegetables used to elevate the importance of the initial ingredient.  So the "Funny Onions" chapter is all about making bulbs sublime.  This speaks to me, for I am a garlic and onion lover.. sometimes I don't know which to choose, so I use both.  I love shallots, and can easily cook them whole and eat them as a side, for they sweeten when cooked.  I love fennel bulbs, raw or roasted, paired with just about anything.  Never in my mind had I ever thought of making a garlic tart.  Onion tart, yes.. onion soup.. yes, but Garlic Tart?  You mean a pie full of garlic?  What a genius idea!
This tart has almost 3 whole heads of garlic in it.. but it is relatively mild, since the garlic is left whole and par-boiled, then caramelized.  The result was mind blowing.  Mild, slightly sweet, and most importantly, making the garlic shine like the star she really is.
Adapted from page 38 of Plenty.
Serves 6-8 as an appetizer
Ingredients
1 rosemary paprika buckwheat shortcrust (original uses an all butter puff pastry)
2 1/2 heads garlic, separated and peeled (original uses 3)
1 Tbsp olive oil
1 tsp balsamic vinegar
1 cup water
3/4 Tbsp sugar
1 tsp chopped rosemary
1 tsp chopped thyme
150g cubed feta (original uses 2 different goat cheeses)
1 handful roasted cubes butternut squash (not in the original recipe..I had leftovers)
1 large handful cherry tomatoes (not in the original)
2 eggs
200mL yogurt (original uses double cream and creme fraiche)
salt and cracked black pepper
Directions
1.  Place the shortcrust or puff pastry in a 28cm fluted tart tin over parchment paper, lightly stab it with a fork, and cover the edges with foil.  Pre-bake it for 15 minutes at 180°C 360°F.  In a lower oven rack, place the cherry tomatoes so they can get a head start and lose their water.
2.  Make the caramelized garlic.  Place all the garlic cloves in a saucepan and cover with water.  Bring to a simmer and blanch for 3 minutes.  Drain, but reserve 1 cup of the water.
3.  Dry the garlic and the sauce pan, then heat the olive oil and the whole blanched garlic cloves on high heat.  Fry for around 2 minutes, then deglaze with the balsamic vinegar and garlic water.
4.  Bring to a boil, then simmer gently for 10 minutes.  Add the sugar, rosemary, and thyme along with a pinch of salt.  Leave to simmer until the garlic cloves are coated in a dark syrup (around 10 minutes).  Set aside.
5.  Assemble by placing the feta cubs into the pre-baked crust along with the butternut squash cubes and blistered cherry tomatoes, then add the garlic cloves and their syrup, making sure to spoon it evenly all over the other vegetables and cheese.
6.  In a separate bowl, make the custard by beating the eggs until frothy, and then adding the yogurt and beating well.  Add some salt and pepper to this mixture before pouring it into the crust over the rest, making sure to fill the gaps but can still see some veggies and cheese over the surface.
7.  The recipe says to bake at 160°C 320°F for 45 minutes, but after 1 hour, mine was still not done, so I turned it up to 170°C 350°F for 20 more minutes.  You want the custard to have set and the top to be golden.  By this time the house smells so lovely you just can't handle it anymore.. you just want to dive into the oven and swim through all that magnificent caramelized garlic.
8.  Let cool at least 20 minutes.  You can do it!
I served mine with a crunchy salad of baby romaine, shredded cabbage, chickpeas, lime, cilantro, and olive oil.

So.. how did it taste?  That first bite is transcending.  It's crunchy from the caramelized garlic that crisped in the oven and creamy on the inside.  The sharpness of the feta mixed with the tang of the oven roasted cherry tomatoes dance as if to thank you for having elevated them to this high ranking status.
That tart is honored to be your guest.  This is genius at its best..

Print Friendly and PDF

Monday, September 5, 2016

Garden Tomato and Eggplant Cake Tatin

Living off the fatta the land..
My baby eggplants are just starting to yield multiple eggplants at a time.  For now, 3 is the most I was able to pick at once, but my next harvest will surely be around 6.
Imagine me jumping up and down smiling clapping my hands with my braids flip flopping all over the place.
That is the image of how the idea of harvesting my own vegetables makes me feel.  Baby eggplants are so cute.  I read that if you harvest them too soon or let them grow too big, they will be bitter.  Since they start out purple, it's hard for me to know exactly what the right size should be since.. well, they are supposed to be baby eggplants.  So far, I think the right size is slightly smaller than my fist.  I have a small fist, though.  I guess the size of a roma tomato.  The skin should be glossy.  If it's not glossy, it may be too ripe.
Anyway, as I was harvesting, my lovely neighbor offered me some of her ripe and juicy beef heart tomatoes off her vine.  The stars were aligned in my favor that day.  What a happy couple tomatoes and eggplants make.
I think I'm in love with the night shades...
Serves 6-8 as an appetizer
Ingredients
2 big juicy beef heart tomatoes, sliced thickly
3 baby eggplants, halved (sub 1 small eggplant, cut into 1 inch cubes)
few pinches dried thyme
cracked black pepper
few pinches fleur de sel
drizzle olive oil
Batter:
2 large eggs
1 cup buttermilk (I put a plain yogurt in a measuring cup and topped off with milk)
2 Tbsp olive oil
1 Tbsp sugar
1 tsp freshly cracked black pepper
pinch fleur de sel
1/2 tsp dried thyme
1 1/2 cups cornmeal
1/2 tsp baking soda
2 tsp baking powder (sub 1 tsp baking soda if GF)
 Directions
1.  Prepare the topping.  Place the tomato slices and eggplant pieces on a baking sheet and sprinkle with thyme, black pepper, fleur de sel, and drizzle with olive oil.  Roast in the oven at 200°C 400°F for about 20 minutes.
2.  Prepare your baking dish.  Cut a circular piece of parchment paper to put at the bottom of your baking dish.  Place the roasted tomato slices and eggplant pieces onto the parchment paper.  This is going to be the top of your cake once it's flipped.
3.  Prepare the batter.  In a mixing bowl, beat the eggs with the buttermilk, olive oil, and sugar.  In a separate mixing bowl, put all the dry ingredients and mix with your hands to evenly distribute.
4.  Carefully pour the wet ingredients into the dry ingredients and mix until just combined.  Don't overdo it.
5.  Pour the batter (it should be somewhat thick) into your baking dish over the tomatoes and eggplants on the parchment paper.  Use a spoon to spread it evenly across the dish.
6.  Bake at 200°C 400°F for 20 minutes.  The top should start to look golden and the sides should be starting to pull away.
7.  Let cool 10 minutes, then run a sharp knife around the sides to loosen the cake from its mould.
8.  Flip onto a plate, and cover until ready to serve.
9.  When ready, remove the layer of parchment paper and slice.
Serve warm or cold.  I served mine with a salad and called it a meal.  The leftovers were partly eaten for breakfast and partly cut into little cubes and served at happy hour with a toothpick the next day.

This lovely cake is slightly sweet, due to the corn flour.  It is a surprising combination that works quite well and has an interesting presentation.  The batter is just a blank palette for any other combinations now.. zucchini slices.. added feta, caramelized onions, spinach, broccoli.. ooh I'm getting all kinds of ideas.  Oh dear.. jalapeño cake is going to happen... ooOoh!
So now you can have your cake... and eat it too!

Print Friendly and PDF

Sunday, July 10, 2016

Onion, Cabbage and Coconut Tart with Cilantro Chutney

During my bouts of kitchen schizophrenia (yes I talk to my vegetables and yes they talk back to me), I couldn't bring myself to make any sensible clean cut decision.  I was to have some of my favorite French people over for an Appetizer Soirée and needed several ideas.  Usually, when I do this, I stick to a basic theme.  This time, I wanted it all.
All of it.
It was going to be my united cultures party.
And of course, since the only thing that was missing was the French flag, I put India in a quiche.
Just Brilliant.
I may not have invented the idea, but this recipe is 100% my own.

Serves 6 - 8 as an appetizer
Ingredients
Shortcrust:
100g (3.5 oz) butter
1 Tbsp nutritional yeast
1/2 tsp chile powder
1 tsp amchur (mango powder)
1/2 tsp turmeric
1/4 tsp salt
100g (3.5 oz) buckwheat flour
120g (4.2 oz) whole wheat flour
1 egg yolk
5 cL water
use the method, then pre-cook for 10 minutes at 190°C 375 °F
Filling:
2 Tbsp olive oil
2 tsp mustard seeds
3 dried red chiles
(if I had curry leaves, I would have added them)
1/4 tsp hing (asafoetida)
1/4 tsp turmeric
4 onions, sliced thinly
1/4 head cabbage, shredded
1/2 cup shredded coconut
few pinches salt
3 small eggs or 2 large
10 cL (3.5 oz) coconut cream
1/2 inch grated ginger

 Directions
1.  Heat the oil in a wok or heavy based pan
2.  Add the mustard seeds and wait for them to crackle before adding the chiles and curry leaves.
3.  Add the hing and turmeric.  They should fizz.  I love that part.
3.  Add the onions and cook on medium-high heat for about 10 minutes, stirring.  You want them to slightly color.
4.  Add the shredded cabbage and a few pinches salt.  Cook, stirring, until onions are nice and golden.
5.  Add the shredded coconut and cook, stirring, for another 2-3 minutes.  The dried coconut gets toasty quick, so be careful not to burn it!  Taste, adjust the seasoning, remove the whole chiles so you can add them to your own slice later on, and remove from heat.
6.  While this is happening, whisk together the eggs, coconut cream, and grated ginger.
7.  In your pre-heated shortcrust, lay the onion-cabbage-coconut mixture down and pour the egg mixture evenly over it.
8.  Cook at 180°C 350°F for 35 minutes.. then let it cool down for at least 30 minutes.
Best served warm with some chutney.... the crumbly crust will melt in your mouth and subtly caress your senses.
Who knew this could actually work?
The next day, I had a slice in my thali with some Daal, Urad Pakoras, Papadums, and Cilantro Chutney.
Are you drooling yet?
I am...

Print Friendly and PDF

Friday, January 15, 2016

Peppermint Beet Carpaccio with Feta

I went crazy the day I discovered Peppermint Beets.
I was about to roughly cut up vegetables and throw them into a roasting pan when I discovered that my lighter colored beets had exquisite candy cane stripes!  I let out a little squeal of joy, then tasted a piece.
Not as earthy as their dark red cousins, but a nice crunch and lighter pleasant taste nonetheless.
I went ahead with the roasting and many plans of better exposing their beauty in the future.  They taste much different roasted than regular beets.  I preferred the raw taste test.
The next day I bought more... excited about slicing them into rounds.  When I chopped them, they had lovely stripes but where not circular.  I wanted to make carpaccio.  Ooh yes!
So I just let myself wander, adding a bit of this, and a dash of that.. and being thankful I had a stash of cilantro to perfect it all.
This little gem was the result.  It didn't really take me any time.. (except the part where I almost sliced off my finger with the mandoline and had no bandaids in the house).  All the pieces just ended up in the right place while I let my senses guide me....
Serves 1
Ingredients
1 peppermint beet, peeled and sliced on the 1.5mm setting of the mandoline
1 small handful salad, washed
2 Tbsp chopped cilantro
chunk of feta, chopped
few grinds black pepper
pinch of fleur de sel
pinch dried piment d'espelette
juice from 1/2 lime
hefty drizzle top quality olive oil
Directions
Plate it.
I first laid down the greens, then placed my beet slices slightly overlapping in a circle.
I sprinkled on the cilantro and feta, then added the pepper, fleur de sel,  and piment d'espelette.
The last thing I did was squeeze the lime juice all over the plate, and then douse it with olive oil.

This meal which is just a simple mixture of great quality ingredients, is the most rewarding meal to enjoy.
First, for its simplicity, next for it's swirls of beauty.. but most of all for its crisp and well seasoned morsels enhanced by the tang of lime and sharpness of feta.
It is something I've made again, and will continue making.
As an appetizer, it is just fine.
I've added poached or soft boiled eggs and made it a meal as well.
If I owned a restaurant, I would serve this and be proud of it!

Print Friendly and PDF

Friday, December 18, 2015

Mouttabal Al-Yaqteen (Pumpkin Tahini Dip)

As an intro to my Falafel Soiree, I wanted something that fit the theme, but that was new and refreshing.  This Syrian pumpkin dip is as old as time, but it was a discovery to me.  I had no idea pumpkin or squash was that popular anywhere else but in the Americas.  It is quite simple to put together once everything is prepped.. it really only takes a few minutes.  The longest part would be roasting the pumpkin and letting it cool.
Fortunately, I must have seen this discovery in my near future the day I brought home a nice plump Delica Moratti pumpkin and roasted it whole for my pumpkin pie urge of the moment.  Since one pumpkin yields quite a bit of flesh, I froze the roasted flesh pound by pound.. you know, just in case.  I was probably preparing for more pie urges.. or some sort of creamy chili, but bless my soul.. that was the perfect amount for this lovely Mouttabal Al-Yaqteen!
Recipe from Desert Candy
Ingredients
450g (1lb) roasted pumpkin flesh (mine was Delica Moratti)
1 large clove garlic, smashed
75g (3/8 cup) tahini
juice from 1 lime
1/2 tsp cumin
pinch salt
toppings:
handful fresh pomegranate seeds
drizzle pomegranate molasses
Directions
1.  Blend everything together until it has a smooth homogenous consistency.  Taste and adjust the seasoning if needed.
2.  Serve topped with fresh pomegranate seeds and a drizzle of pomegranate molasses.
I served mine for happy hour with some Luques olives and some turkish cheese stuffed chiles.
I also had some Man'Ouché bread for dipping.
The fresh tart beads of pomegranate are really what take this over the top.  The pumpkin is lightly sweet with the nutty creaminess of the tahini, making it a perfect dippable texture.. but those little beads of sweet juiciness that explode as you bite into them give so much dimension it seems they were made to be paired together.  The molasses evens out the flavors as well.
As long as you have roasted pumpkin handy.. Mouttabal should be on your mind...

Print Friendly and PDF

Thursday, November 5, 2015

Tandoori Roasted Eggplant with Pear

Sometimes I have different cravings at the same time.  Those days I just zone out and put my inner cook on autopilot.  Sometimes the result is ok, but not breathtaking.
This time it was a masterpiece.
The balance, between textures, spiciness, sweetness, and Indianness makes it so perfect I wouldn't be surprised if I was served this as an appetizer at a classy restaurant.
I wanted eggplant but had some leftover chutney that needed to be used up.  I only needed to cook for myself so I set myself free and let it happen.  I took my desired eggplant, sliced it, rubbed with tandoori spice and then found a pear that had been hanging out in the fridge for a while and decided to do the same with it.  The worst that could happen would be if cooked pear and tandoori didn't go together.
What happened?
Ultimate witchcraft.  A mesmerizing state of mind during the enjoyment process.  Something I had to absolutely document so I can make it again and serve it to actual humans...
Serves 2-3 as an appetizer
Ingredients
1 large eggplant, cut into 4-5 lengthwise slices
1 pear, peeled, cored, and cut into wedges
1 green chile, split
1 1/2 tsp tandoori spice
1 Tbsp olive oil
Directions
1.  In a baking dish, rub the tandoori spice all over each slice of eggplant, pear, and green chile, then toss with the olive oil.
2.  Spread out in one layer and roast for 30 minutes at 200°C 400°F.

Serve with Spicy Cilantro Chutney

or do it again with Persimmons, and Zucchini instead of pear
and serve as a "real" meal with basmati rice and dal.

I had the entire thing for dinner because I could not stop myself from savoring each and every little piece.  Each bite is an adventure in itself.. and with the chutney you skyrocket off your seat.
I cannot wait to make this for company.
It is a high class appetizer.. plus, I won't be offended if you eat it with a knife and fork..

Print Friendly and PDF

Monday, November 2, 2015

Beetroot Pakoras

This weekend I was invited to a party and asked to bring an appetizer.  That news in and itself was thrilling and got my gears churning all week to figure out what to make.
I was told to stay within reasonable limits because it was to be served alongside a gratin dauphinois....
That completely blocked my gears.
All I wanted to do was make Lobia Pakoras with chutney and now I find out it has to go with a potato and cream casserole.  How in the hail am I supposed to make something that crazy happen?
Well, lets see.. since a gratin dauphinois is pretty heavy, I should make something light with vegetables.  Ooh beet pakoras!  PERFECT!
All I had to do was present them as beet fritters with cilantro "coulis" to make it sound local enough to psychologically be paired with whatever was going to be served.
After 2 days of trying to find a "French-ish" recipe that I could be proud of, I found the absolute perfect way to break the ice... Indian style.
Original recipe from Padma'sRecipes.
Yield 22 pakoras
Ingredients
1/2 cup toor daal, soaked overnight
1/2 cup chana daal, soaked overnight
1 medium beet, peeled and grated (about 1 cup)
1 large carrot, peeled and grated
1 green chile, finely minced
1 red onion finely minced
1 inch piece ginger, grated
1 sprig curry leaves
2 pinch hing
1/2 tsp salt
sunflower oil to fry
Directions
1.  Drain the daals and grind them with the hing, salt, and curry leaves into a paste.  It shouldn't be an evenly smooth paste.
2.  In a mixing bowl, stir together the dal paste and the vegetables.  Knead until everything is evenly distributed.  I pulsed my hand blender in the mix a few times to help it come together.  It should not be goopy or watery, but if you form a ball with your hands it should stay together.
3.  Heat the frying oil.  Make balls and press them tightly together.  Carefully drop the balls into the hot oil.  Do not overcrowd.  You should have enough oil to almost cover the pakoras.
4.  Cook 3 minutes, then flip and cook another 3 minutes.  They should be golden and crispy.  Reserve onto paper towels.
5.  Reheat if needed in the oven for 10 minutes so they keep their crispiness.

I served with a duo of Spicy Cilantro Chutney and Sweet Tamarind Chutney.

This was a great success.  Although they were fried, they were light and crunchy and went perfectly with both chutneys.  The Sweet Tamarind actually enhanced the flavor more than the Spicy Cilantro.. but I can eat that one by the spoonful whether or not there are pakoras or samosas!  I was asked for the recipe.  WIN!
I'm very happy I didn't listen to the "advice" about staying French.  If I have something on my mind, you can't ask me NOT to do it.  The human brain just does not work that way.

Print Friendly and PDF

Thursday, October 22, 2015

Green Pea and Feta Quiche with a Millet Crust

I stumbled upon this idea from while flipping through DesertCandy a few months ago.  The idea completely intrigued me.  Peas.. in a quiche??  I tweaked a few things but the basic idea is the same.  Put peas and cheese in a quiche.  How fabulous!
I've made this twice and each time was a success.  I was even asked to make it again for the next quiche occasion!
Serves 6 as an appetizer
Ingredients
2 Tbsp olive oil
1 onion, sliced into moons
drizzle balsamic vinegar
100g (3.5oz) fresh spinach
2 cups frozen peas
2 large cloves garlic, grated
200g (7oz) feta, cut into cubes
2 Tbsp freshly chopped mint
4 eggs
1/2 cup heavy cream
1 cup full milk (I used goat)
few pinches salt
lots of ground black pepper
1/2 cup millet, rinsed
Directions
1.  Heat 1 Tbsp olive oil in a sautée pan and cook the onions on medium heat until they are glossy and dark in color.  Deglaze with balsamic vinegar.  Remove from heat and set aside.
2.  Heat the other Tbsp olive oil in the same pan and add the fresh spinach.  Sautée for a few minutes with a pinch of fleur de sel, some pepper, and 1 of the grated garlic cloves.  This takes about 4 minutes.  Remove from heat and set aside.
3.  Rinse the frozen peas in a colander under warm water.  Drain and transfer to a mixing bowl and stir in the other clove of grated garlic and the chopped mint.  Smash some of the peas.  I used my hands and squished some.
4.  In a mixing bowl, beat the eggs until frothy.  Add the milk and cream and beat until frothy again.  Add a bit of salt and cracked black pepper.
5.  Oil your baking dish and spread the millet along the bottom.
6.  You are now ready to assemble.  Place the cooked onions over the millet, followed by the sautéed spinach.  Add the peas and try to even out the layer.  Press the feta cubes into the peas.  Help them nestle in and find their place.  Pour the egg and cream mixture over it all.
7.  Bake for 50 minutes at 185°C 365°F
8.  Let cool at least 1 hour before eating.

Serve warm or at room temperature.

The millet hardens the longer it sits to form a nice crust that is crunchy and tender all at once.
The mixture of ingredients is completely surprising but works like magic.  I absolutely love the texture of the half smashed, half whole peas and their natural sweetness contrasted with the feta.  Those two make a lovely pair...

Print Friendly and PDF

Sunday, July 5, 2015

Guadalajara Style Ceviche with Blue Ling

I should rather call this Flashback to adolescence Ceviche...
Since I've been recently fiddling with a Tahitian version of ceviche, I've been flashing back to the very first ceviche I've ever had.  I must have been very young, probably a freshman in high school sleeping over at one of my best friends' house whose family is Mexican and where I learned most of the Spanish I still am able to speak today.  There must have been a social event that day or maybe the uncles were coming over, but everybody was cutting or chopping something at the kitchen table around a massive metallic bowl.  Each person had a task, and I happily joined in the fun (being slow at chopping at that age but glad to be participating nonetheless).  When I asked about the final product, I was told it was Ceviche and that I would love it.
Raw fish? No Way!
At that age, I didn't know anything.  I thought I didn't like fish, but oh how wrong I was about that!!
I was told not to worry, that it wasn't really raw because the lime juice would cook it, and that I should at least taste it.  If I didn't like it it wouldn't be a big deal (there were so many other things to eat.)
When the time came, my friend prepared the tostada for me and heavily squirted it with Valentina hot sauce.
I was seduced.
After that, I would order it whenever it was on a menu, and when I moved to France, I never saw it again until I found a Peruvian restaurant that had it (each country or even region has its own version of ceviche).  I found it exhilarating to be eating ceviche again.. especially in France, and made a mental note to myself to give it a shot.
After succeeding with the Tahitian Poisson Cru, and hearing about a wine bar in Lyon that served ceviche.. the time had come to make this myself.  I can't be letting some wine bar give my French friends their first introduction to ceviche!  I have to give them the same debut recipe that started me out on it.
This one.
And it's a perfect debut to the dinner parties I'll be hosting in my new house =)
Serves 5-6
Ingredients
450g (1 lb) blue ling (julienne in French) or other firm white fish
raw shrimp, deveined and cubed (I didn't have this)
1 red onion, chopped
1/2 cucumber, chopped
1 green onion, chopped
1/2 bunch cilantro, chopped
1 tomato, chopped
1-2 jalapeños or serrano chiles, diced
few pinches fleur de sel
many grinds black pepper
juice from 3-4 limes
few hefty squirts Tapatio, Valentina, Cholula or equivalent hot sauce (salsa para botana)
1 avocado, sliced
tostadas for serving (I used tortilla chips)
Directions
1.  Remove any bones from the fish and chop into small cubes.  Do not make mincemeat out of it, but keep it only slightly bigger than your cucumber pieces.
2.  In a large bowl, place all the chopped veggies, salt, and pepper and place the chopped fish on top.
3.  Squeeze all the lime juice onto the fish and add some squirts of Tapatio sauce.  Stir well making the mixture homogenous.
4.  Once everything is evenly mixed, refrigerate for 2-4 hours.  This is where the lime juice will "cook" the fish and the cucumbers will release some liquid, making a nice tangy broth.
5.  Serve over tostadas with avocado slices and extra squirts of Tapatio.
If you are like me and live in a land too far away from Mexico for tostadas to be available, no access to masa, and the only corn tortillas available are ridiculously priced, and even if they were reasonably priced, it is too dang hot to be cooking anything in oil....you can in this case (and only in this case) use corn tortilla chips.
The result?
I would have to go back and taste the Madre's version again to be sure, but as far as my brain is concerned, this is exactly how it was (minus the shrimp).  My heart fluttered the same way with the first bite, and the expression on my guests faces satisfied my curiosity as well.
They just didn't have extra Tapatio squirted on theirs.
This is a perfect meal during blistering heat.  I know I shouldn't really complain about the heat.. I do come from the desert where 37°C 99°F is standard and we have even gone up to 53°C 127°F in August.  It's just that I never thought I'd end up missing A/C in France.

I named it Guadalajara Style because the family from which I extracted this recipe (that I based on my memory of that experience 18 years ago but is still vivid in my mind) is originally from that region of Mexico.  After looking around, though, I noticed it's mostly all of Baja that makes it this way.. including San Diego and LA.. and that awesome flea market somewhere near La Puente...
aaah the lovely memories...

Print Friendly and PDF

Sunday, June 14, 2015

Salmon 'Ota 'Ika with Mango

The last time I made Poisson Cru à la Tahitienne, I was smitten.  Everything about it was perfect, delicate, refreshing, and nourishing.  I couldn't wait to get a chance to make it again with a few tweaks here and there.  The thing is.. I haven't seen fresh white albacore tuna on the stalls at all.  It's as if he just made a cameo appearance to give me a taste of his beauty just to leave me there, lusting for his unattainable passion.  I've been wanting to pair him with a sweet tangy mango and watch the chemistry happen.  Last night I gave in.  With no tuna on the horizon, I let myself be seduced by salmon.  The two have nothing in common in terms of taste, but both make me swoon in different ways.
As it turns out, salmon works wonderfully with coconut milk, avocado, and of course, mango.  It's almost as if it was made to be..
Serves 7-8 as a starter
Ingredients
500g (1lb) fresh salmon, cut into cubes
1 large mango, cut into cubes
1 carrot, grated
1/2 cucumber, diced
2 tomatoes, diced
4 cloves garlic, grated
3 green onions, chopped
1/2 red onion, diced
1 avocado, chopped
1-2 green chiles, diced
1/2 red bell pepper, diced
1/2 bunch cilantro, chopped
1/2 can premium coconut milk (about 1 cup)
juice from 3 limes
few grinds black pepper
Directions
Stir everything together and reserve in the fridge for 30 minutes to 1 hour.
Serve cold as an appetizer alone or as a meal along with hot basmati rice.
I served as part of a trio of appetizers alongside some fresh spring rolls and grilled sardines.  It was a very emotional event.

As soon as I move and unpack, I'm buying better a better small dish service.  I don't have many matching small bowls or verrines, so when there is company nobody has the same size or shape.  We all know it's not the plate that makes the meal a hit, but now that I'm a grown woman and a homeowner, I will be upgrading certain things in my kitchen.

Print Friendly and PDF